Nature's Best :: Don Smith Photography
Exploring our incredible world one image at a time!
Nasty Weather Makes For Great Image Opportunities!
Posted on April 28, 2014
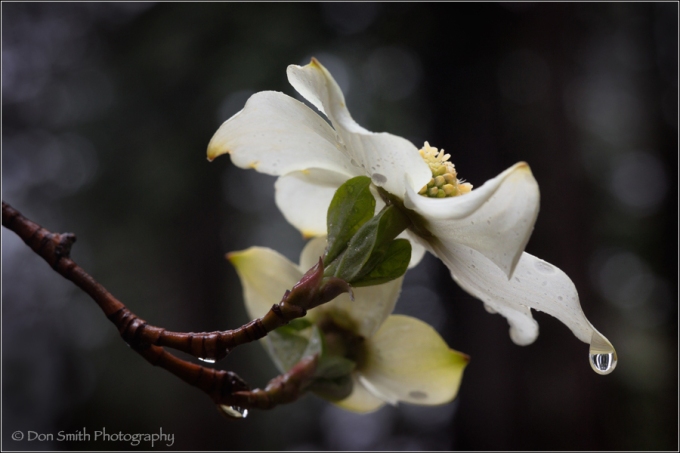
Raindrop On Dogwood Flower, Yosemite National Park, California
Canon 5DMKIII, 100mm macro, f/10, 1/15th, 800 ISO
“Oh, the weather outside is frightful…”
So what do you do when the weather turns bad? Curl up with a good book in front of a fire? That sounded like a really good idea this past Friday when a late-winter storm descended upon Yosemite Valley.
But I actually planned this day. Yeah, I know, sounds crazy, but bad weather often makes for awesome images!
The dogwoods are blooming early in the Valley and it had been three years since I’d had a chance to photograph them. I had two days on my schedule (Wednesday or Friday) that were open for a day trip (I have less than a three hour drive to the Valley from my home).
Wednesday’s forecast was for sun – tough conditions to shoot these delicate blooms. But Friday’s forecast looked promising – originally it called for snow! This is pretty unheard of for California this late in the year. I immediately switched plans and awaited what I hoped would be a winter wonderland.
But as is often the case, Mother Nature had other plans. The snow did indeed arrive, only the snow level was about 600-1,000 feet higher than the Valley floor (4,000 – 4,200 feet). Instead of the white stuff, we (Gary Hart and Mike Hall joined in the fun) were greeted with the wet stuff.
Fortunately there was no wind. At times there was a bit of a breeze, but nothing too hard to deal with. It did rain steadily and even intensified late in the afternoon.
We broke our shooting sessions into two 2 1/2 hour stints, shooting nothing but blooming dogwood. Gary had been in the Valley shooting the previous Tuesday, so he knew the areas that held the most promise.
Today’s image comes from our afternoon session near the turnout across from Bridalveil Fall. I walked around looking for a bloom that would be slightly higher than eye-level. This particular flower caught my eye immediately because of the rain drops that were dripping off the slanted flower.
I envisioned turning the muted highlights to out-of-focus donuts, and just played with a combination of shutter speeds and apertures until it worked. I was fortunate that my camera was on the exact plane on a line between the rain drop and the bud of the flower to hold focus on each.
Moreover, I was also fortunate that the second flower, even though it was out-of-focus, was a bit more yellow as to not to compete for attention with the foreground flower.
The real key is the rain drop. That is what drew my attention and that is what makes this image work. If it was not for a willingness on may part to work in the rain, then this image would have never existed.
Nasty weather usually bodes well for exciting (or at least different) imagery, Yet, one has to be willing to put up with the discomfort of working in such conditions.
Snow is actually easier than rain, but rain is doable as long as it is not accompanied by a lot of wind – especially when trying to shoot closeups with macro lenses!
Here are a few tips for shooting in the rain that will help to alleviate your frustrations:
Dress appropriately: Gore-Tex or water proof clothing.
Use an umbrella: I took along a Nike golf umbrella that really helped keep the rain off my camera and lens.
Cover the camera: I don’t get fancy here. Plastic garbage bags work just as well and $100 covers – with less hassle. I do use either micro fiber cloths or more preferably large car shammy’s to wipe down equipment and lenses.
Keep an eye on your lens filter: the shammy’s work great here. It is imperative that you keep rain drops off you lens – check every frame if necessary.
Take breaks: it is necessary to take a break every now and then to dry off equipment (and yourself). A sort of recharge for both machine and human! Staying warm and dry will go a long way towards improving one’s creativity. Hard to be creative when you are miserable.
Water proof boots: self-explanatory 🙂
Shutter speeds: slower shutter speeds will allow the rain to blur and not record as streaks (unless you want this). Macros allow for extremely limited depth-of-field which also helps eliminate streaking rain.
So the next time the weather turns bad, when all the tourists are running inside, grab your camera and head outside. Not only will your images be more interesting, but more-than-likely, you’ll only be shooting with other pros!
Free Video Sample :: Chapter 19 – Introduction to Luminosity Masks
2014 Photo Workshops – Complete List
2015 Photo Workshops
Software Discounts
Photomatix Pro 4.2 type in code at checkout: donsmithphotography 15% discount
Topaz Software type in code at checkout: SMITHPHOTO 10% discount
Helicon Focus click on link to receive 15% discount
Hardware Discounts
MindShift Gear rotation180° Panorama rotating day hiker backpack
Category: Landscape Photography Tagged: California, dogwood, rain, rain drops, spring, Yosemite National Park
My Favorite 12 Images Of 2013
Posted on December 23, 2013
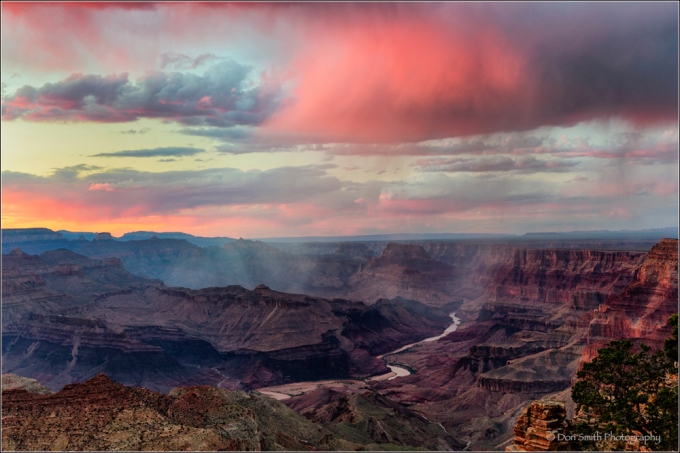
Image #9 – Evening Showers, Desert View, Grand Canyon National Park, Arizona
Canon 5DMKIII, 35mm, f/16, 2.0 sec., 100 ISO, Singh-Ray Slim LB Polarizer, Singh-Ray 2-stop graduated neutral density filter
My 9th favorite image of 2013 was captured during Gary Hart and my inaugural Grand Canyon Monsoon Season Workshop this past August. This was one of my first outings since my knee replacement surgery 3 1/2 weeks prior.
We started the workshop on the north rim, then caravaned the group down to the south rim for two days of shooting. Desert View is one of my favorite locations in the entire park because of the view it affords of the Colorado River below.
On this particular evening, rain squalls were moving up the canyon from west to east as the sun was setting. Just as the sun hit the horizon, it threw light up and under these storm clouds to color up the sky.
Some lingering bands of rain showers caught enough light to highlight the falling rain completing the image.
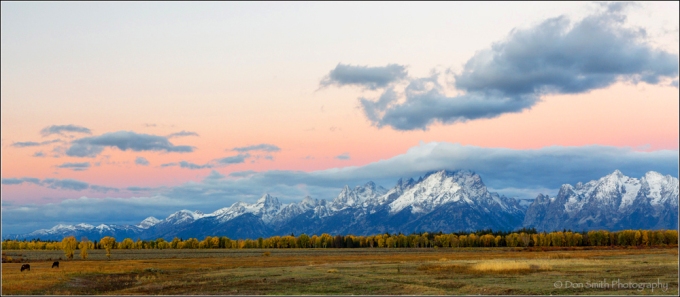
Image #10 – Dawn, Grand Teton National Park, Wyoming
Canon 5DMKIII, 50mm, f/16, 1.3 sec., ISO 100, Singh-Ray Slim LB Polarizer
My 10th favorite image of the year came about quite by accident. On this particular morning, my Grand Teton workshop group departed Jackson for Oxbow Bend. My co-instructors, Scott Schilling, Pierre Steenberg and I were in the last car following the group.
As we approached the Moran gate, a young ranger put up his hand for us to stop. I saw he had four large orange cones near his booth. As I rolled down the window, he said the park was officially closed due to the government’s inability to reach a budget settlement hours earlier.
I proceeded to plead with him that we were workshop instructors with a valid Commercial Use Authorization permit and that our group was just up the road awaiting sunrise. He apologized, but said we would have to turn around.
Scott made a quick phone call to one of our group members alerting them what had happened and we headed back towards Jackson and stopped to photograph this scene near Triangle X Ranch. I made this image about 10 minutes before actual sunrise and loved the juxtaposition of the morning hues against the fall color of the cottonwoods in the distance.
Our group had great light at Oxbow Bend, and we completed the workshop at awesome locations outside of the park (some that will remain in the lineup for next year’s workshops)!
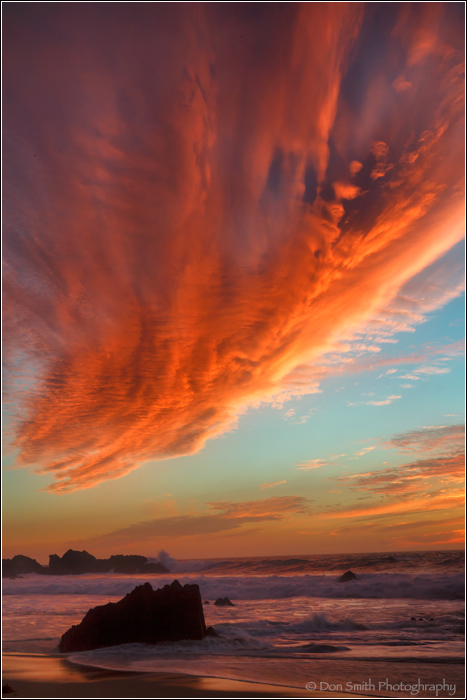
Image # 11 – Winter Sunset at Garrapata State Beach
Canon 5DMKIII, 44mm, f/16, 1/10th sec., ISO 200, Singh-Ray Slim Polarizer
My 11th favorite image of the year was captured in early February while teaching a private lesson and shooting a sunset at Big Sur’s Garrapata State Beach. The sun had actually set and the color on the horizon had momentarily disappeared. I cautioned my client to not be so quick to pack as we had an extremely clear horizon that evening.
As the sun sank lower below the horizon, it cast warm rays up and under this stratus cloud that was hanging along the shoreline. We quickly moved in front of this rock to anchor the foreground and the light on the cloud became incredibly rich and saturated.
Generally speaking, one does not often see this type of saturated light after sunset on the coast. This light is more often seen in the mountains; yet, on this evening, we got one heck of a show!
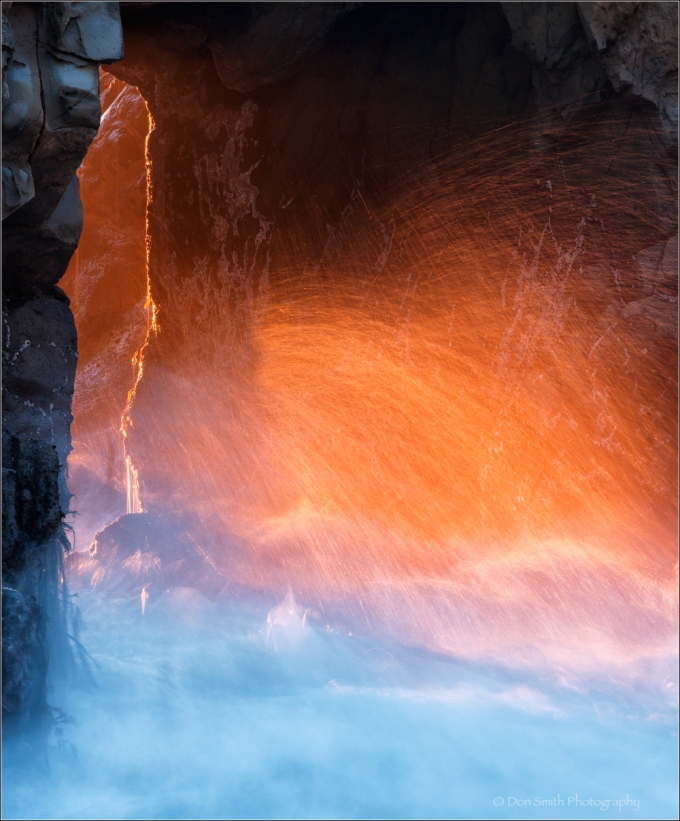
Image #12 – Devil’s Cauldron, Pfeiffer Arch
Canon 5DMKIII, 200mm, f/22, 2.0 sec., 200 ISO, Singh-Ray CC Polarizer
Today I start with Image #12, that I captured last week at Pfeiffer Arch along the Big Sur coast. This image is both exciting and sad, as a day after I captured this scene, the Big Sur Pfeiffer Ridge fire broke out along the mountain ridge across from this arch. As I write this, firefighters expect full containment (today), but 34 homes were destroyed.
During December and January, on a clear-sky day, the setting sun aligns with the opening of the arch and allows for this incredible warm light to spill through the opening. One must time the wave surging through the arch. As the mist from the funneled water rises, it is backlit by the sun.
I personally try for a different approach each time I’m at the arch. On this particular evening, the color was gorgeous and I decided to try a tight shot with a 200mm. This was my second to last frame before the sun finally set allowing for the intense warm color.
Sadly, for all those who lost their homes in the Pfeiffer fire, our thoughts and prayers go out to you.
2014 Photo Workshops – Complete List
5th Annual Kauai Workshop – Garden Isle and Tropical Paradise – June 20-24, 2014 (3 spots remaining)
Software Discounts
Photomatix Pro 4.2 type in code at checkout: donsmithphotography 15% discount
Topaz Software type in code at checkout: SMITHPHOTO 10% discount
Helicon Focus click on link to receive 15% discount
Hardware Discounts
Special Year End “Black Friday” Offer From Think Tank Photo NOTE: (Use Promo Code WS-643)
Category: Landscape Photography Tagged: Desert View, Grand Canyon National Park, monsoon season, rain, squalls, sunset
How to Give Your Images a Luminescent Feel
Posted on June 3, 2011
I believe the best way to demonstrate my workflow with this image is to do it through a series of screen grabs. I may not be able to reproduce my settings for each of the Nik Software products I used, but it is close, So without further adieu, let’s get started.
Here is how the image looked in Adobe Camera RAW. As you can see, the image is extremely muddy looking with no hint of luminosity. This is just a starting point. I do all of my major tweaking in Photoshop using the Nik products. I basically recovered some of the blown highlights using the Recovery slider and upped the overall gamma using the Fill Light slider.
Now I opened my image into Photoshop, duplicated it, then opened the duplicate image into Nik’s HDR Efex Pro software using the Single-Image Tone Mapping button. As you can see, it is a bit too punchy for my taste, but don’t worry, we are going to tone it down by blending it back with the processed RAW file.
Here I selected my processed ACR file (control/command A), copied it (control/command C), then pasted it onto my HDR’d image (control/command V). I then lowered the opacity to 56% to get a more realistic looking frame and eliminate that HDR feeling.
By adding a layer mask to the top layer (my processed ACR file), I could paint back in the Nik HDR Efex Pro layer on just the moss-covered tree only. That was the tree that appeared to be luminescent to my eye, so that is what I want to appear luminescent in my final image.
These next couple of filters can be found in Nik’s Color Efex Pro software. I opened the image into the Tonal Contrast filter and adjusted the Highlight, Midtone, and Shadow contrast until the image looked good to my eye. All of the default settings are at +30, but for this image, it looked a bit edgy so I backed all three down. Using the slider commands makes this process a snap!
Next, I opened the image into Nik’s Brilliance/Warmth Filter and just tried to bring back a touch of warmth to the tree. Again, this is just done visually by playing with the sliders.
This next step is optional but I used it nonetheless to get a final check on contrast and color cast. I opened the image into Nik’s Pro Contrast filter and just played with the Correct Color Cast slider and the Correct Contrast slider as a final tune-up.
Lastly I opened the image into Nik’s Viveza 2 software and added a touch of saturation along with a couple of localized tweaks and I was finished!
As always, I saved and sharpened (using Nik’s Sharpener Pro) a copy of my final outputted image that I will send to my stock agencies, then removed any noise using Nik DFine.
So the next time you are faced with a rainy day, don’t put your cameras away; in fact, just the opposite. Cover up and get out into the elements. As long as there is no wind to deal with, shooting in the rain can provide some beautiful light conditions and allow for a luminescent feel for your images.
Recent Posts
- Why I Will Never Fly American Airlines Again :: At Least Not After Next Tuesday…
- New Blog Site For Don Smith Photography!
- Do You Look Or Do You See? Developing Your Creative Vision :: Part 2 of 3
- Do You Look Or Do You See? Start With 10,000 Hours Of Practice :: Part 1 of 3
- Photographing Wildflowers In The Wind At Big Sur’s Garrapata State Park


