Nature's Best :: Don Smith Photography
Exploring our incredible world one image at a time!
Photographing Wildflowers In The Wind At Big Sur’s Garrapata State Park
Posted on May 29, 2014
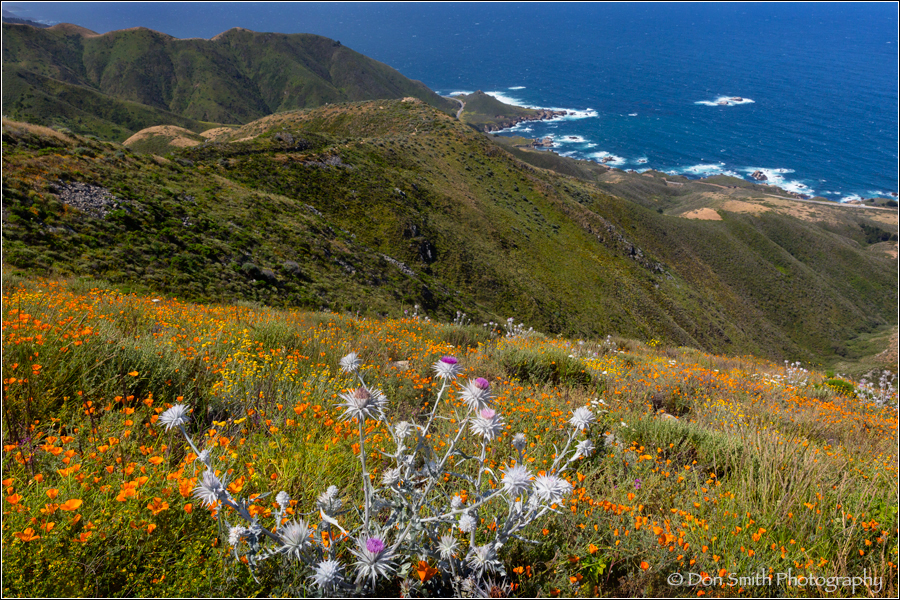
Thistles and California Golden Poppies, Rocky Ridge, 1850 feet, Garapatta State Park, Big Sur Coast, California
Canon 5DMKIII, 24mm, f/16, 1/200th, ISO 400, Singh-Ray Thin LB Polarizer, Lexar Digital Media
Yesterday was quite rewarding for me in more ways than one. A friend of mine, Sara Singleton, had notified me that the Garapatta Rocky Ridge Loop Trail was open and the wildflowers were amazing!
I immediately called my friend/colleague Mike Hall and asked if he was up for a tough hike. The summit of Rocky Ridge is 1850 feet above the Pacific Ocean. Most hikers start this 7-mile loop through Soberanes Canyon.
We decided that the most direct route was up the western face (our cars are parked along the side of Highway 1 seen paralleling the ocean as seen in the top right of this image).
More than getting to experience and photograph spring wildflowers, it was a chance to test my partial knee replacement. Doctor Ting had run his final X-Ray’s last week and said that I was good to go. I hadn’t tried this hike in over two years.
It took us about 75-minutes to reach this location, but as you can see by the amazing views, the climb was more than worth it.
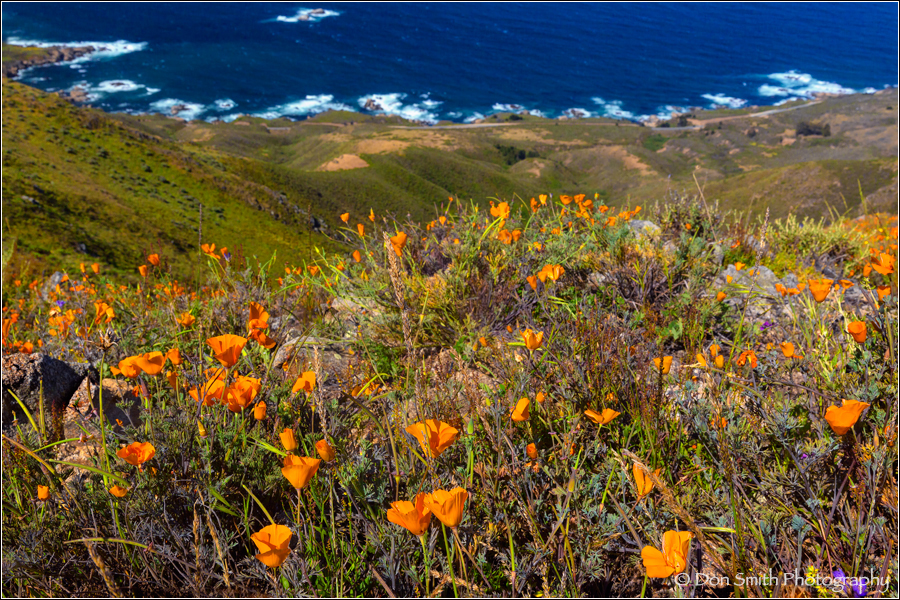
Poppies and Big Sur Coast, Rocky Ridge, 1850 feet, Garapatta State Park, California,
Canon 5DMKIII, 35mm, f/16, 1/320th, ISO 400, Singh-Ray Thin LB Polarizer, Lexar Digital Media
As I pulled into the parking area, I knew we could be facing some stiff winds. Our summer fog season has not started in earnest as of yet and the winds whipping off the Pacific were rather stiff.
One of the cool things about shooting poppies is that one has to wait for the sun to climb. From past experience, I knew that the poppies would not start opening until 9am.
Sure enough, the winds were very brisk atop the 1850-foot summit of Rocky Ridge. We knew we wanted to stay on the west-facing slope in order to use the incredible coastline as a background. Talk about million dollar views!
When photographing wildflowers in the wind, the number one concern is shutter speed. Is there one speed that fits all scenes? Unfortunately no.
Picking a correct shutter speed to stop the bobbing flowers is a function of focal length, aperture, your distance to the flowers, and speed of the wind, which was not constant.
Waiting for lulls in the breeze was one thing to consider, but we also knew we had a limited window to photograph as the sun was climbing and once it got too high, we would lose any sense of modeling with the flowers and landscape.
I made sure I stayed as far off-angle from the sun as possible and used my Singh-Ray Polarizer to minimize the glare of the waxy sheen on the foliage. This allowed for deeper saturation of the colors.
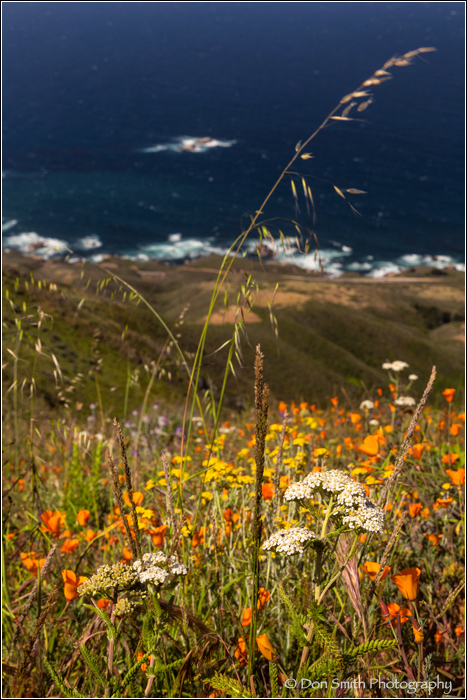
Poppies and Yarrow, Rocky Ridge, 1850 feet, Garapatta State Park, Big Sur Coast, California
Canon 5DMKIII, 57mm, f/16, 1/250thth, ISO 400, Singh-Ray Thin LB Polarizer, Lexar Digital Media
As you can see with these three images, 1/200th was longest shutter that I chose. Fortunately the breeze lessened as the sun rose higher.
My method for determining the correct shutter speed for each composition was as follows:
Compose my scene with camera off the tripod.
Once I find a pleasing composition, I bring in the tripod for support and to allow me time to slow down and check the edges of my frame.
Now I determine what aperture I wish based on depth-of-field considerations.
Next, I set the shutter using the lowest ISO I can.
Take some test shots and check back of LCD blown up 100%.
If I need a faster shutter, I either raise the ISO, and/or give back some exposure by opening my aperture.
That’s it. I do try to find a suitable foreground element. Perhaps the diciest part of yesterday was paying attention to an abnormal amount of lizards, ticks (Garapatta is Spanish for tick), and snakes. We were walking and laying in deep grasses.
As Harrison Ford (Indiana Jones once quipped) “I hate snakes!”
So the rewards that I mentioned at the start of this blog? Well they were: An awesome day spent hiking/photographing with a good friend, beautiful scenery, and best of all, no pain in my knee!
Free Video Sample :: Chapter 19 – Introduction to Luminosity Masks

2014 Photo Workshops – Complete List
2015 Photo Workshops
Software Discounts
Photomatix Pro 4.2 type in code at checkout: donsmithphotography 15% discount
Topaz Software type in code at checkout: SMITHPHOTO 10% discount
Helicon Focus click on link to receive 15% discount
Hardware Discounts
MindShift Gear rotation180° Panorama rotating day hiker backpack
Robert’s Distributors – 10% off any regularly priced camera bag and a free memory card wallet with any purchase. Call John or Nick at 800-726-5544 and reference you saw this posted on my blog site.
Shooting On Foggy Days? Find Your Scene Then Find A Colorful Foreground
Posted on March 15, 2014

Spring Color, Soberanes Point and Arch, Garapatta State Park, Big Sur Coast
Canon 5DMKIII, 22mm, f/22, 1 second, 100 ISO, Singh Ray Thin LB Polarizer
NOTE: If you would like to shoot with me next Month in Big Sur, I have had one position open up. Please click here for more information.
NOTE: Special Offer From Topaz Software: Limited-time Offer: 50% off DeNoise 5. I would consider this the best 3rd-party noise reduction software on the market today. I use it all the time!
I love spring along the coast of Big Sur. We are in the transition time of year when the fog season is gradually starting its return with the help of rising temps in the central valley and the warmer air aloft passing over the relatively cold waters of the central Pacific Ocean. Too many factors are involved to predict exactly when and where fog will form, but when it does, I immediately seek out color to add to the mono-toned diffused light.
But this is not a blog about shooting in the fog; instead, this is about finding foregrounds to both enliven and add depth to your foggy day scenes.
Seems ironic that I am writing this blog while sitting in a Sun City, Arizona Starbucks. Don’t believe me? Well, I almost saw an older woman on a 3-wheel bike get wiped-out by an older gentleman a bit out-of-control in his golf cart. Hey, I can’t make this stuff up 🙂 Fortunately everyone is alright!
I’m in Arizona with Gary Hart to watch our beloved San Francisco Giants play some Spring Training baseball before the start of my Northern Arizona Workshop tomorrow (we start at the Grand Canyon and end in Sedona next Tuesday).
I was going through some images for the workshop when I came across these two. The lead image of Soberanes Arch shows just how colorful the headlands along the Big Sur Coast can get at this time of year. This foreground is a mix of flowering ice plant (non-native and evasive, but very photogenic), mixed with sea daisies. In the winter, this patch is rather dormant.
The arch is really the subject of the image, but as nice as it looked, under mono-toned conditions like fog (and clouds), I always challenge myself to find something colorful. In honesty, I didn’t have to go far to find this spot. If you have taken one of my Big Sur workshops, you will immediately recognize the location.

Flowering Ice Plant, Julia Pfeiffer Burns State Park – McWay Fall, Big Sur Coast
Canon 1DMKIII, 35mm, f/22, 3 second timed-exposure, 200 ISO
In this image that I captured at Julia Pfeiffer Burns State Park, I decided to relegate the 80-foot freshwater McWay Fall to a background element; instead, letting the gorgeous flowering ice plant take center stage.
This image was made about 15 minutes after sunset. The wind had completely died away (as is often the case once the sun disappears) and I could use a 3-second exposure and f/22 for extreme depth-of-field to make this image work. Any wind would have blurred the flowers and ruined the image.
Again, with the light subdued and mono-toned, I found a colorful foreground.
The other point is that if you find a great background, find a foreground to go with it; conversely, if you find an awesome foreground, find a background to match. Don’t think one without the other.
Challenging yourself to think this way will add the extra benefit of creating the illusion of depth in your images. I talked about this in my blog on Point of View and Perspective.
Well, the crack-of-the-bat is calling. It’s springtime – a great time of year!
Free Video Sample :: Chapter 19 – Introduction to Luminosity Masks
2014 Photo Workshops – Complete List
2015 Photo Workshops
Software Discounts
Photomatix Pro 4.2 type in code at checkout: donsmithphotography 15% discount
Topaz Software type in code at checkout: SMITHPHOTO 10% discount
Helicon Focus click on link to receive 15% discount
Hardware Discounts
MindShift Gear rotation180° Panorama rotating day hiker backpack
