Nature's Best :: Don Smith Photography
Exploring our incredible world one image at a time!
Do You Look Or Do You See? Start With 10,000 Hours Of Practice :: Part 1 of 3
Posted on May 31, 2014

The Crack, Zion National Park, Utah
Canon 5DMKIII, 70mm, f/16, 1.3 sec., ISO 100, Singh-Ray Thin LB Polarizer, Lexar Digital Film
NOTE: This is the first of a three-part series on the art of seeing creatively. We are all creative to one degree or another, but our vision can be developed similar to our craft skills. I don’t buy into the assumption that “you were born that way.” Like anything else in life, some people have an easier time than others in anything we do (including photography), but I don’t personally believe that I was born with any special gift. In fact, in my first serious college photo class, I got a C- and the instructor wrote that in no way should I ever consider doing photography for a living. Looking back, that was great motivation. I love proving the naysayers wrong. Hard work, lots of study, a strong self-belief and lots of love and support from my wife, Beri, was the way I improved my vision (I still work at it daily).
In Part 1, I take a look at the difference between craft and vision.
Over the course of my career, I have literally learned how to get past seeing literally (at least I hope I have). What I mean by this is that when most of us first pick up a camera, we tend to think that we have to re-create the world exactly as it appears to us. That’s fine and that is a good way to really get a handle on how to operate the camera and learn how it sees with its various lens focal lengths.
I call this the “craft” side of photography. That craft side also extends to learning how to correctly process an image (I shoot in RAW mode and process using both Lightroom 5 and Photoshop CC). I can help you here also, please order my new video series: A Simplified Method to Workflow. You’ll receive 6.5 hours of training via 26 easy to follow videos. You’ll start processing like a pro within your first few lessons!
You really need to get proficient at both your camera and your post-processing; yet, craft is only half of the equation; vision (artistic vision) is the other half.
I’ve seen many of my workshop students over the years really struggle with the craft side. They are so consumed with trying to learn how to operate their camera(s) that making (notice I didn’t say taking) an image is almost an afterthought. Then, they are back at their computers trying to figure out how to properly process the image to match their vision – it can get very frustrating and confusing.
With all it takes to sort through all the craft side of the equation, it’s no wonder most photographers never really get to the vision side. I can tell you from experience, excellent craft skills without artistic vision will only equate boring images with no soul, but at least they’ll be crafted well. How do I know? Because I was one of those who thought if I just learned all the bells and whistles of my camera, then my pictures would be awesome. Well, looking back, they were awesomely boring. This was in the film days when I was shooting chrome.
Then Photoshop came along and suddenly we were the lab. Again, I dove in head-first trying to learn the beast. Still didn’t make me any better as a photographer, but at least I could process my images to my match my vision of a scene, so it was a step in the right direction.
I believe the craft of photography can be learned within a year, but it has to be practiced almost daily. In the book Outliers, Malcolm Gladwell follows highly successful people from all walks of life and determines that the one common thread between all of these people is that they put in a minimum of 10,000 hours of practice before reaching their maximum potential. Have you put in your 10,000 hours on your photography?
You really need to get proficient at both; yet, craft is only half of the equation; vision (artistic vision) is the other half.
My first camera was purchased when I was 13-years-old (45 years ago – Yikes!). Over the past 35 years, I rarely skip a day when I am not either shooting, processing, teaching, reading or writing about photography. Some days go as long as 15-20 hours when I am teaching a workshop, shooting stock, or scouting for a new workshop.

Dawn at Hanalei Bay, Kauai, Hawaii
Canon 5DMKIII, 24mm, f/16, 6 minutes, ISO 100, Singh-Ray 10 stop mor-slo neutral density filter, Lexar Digital Media
I ran some quick math, and in the last 35 years, I’ve put in 102,200 hours on my craft. That’s not even counting the first 10 years that I owned cameras. My best guesstimate for that time frame was another 14,600 hours for a combined total of 116,800 hours and counting!
Along the way, I earned a BA in Photojournalism and English from San Jose State University, worked 23 years (and counting) for the NHL’s San Jose Sharks, spent 26 years photographing MLB, NFL, NBA and NHL games, along with a host of other sports. I worked 7 years as a stringer for Sports Illustrated, and have been making landscape images since my teenage years.
I have also been teaching photo workshops for 10 years and have been shooting landscape imagery for Getty Images for the past 8 years. Eighty percent of my efforts these days are spent in the landscape realm.
All told, I have put in my 10,000 hours over 11 1/2 times (rapidly closing in on 12 times)!
I ran some quick math, and in the last 35 years, I’ve put in 102,200 hours on my craft. That’s not even counting the first 10 years that I owned cameras. My best guesstimate for that time frame was another 14,600 hours for a combined total of 116,800 hours and counting!
Here’s the bottom line. I can teach you the craft. I can teach you the aesthetic side of photography (the vision – though that takes much longer). What I cannot teach or help you with is PASSION. I can’t put in the time for you – only you can do that and everyone does it differently.
Passion is what stirs the drink so-to-speak. Passion is what will push you daily to achieve your first 10,000 hours. Perhaps many of you reading this have already surpassed that point – if so – congratulations. Now get going towards your second 10,000 hours.
The cool thing is that your journey will never end as long as your passion burns. I really can’t explain why, after all these years, I still have the passion. I do have some thoughts on that subject though and I will share them with you in Part 2 of this series.
One thing I do know is that when I was young, I focused (pardon the pun) far too much on technical and not enough on learning how to see. Once I started to put my attention towards that goal, my images began to change. No longer was every image a grand view of exactly what I was looking at; my images became more intimate like this image of Zion’s Crack that you see here.
I realize most of you reading this have a job or school and a ton of other responsibilities. Well, even though I do this for a living, I also have a family and the time constraints of running my business.
Yet, like you, I have to look at my calendar and carve out my shooting times. I’m fortunate in that half of my office time is spent outdoors scouting locations and waiting for the right light. My actual shooting time is probably less than you think. I work in very small windows of opportunity. Yet, I maximize the time I do spend in the field with adequate preparation. Then of course, Mother Nature can change on a moment’s notice. As a pro, I still have to come back with a good image.
So get after it. Don’t feel like lugging out your 35mm gear? How about taking a walk around your neighborhood with your smartphone (challenge yourself to find an image in your everyday surroundings). You will be amazed what this will do for your creativity.
Yes you can teach yourself how to see creatively. Come back for Part 2 and I will share more on how I accomplish this.
Free Video Sample :: Chapter 19 – Introduction to Luminosity Masks

2014 Photo Workshops – Complete List
2015 Photo Workshops
Software Discounts
Photomatix Pro 4.2 type in code at checkout: donsmithphotography 15% discount
Topaz Software type in code at checkout: SMITHPHOTO 10% discount
Helicon Focus click on link to receive 15% discount
Hardware Discounts
MindShift Gear rotation180° Panorama rotating day hiker backpack
Special offer From Singh-Ray Filters: You will receive 15% off of any filter(s) you order when you call Singh-Ray direct and use my code – Smith 15: (800) 486-5501. Offer valid through June 13th!
It’s Not So Much What You See; Rather, It’s How You See!
Posted on December 21, 2012
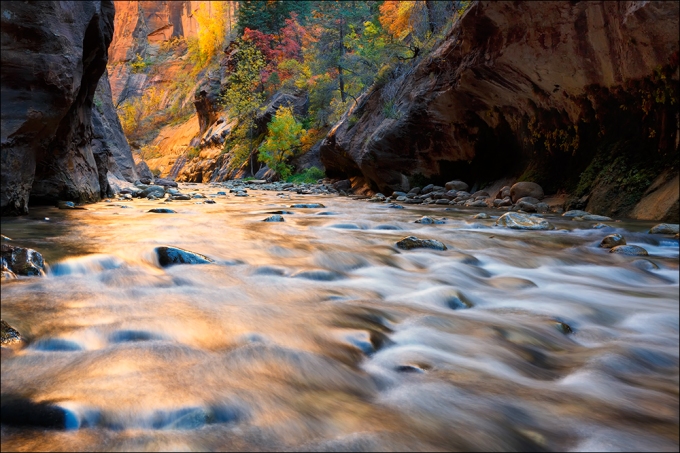
The Narrows, Zion National Park, Utah
Canon 5DMKIII, 24-70mmL @ f/22, 2.5 second timed-shutter, 100 ISO, Singh-Ray LB Warming Polarizer.
Simply put, nature is a conglomeration of elements, both landbound and atmospheric. How we combine these elements and arrange them for our viewer really dictates whether an image will survive or fail in the long run. So often, for me, light (quality and quantity) is the key ingredient once I have the mix of elements in place. Which all leads to the crux of today’s blog, which is simply, it’s not so much what we see in nature; rather it’s how we see. In other words, do you see nature’s elements in a literal sense, or do you see them more from an artistic point of view?
I think most of us start out seeing the world literally (unless you have some other artistic training in another genre). At the start, a forest of trees is just that – a conglomeration of trees. Only through practice and training does our own unique vision begin to emerge. From that point onward, we are no longer “snapshooters;” rather, we become photographers and artists. I think another safe assumption is that when we first start out in photography, we tend to try recreating what has been done previously. I know this from years of teaching photo workshops where individuals will ask me, what are we shooting here? Conversely, we may be at an iconic location like Arches National Park’s Delicate Arch. The resulting images can too easily be just an image of the arch instead of something more engaging.
In the image below of Yosemite’s Nevada Fall, I tried for something a bit more interesting than just a top-to-bottom image of the raging fall. I hiked to the top of the fall and shot down into the plume with a telephoto after spotting this mist bow. For me, not only is this image more engaging, but it also translates the power of the raging water that I was experiencing.
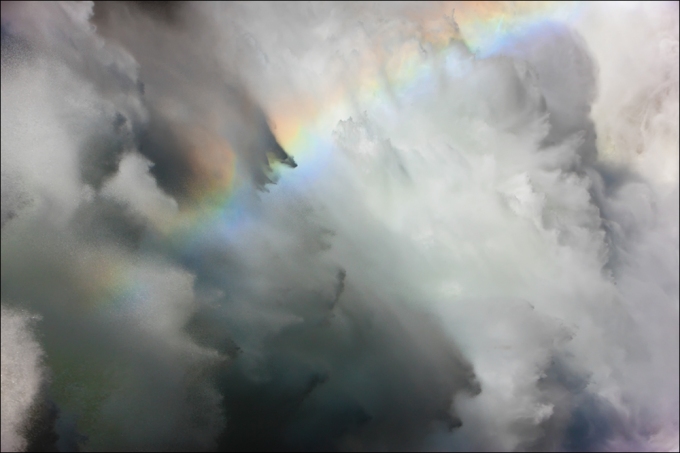
Nevada Fall, Yosemite National Park.
Canon 1DsMKIII, 70-200mmL @ f/11, 1/250th second, ISO 100, Singh-Ray LB Color Combo Polarizer.
If one has to ask, what are we shooting, then one has not yet learned how to really see. Personally, I think of potential scenes in nature as unassembled jigsaw puzzles. The pieces are all there before you, but it is your task to assemble them in some meaningful and artistic fashion. But how do we start? Is there a formula?
Personally, I start by paying attention to what is tugging at my emotions while in the field. Sometimes it is obvious, other times it is subtle. But if I am not feeling some sort of emotional connection, then the image is probably not going to transcend into a photograph that will move others. The next step is to either find quality light, or anticipate its arrival. This involves lots of time in nature studying the nuances of light and is a key reason I like shooting on the fringes of the day. I once had a guy write on my blog: a true artist can photograph under any light, even in the middle of a sunny day. After thinking long and hard about this statement, my response today would be, only a non-artist would make that statement because a true artist knows how important quality light is to the success of an image.
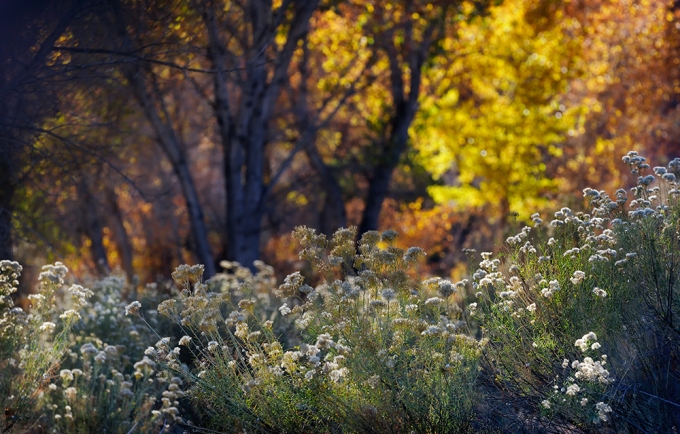
Courthouse Buttes Wash, Arches National Park, Utah
Canon 5DMKIII, 70-200mmL @ f/5.6, 1/100th second shutter, ISO 100, Singh-Ray LB Color Combo Polarizer
There are also a bevy of lessons we can learn from the world of design that can be incorporated into our photography: patterns, shapes, lines, contrasts, textures, etc., are all crucial in aiding in an image’s success or failure.
Photography is a craft and an art, similar to playing a musical instrument. There has to be a personal feel attached to every image we create. Without that input from us, the image becomes lifeless and has no soul. Also, without regular practice, we cannot expect to improve at our craft. Beyond the technical aspects of learning the camera and post-processing, we must develop our vision skills; only then can we start to previsualize images in the field. This is the key component that will take you from shooting literal scenes to producing artistic visions.
The first image accompanying this blog is a good example. I captured it this past fall in Zion’s famed Narrows. Many of the key ingredients were there for success: a river, warm reflections, fall color, shapes, lines, and quality light. To put the viewer into the middle of the action, I took a low perspective with my camera about a foot above the Virgin River. A good polarizer cut the highlights off the river and brought out the warm reflecting light from the surrounding Kayenta Shale walls. I made sure I had plenty of depth-of-field (f/22) and in-turn had a shutter of 2 1/2 seconds that accentuated the movement of the water and led the viewer’s eye into the frame. The warm reflected light on the surface of the water connected with the warm color striking the far wall tying the near/far relationship together, and the fall foliage anchored the top of the frame and was positioned conveniently at the end of the diagonal line (a motion line) from the far right wall. All key elements to success and all nicely arranged. When it comes together like that it seems simple, but in reality, it took years of study and practice to be able to see this so quickly.
The last image was one of those subtle locations at a wash filled with backlit fall color in Arches National Park. It was really the subtle play of light on the foreground foliage that caught my eye. The backlit cottonwood trees were rendered as an out-of-focus placeholder of color for the foreground accomplished with a combination of a telephoto lens and a wide aperture. Again, seemingly simple but something I would have not had seen earlier in my development as a photographer.
So if you want to improve your vision skills, practice! Every day if you can! Have a smartphone? Use that and challenge yourself to make an image per day. Look around your immediate surroundings: work, home, an evening stroll, a trip shopping. The key is to look. Find the artistic in the everyday settings. Look for the light, Watch how all the elements in your scene work together. If they don’t, eliminate what is not working. Before long, images in nature will appear everywhere and your ability to compose them will improve.
2013 Photo Workshops
4th Annual Kauai Workshop – Garden Isle and Tropical Paradise – June 21-25, 2013
3rd Annual Bryce/Zion National Parks – Hoodoos and Fall Color – November 4-8, 2013
Software Discounts
Photomatix Pro 4.2 type in code at checkout: donsmithphotography 15% discount
Nik Software type in code at checkout: DSMITH 15% discount
Topaz Software type in code at checkout: SMITHPHOTO 10% disount
Purchase Prints and Cards
Click on this link to purchase prints and cards from a growing library of my favorite landscape images:
Revisiting a Dangerous Old Friend
Posted on November 8, 2012

Canon 5DMKIII, 24-70mmL @ f/16, 1.3 seconds, 100 ISO, Singh-Ray LB Polarizer.
I’ve just returned from two weeks of teaching workshops in the amazing state of Utah. It all started with six days at Arches/Canyonlands National Parks, then resumed with another workshop at Bryce/Zion National Parks. Finally, I spent my last two days in Zion photographing the famed Narrows and Subway with friends Tracy Anderson and Jill Matyuch. Today’s blog centers on an image I tried capturing two years ago (albeit in the spring) with another friend, Pierre Steenberg. I knew back then that water levels of the famed “Crack” would be too high, but it was more of a quest to just see the area where so many captivating images had been taken. If you look closely at the dark sections of the Kayenta Shale, the harmless appearance is actually a very slippery moss. I found out the hard way as I lost my footing back then and slid precariously close to a ledge about 100 feet below this image. Fortunately I stopped before what could have been a disaster.
Fast forward to a couple days ago when my friends and I finally reached this area (located above Arch Angel Falls), and my “bad experience” raced back through my mind and got my adrenaline pumping. Having injured my ankle 13 days prior in Canyonlands while walking to Mesa Arch in the dark, I moved with extreme caution. Fortunately we had this area to ourselves and I was first to set my tripod. This composition is by no means unique; in fact, there is probably not a composition out there that is, though some photographers would like you the think so, thus I went with what pleased me. During the fall season, North Creek funnels through this fissure in the Shale that is about 6 inches wide. We were in the height of Zion’s fall color season and thus had some vibrant aspen and maple leaves resting on the Shale.
I really had this composition in mind prior to arriving. If I would have been by myself, I would have tried more, but there were three of us and we wanted to get to the famed Subway before the throngs of photographers hiking up behind us got there – so time was of the essence. In reality, this scene is all about symmetry. About the only time I think symmetrical is when I am photographing water reflections. Yet, for this scene, I thought two equal halves would be far more aesthetically pleasing. The definition of symmetry is “patterned self-similarity.” The leaves also add a sense of scale that otherwise would not be present. This was my thought two years ago before I took my slippery ride down the Shale. In retrospect, the water levels were too high back then to fully reveal the beauty of the crack, so I was glad to be back for another try. As you can see here, the water level was perfect.
My two friends almost met with disaster as both unexpectedly found just enough of the slippery moss to send one of their legs dangerously into the awaiting crack (it happens quickly and without warning – suddenly your footing goes). Thank goodness neither was hurt. The consequences of getting an injured hiker out of North Creek Canyon are daunting to say the least. It took us 3 hours of hard hiking to reach this location and cell phones are useless. I had done my homework on making this hike and all my readings were peppered by warnings that many hikers had met with broken bones, twisted ankles and so on. Some actually make it to the Subway in 2 1/2 hours, but we took planned rest stops as a precaution and to give both my ankle and Tracy’s knee a respite. Coming down was even a bit longer as Tracy’s knee really started to hamper her, but she persevered and we made it out of the canyon with time to spare.
Here is my image of The Subway from the spring of 2010. You can see how high the water level was back then and why each step was one away from impending disaster.

Canon 1DMKIII, 16-35mmL @ f/16, 3.2 second timed-exposure, 100 ISO, Singh-Ray slim polarizer.
It is really quite an accomplishment for most to make this hike. It is rated as “strenuous” by most guide books and one really should be in excellent physical shape before attempting it. The rewards are great as Arch Angel Falls, The Cascades, The Crack, and The Subway await. I know by next fall, the memories of my ankle pain will be a distant memory and I will probably give this hike another go with other compositions still rambling through my mind. If you go, remember to be cautious, especially around “the Crack.” Don’t be the next victim of the underlying moss!
2013 Photo Workshops
4th Annual Kauai Workshop – Garden Isle and Tropical Paradise – June 21-25, 2013
2nd Annual Fall Color in Grand Teton National Park – September 28 – October 2, 2013
Software Discounts
Photomatix Pro 4.2 type in code at checkout: donsmithphotography 15% discount
Nik Software type in code at checkout: DSMITH 15% discount
Topaz Software type in code at checkout: SMITHPHOTO 10% disount
Rediscovering A Passion For The Intimate Landscape
Posted on October 15, 2012

Canon 1DMKIV, 16-25mmL II @ f/22, 1 1/2 second exposure, 200 ISO, Singh-Ray Slim Polarizer
My travels as a landscape photographer take me to some pretty famous locations: Yosemite, Big Sur, Kauai, Grand Canyon, Grand Teton, Arches/Canyonlands, well, you get the idea. All marvelous landscape locations but also ones that have been photographed incessantly. True, I make my share of iconic images as I lead workshop groups to many of these areas famous landmarks – I would be remiss if I didn’t. However, I have to constantly remind my students (and in the process, myself) that the intimate landscape – the smaller snippets of the grand scene – are everywhere to be found if we just open our eyes.
Now I understand, that I’m not the first nor the last to pass on this advice. I have even had workshop students ask, “what are we shooting here?” Kind of like a “Where’s Waldo” question if you ask me! I generally try to work-in at least one or two of these more subtle locations per workshop. I know many students are along to capture the “trophy shot” and we get those also. But as the years have rolled by and one finds themselves returning to familiar venues, the real challenge lies in finding the undiscovered. I don’t mean the next glowing backlit arch or snow capped 14er bathed in alpenglow. What I’m talking about is something that is uniquely your vision. A scene that 100 other photographers could walk right past but something about the scene: light, pattern, line, form, texture, color shape, etc., catches just your eye – not theirs! In my opinion, this is what stretches both you and your vision, and in the process, helps you grow as an artist.
In about 10 days I will embark on back-to-back workshops in the beautiful state of Utah. I will begin with a workshop in Arches/Canyonlands and then continue with another in Bryce/Zion (I know, tough work but I’m not complaining)! On the last morning of last year’s Bryce/Zion fall workshop, I had the group at the far end of Zion Canyon working a stretch that leads from the parking area to the start of the Narrows. The canyon was alive with beautiful fall color and the morning air was still – a perfect time to be photographing. As I walked along the trail alongside the Virgin River, I came across some vibrant red big leaf maples. Juxtaposed against some yellow birch, the color combination stopped me dead on my tracks. Soft reflected light lit the scene perfectly. I had made many images the previous day of trees against the incredible red rock walls of the canyon and wanted to try for something a bit more intimate. One of my favorite photographers – Elliot Porter – flashed into my mind at that time. Porter was a master at capturing the intimate landscape and his work had always resonated with me.
I had my color palette, all I needed was a foreground – something to add to the colorful background. I decided to put my gear down and just wander around the scene looking for possibilities. I did not immediately spot this foreground though it looks rather obvious. My first thought was a gentle sloping hillside dotted with colorful leaves, but when I dropped low to the ground the angle of the trees became too severe and disorganized. There was no flow in the composition and that is important to me – the eye must be able to travel in a non-jarring journey through the frame. I then rounded a turn on the trail and came to these leaves resting on the rocks. It took a while to maneuver my tripod into position, but the image slowly started to reveal itself. I used my Live View quite a bit in refining the frame and it helped that there was zero wind. I bracketed my aperture and focus to make sure I was obtaining the proper depth-of-field and in the end settled on this frame captured at f/22.
What I felt that I accomplished was an image that contained what had initially drawn me into the scene – the red/yellow color palette – but also another image of the vibrant red maple leaves. Really the image is a combination of these two images and perhaps each portion of the image could be made into a single and separate image. But the flow in my opinion is there and they eye works easily back and forth between both halves of the frame.
Perhaps more than an image I’m proud of is the fact that this image is uniquely mine. I saw many other photographers that morning walk right past this scene on their way for the more “famous” locations. I’m not saying that’s wrong, many times I’m leading the line, but in the journey, keep your eyes and mind open to all the marvelous treasures nature has in store for us. Intimate images are truly everywhere – like hidden gems. Discovering them will bring a newfound sense of gratification to this wonderful passion we all share.
Revisiting An Old Friend With New Software
Posted on July 28, 2012

Canon 1DsMKIII, 24-70mmL @ f/16, (5) frames bracketed and compiled with Nik HDR Efex Pro 2, ISO 200, Singh-Ray Neutral Polarizer
I guess you could term me somewhat of a software freak. Where many of my colleagues had to be forced into the digital realm kicking and screaming, I for some unexplained reason, embraced the technology with open arms. I don’t view software as some evil demon robbing me of the pleasures of film; instead, I look at it as another creative tool in my arsenal to reveal my vision, or more exactly, my previsualization of a particular scene that I am trying to render. Perhaps this harkens back to my darkroom days where I could while away hours working and reworking prints (much to my abhorrence of smelly chemicals)!
Now I can work and rework images without the smell (and resulting headache) that the chemicals caused. The magic is still there, just in a different manner (not sure if anything digital will ever replace the thrill of a print emerging in the developer tray). Case in point is today’s image of the iconic view of Zion’s Virgin River against the backdrop of The Watchman at sunset. I captured this scene last November just prior to the start of my Bryce Canon and Zion National Parks Photo Workshop. I never could reveal this scene the way my eye saw it with earlier versions of HDR software, thus I put the frames aside and rendered a horizontal version via tedious layers and masks in Photoshop.
With the recent release of Nik Software’s HDR Efex Pro 2, I decided to give these frames another try. There are many features of this new release that I really like, but none more than the realism that this software reveals. I am not of fan of the HDR look. I don’t want my viewers looking at a scene and thinking, that’s an HDR. I simply want the software to overcome the limitations of my camera sensor’s ability to render the scene’s contrast range similar to how my eyes saw it (termed dynamic range).
The new version of Nik HDR Efex Pro 2 excels in many ways over its predecessor. First off, it is much faster at rendering the image. But that is just the start. You have much finer control over the resulting image starting with the option to choose a single frame that will allow motion (such as the multiple frames of the Virgin River) to appear as if it was captured in one frame. I’m pretty good at masking but I can’t hold a candle to what this software can do automatically!
Next, and for me this is one of the most important changes to this version of software, is the ability to control the tonality (think depth) of this image. One of my many concerns using HDR software was the flat look that the resulting image usually revealed. This can now be controlled via choices within the software. This gives the resulting image a much more realistic look and feel. The masking is done behind the scenes, on-the-fly, saving me valuable time! Nik also provides 29 presets to get me in the ballpark. I’ve found myself choosing the “Realistic” presets and starting there. Using a preset generally takes care of 90% of the work!
Once my image was near the look I desired, I opened it into Nik’s Color Efex Pro 4 and followed my normal workflow. I did tone down some of the highlights on the water surface and along the bank using Nik’s Viveza 2. Viola – start to finish in less than 10 minutes!
Yes I am a software freak, but why not? With the great tools available from Nik Software, my vision can be realized in minutes as opposed to hours. If you would like to purchase any of the amazing products from Nik Software, please use my code DSMITH at checkout and receive a 15% discount.
If you would like to capture scenes such as this while improving your workflow and vision, please check out my Workshops for 2012 and 2013. I still have some openings for this workshop which begins in beautiful Bryce Canyon this November 1-5!
2012 Don Smith Photography Workshop Schedule
Posted on January 28, 2012

Here is my 2012 Workshop Schedule. I currently have openings in all my workshops except for Yellowstone/Grand Tetons where I can add you to a waiting list. My Northern Arizona (Grand Canyon, Page and Sedona) and Kauai are getting close to selling out so don’t wait!
Exploring Visual Concepts – Relationships
Posted on November 10, 2011

Canon 1DMKIV, 16-25mmL @ f/22, 0.8 second shutter, 200 ISO, Singh-Ray Slim Polarizer, Lexar Digital Media.
Relationships in nature are ever-present. Some are more obvious than others, while others have to be found amongst the apparent visual chaos. In discovering relationships, we not only present a more visually cohesive image, but one that ties the various elements together within the frame. But there is another use of relationships that can actually create depth in your image. Remember, we see in three-dimensions while our images are represented as two-dimensional. A significant way to create the illusion of depth in a frame is by seeking out near/far relationships.
In the accompanying image captured in Zion Canyon, my eye was first drawn to the vivid reds of the Big Tooth Maples juxtaposed against the yellow Aspens (remember color is number two on my list). I began working the scene’s color and made some nice frames, but then I asked myself if there was a way to create some much needed depth with the image. I spotted this rock with these leaves and immediately thought of working the scene with the leaves in the foreground. Here is where wide-angle lenses earn their keep in my opinion. I would have loved to had a 17mm Tilt/Shift (still on the wish list) but opted for my 16-35mmL Series II Canon lens set at 17mm. The key for me in creating successful near/far scenes is how I position the camera to lead the eye. I like to create pathways from foreground to midground to background for the eye to move. My other key was in the careful focusing to ensure sharpness with the foreground leaves and maintain the sharpness throughout the scene. This is where the T/S would have made life easy, but all was not lost. By carefully planing my camera (aligning the image sensor plane with the plane of my scene), I could create enough sharpness to hold focus throughout the frame. I opted for f/22 to hedge my bets (yeah, I just hear that collective gasp from all you techies out there), but this is how I earn my bread-and-butter. Granted, f/22 does create some unwanted softness (due to diffraction – caused by the extreme bending of light) around the corners of the frame and I would have loved to have used f/11 and/or f/16, but at the sacrifice of overall loss of sharpness in the trees. I simply opted for the lesser of two evils. Careful post-sharpening brought back much of what I lost.
I did have one leaf that was not cooperating as it was half out of the frame and I did reposition it within the frame. Now, is this a photographic no-no? Well, we can debate that one to death. I generally do not move elements in my scene; however, in the case of a misplaced leaf, twig, weed, etc., I see it more as maintenance. Perhaps a gust of wind could have rearranged them for me anyway, so I see it as not big deal. If I was to have come to this rock with no leaves and I threw a bunch up there, then I would have some issues. Anyway, that is something each of you has to decide.
As for the image itself, I believe the near/far relationship between to foreground leaves and the background trees is a success. By my careful positioning of the camera, I was able to create the much-needed pathways for the eye to move up and through the scene. I also have other relationships working in this scene. There is a contrasting relationship between the foreground boulder and the trees, the color harmony with the maples and aspens, and the relationship of life and death itself with the leaves (which will all be dead within in the next couple of weeks – that’s kind of a morbid thought)!
So the next time you are stuck visually, seek out nature’s relationships. It can not only create unity amongst elements, but also create depth and visual messages. In a sense, you are helping the viewer along by guiding the eye. Pay special attention to pathways to allow the eye to move, and keep moving and re-framing your image until it all comes together. In the process, have some fun and enjoy the creative process!
Photographing the Icons – Finding Your Own Unique Point of View – or Not!
Posted on April 7, 2011

Sunset light on the Watchman, Zion National Park, Utah.
You may be wondering why you have been redirected to this new WordPress site? Well, this is something that I have had on the drawing board for some time. I will still be posting on Aminus3, but adding WordPress to the mix will allow me to be more versatile in the future. Some new features coming later this year will be the introduction to video tutorials. My oldest son Rob has gotten into producing some really funny videos on YouTube and will now (hopefully) teach his old man a thing or two about video editing! Moreover, I will now be able to offer multiple images to help demonstrate some of my post-processing techniques. So without further ado, let’s get on with today’s topic!
When it comes to photographing iconic locations, finding your own unique point of view (POV) can make your image stand apart from the masses. But what happens if one cannot find a different POV? Today’s image was captured from the Highway 9 bridge as it crosses the over the Virgin River just prior to the reaching the Zion Canyon Scenic Drive in Zion National Park, Utah. There have been so many tripods placed at this iconic location that there are actually painted lines (show up early and claim your spot)! So upon arriving with my friend Pierre Steenberg a couple weeks back while on a scouting trip for my upcoming Fall Bryce Canyon/Zion Fall Color Photo Workshop, we both felt we could find something different and unique so off we went. Well guess what? Neither of us could find a location that beat this one. Perhaps that is why iconic locations become, ICONIC!
As I walked up and down the river, I did indeed find different POV’s, but I realized I would be cropping out the beautiful cottonwoods that are prominent when framed from the bridge. Moreover, when I arrive with my group during the first week of November, these cottonwoods will hopefully be displaying vivid yellow fall color that will enhance this scene even more. Add a few clouds catching color and watch the scene become a painter’s palette! So I can hear some of you now, but you’ll have the same image that everyone else has! Well, yes and no.
True, I may have a similar composition (no matter how hard I try to convince myself that I will find something unique – seriously?) but the weather gods and the fall color gods will be the ones to dictate the uniqueness of the image. Will I even attempt to fight the masses with a workshop group of 12 students? Perhaps not. Perhaps we’ll opt to stay in the canyon and photograph fall color. Perhaps we’ll try another location. Perhaps I’ll split the group (something I do when photographing Mesa Arch in Canyonlands National Park). Perhaps, perhaps ……
Bottom line, I’ll let my workshop group make the final decision – after all, it’s their workshop. I know people attend workshops, in iconic National Parks such as Bryce Canyon and Zion for a reason, they want their own interpretation of the trophy shot. I know many pros who snub their collective noses at iconic locations, opting to find their own unique images elsewhere. I commend them (instead of condemn them) and they should feel the same about those who do want to attempt to make their own images of the popular locations. Really now, what hasn’t been done time and again, ad nausea, when it comes to shooting any iconic location?
I’d love to hear your thoughts on this topic, it’s a fun one to debate over a couple of beers with fellow pros. Personally, I’m in the business of making images. If once in a while I set my tripod legs where the greats before me set theirs, does that really make me any less of a photographer? I’ll find my unique images, but first time to an iconic location, I’ll line up and give it a go!
