Nature's Best :: Don Smith Photography
Exploring our incredible world one image at a time!
Do You Look Or Do You See? Start With 10,000 Hours Of Practice :: Part 1 of 3
Posted on May 31, 2014

The Crack, Zion National Park, Utah
Canon 5DMKIII, 70mm, f/16, 1.3 sec., ISO 100, Singh-Ray Thin LB Polarizer, Lexar Digital Film
NOTE: This is the first of a three-part series on the art of seeing creatively. We are all creative to one degree or another, but our vision can be developed similar to our craft skills. I don’t buy into the assumption that “you were born that way.” Like anything else in life, some people have an easier time than others in anything we do (including photography), but I don’t personally believe that I was born with any special gift. In fact, in my first serious college photo class, I got a C- and the instructor wrote that in no way should I ever consider doing photography for a living. Looking back, that was great motivation. I love proving the naysayers wrong. Hard work, lots of study, a strong self-belief and lots of love and support from my wife, Beri, was the way I improved my vision (I still work at it daily).
In Part 1, I take a look at the difference between craft and vision.
Over the course of my career, I have literally learned how to get past seeing literally (at least I hope I have). What I mean by this is that when most of us first pick up a camera, we tend to think that we have to re-create the world exactly as it appears to us. That’s fine and that is a good way to really get a handle on how to operate the camera and learn how it sees with its various lens focal lengths.
I call this the “craft” side of photography. That craft side also extends to learning how to correctly process an image (I shoot in RAW mode and process using both Lightroom 5 and Photoshop CC). I can help you here also, please order my new video series: A Simplified Method to Workflow. You’ll receive 6.5 hours of training via 26 easy to follow videos. You’ll start processing like a pro within your first few lessons!
You really need to get proficient at both your camera and your post-processing; yet, craft is only half of the equation; vision (artistic vision) is the other half.
I’ve seen many of my workshop students over the years really struggle with the craft side. They are so consumed with trying to learn how to operate their camera(s) that making (notice I didn’t say taking) an image is almost an afterthought. Then, they are back at their computers trying to figure out how to properly process the image to match their vision – it can get very frustrating and confusing.
With all it takes to sort through all the craft side of the equation, it’s no wonder most photographers never really get to the vision side. I can tell you from experience, excellent craft skills without artistic vision will only equate boring images with no soul, but at least they’ll be crafted well. How do I know? Because I was one of those who thought if I just learned all the bells and whistles of my camera, then my pictures would be awesome. Well, looking back, they were awesomely boring. This was in the film days when I was shooting chrome.
Then Photoshop came along and suddenly we were the lab. Again, I dove in head-first trying to learn the beast. Still didn’t make me any better as a photographer, but at least I could process my images to my match my vision of a scene, so it was a step in the right direction.
I believe the craft of photography can be learned within a year, but it has to be practiced almost daily. In the book Outliers, Malcolm Gladwell follows highly successful people from all walks of life and determines that the one common thread between all of these people is that they put in a minimum of 10,000 hours of practice before reaching their maximum potential. Have you put in your 10,000 hours on your photography?
You really need to get proficient at both; yet, craft is only half of the equation; vision (artistic vision) is the other half.
My first camera was purchased when I was 13-years-old (45 years ago – Yikes!). Over the past 35 years, I rarely skip a day when I am not either shooting, processing, teaching, reading or writing about photography. Some days go as long as 15-20 hours when I am teaching a workshop, shooting stock, or scouting for a new workshop.

Dawn at Hanalei Bay, Kauai, Hawaii
Canon 5DMKIII, 24mm, f/16, 6 minutes, ISO 100, Singh-Ray 10 stop mor-slo neutral density filter, Lexar Digital Media
I ran some quick math, and in the last 35 years, I’ve put in 102,200 hours on my craft. That’s not even counting the first 10 years that I owned cameras. My best guesstimate for that time frame was another 14,600 hours for a combined total of 116,800 hours and counting!
Along the way, I earned a BA in Photojournalism and English from San Jose State University, worked 23 years (and counting) for the NHL’s San Jose Sharks, spent 26 years photographing MLB, NFL, NBA and NHL games, along with a host of other sports. I worked 7 years as a stringer for Sports Illustrated, and have been making landscape images since my teenage years.
I have also been teaching photo workshops for 10 years and have been shooting landscape imagery for Getty Images for the past 8 years. Eighty percent of my efforts these days are spent in the landscape realm.
All told, I have put in my 10,000 hours over 11 1/2 times (rapidly closing in on 12 times)!
I ran some quick math, and in the last 35 years, I’ve put in 102,200 hours on my craft. That’s not even counting the first 10 years that I owned cameras. My best guesstimate for that time frame was another 14,600 hours for a combined total of 116,800 hours and counting!
Here’s the bottom line. I can teach you the craft. I can teach you the aesthetic side of photography (the vision – though that takes much longer). What I cannot teach or help you with is PASSION. I can’t put in the time for you – only you can do that and everyone does it differently.
Passion is what stirs the drink so-to-speak. Passion is what will push you daily to achieve your first 10,000 hours. Perhaps many of you reading this have already surpassed that point – if so – congratulations. Now get going towards your second 10,000 hours.
The cool thing is that your journey will never end as long as your passion burns. I really can’t explain why, after all these years, I still have the passion. I do have some thoughts on that subject though and I will share them with you in Part 2 of this series.
One thing I do know is that when I was young, I focused (pardon the pun) far too much on technical and not enough on learning how to see. Once I started to put my attention towards that goal, my images began to change. No longer was every image a grand view of exactly what I was looking at; my images became more intimate like this image of Zion’s Crack that you see here.
I realize most of you reading this have a job or school and a ton of other responsibilities. Well, even though I do this for a living, I also have a family and the time constraints of running my business.
Yet, like you, I have to look at my calendar and carve out my shooting times. I’m fortunate in that half of my office time is spent outdoors scouting locations and waiting for the right light. My actual shooting time is probably less than you think. I work in very small windows of opportunity. Yet, I maximize the time I do spend in the field with adequate preparation. Then of course, Mother Nature can change on a moment’s notice. As a pro, I still have to come back with a good image.
So get after it. Don’t feel like lugging out your 35mm gear? How about taking a walk around your neighborhood with your smartphone (challenge yourself to find an image in your everyday surroundings). You will be amazed what this will do for your creativity.
Yes you can teach yourself how to see creatively. Come back for Part 2 and I will share more on how I accomplish this.
Free Video Sample :: Chapter 19 – Introduction to Luminosity Masks

2014 Photo Workshops – Complete List
2015 Photo Workshops
Software Discounts
Photomatix Pro 4.2 type in code at checkout: donsmithphotography 15% discount
Topaz Software type in code at checkout: SMITHPHOTO 10% discount
Helicon Focus click on link to receive 15% discount
Hardware Discounts
MindShift Gear rotation180° Panorama rotating day hiker backpack
Special offer From Singh-Ray Filters: You will receive 15% off of any filter(s) you order when you call Singh-Ray direct and use my code – Smith 15: (800) 486-5501. Offer valid through June 13th!
Grand Teton Photo Workshop :: September 28 – October 2
Posted on May 26, 2014
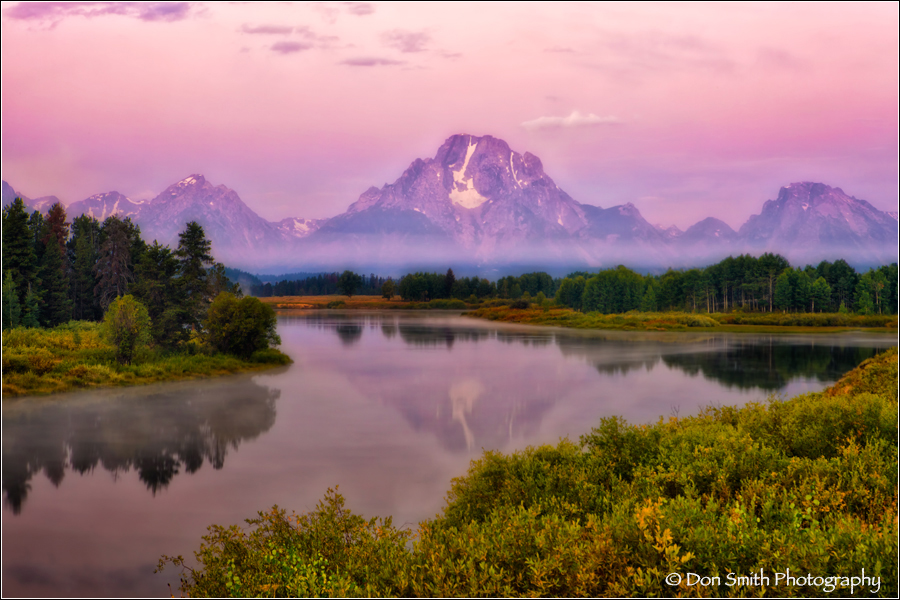
Dawn’s Hues, Oxbow Bend, Grand Teton National Park, Wyoming
Canon 1DsMKIII, 70mm, f/16, 4 seconds, ISO 100, Singh-Ray Thin LB Polarizer, Lexar Digital Media
Join me, along with Scott Schilling and Pierre Steenberg for my 3rd Annual Fall in Grand Teton National Park Workshop this September 28 – October 2, 2014.
Come photograph one of America’s grandest National Parks in one spectacular fall workshop. The aspens and cottonwoods will be at or near peak color with the dramatic sweep of the Grand Teton Range and the iconic Snake River serving as a backdrop.
Above is just one sample of the breathtaking beauty that you will see and photograph. This image was captured at dawn at famed Oxbow Bend.
Words simply won’t do this justice, so I thought I’d let some images do the talking.

Stormy Evening, Snake River Overlook, Grand Teton National Park, Wyoming
Canon 1DsMKIII, 32mm, f/11, 2.5 seconds, ISO 200, Singh-Ray Thin LB Polarizer, Lexar Digital Media
The Snake River Overlook was made iconic by none other than Ansel Adams. Though the trees have grown concealing the actual bend, the beauty is still exquisite. The cottonwoods to the west of the river should be showing their beautiful yellows during the workshop.
I captured this image after sunset with Mike Hall when all the other photographers had left – amazing what they missed!
As you can see in both this image and the next, snows come early in the Grand Teton range. This provides even another layer of beauty to this already amazing area.

First Light at Schwabacher’s Landing, Grand Teton National Park, Wyoming
Canon 5DMKIII, 44mm, f/16, 1/4 sec., 200 ISO, Singh-Ray Thin LB Polarizer, Lexar Digital Media
We will shoot early at iconic Schwabacher’s Landing. There are so many compositional possibilities that it will boggle your mind – simply gorgeous is the only way I can describe the location.
Just to the north of this scene are the famed beaver ponds and I’ll have you on-location very early to stake your spot.
If we get lucky, the models just may show up on time. My workshop group captured this scene on the way to Oxbow Bend for a sunset shoot (below).

Wild Horses and Fall Color, Grand Teton National Park, Wyoming
Canon 5DMKIII, 190mm, f/8, 1/80th, 100 ISO, Singh-Ray CC Polarizer, Lexar Digital Media
When we are not out photographing, we will be holding daily class sessions dealing with workflow and vision.
As my workshop description states: This workshop will have an emphasis on field location shooting. It will also include two sessions of Photoshop training and a minimum of two image review sessions. Workflow training will include: RAW processing in using the latest version of Lightroom and complete workflow training in the latest version of Photoshop. Workflow topics will include: preparing an image for both print and web presentation, proper methods of setting white and black points, how to “properly massage the middle tones,” color balance, localized tonal and color adjustments via luminosity masking, 32-bit blending techniques, blending multiple exposures via layers and masks, freehand masking techniques, section of masks based on both tones and colors, proper sharpening and noise reduction techniques, etc.
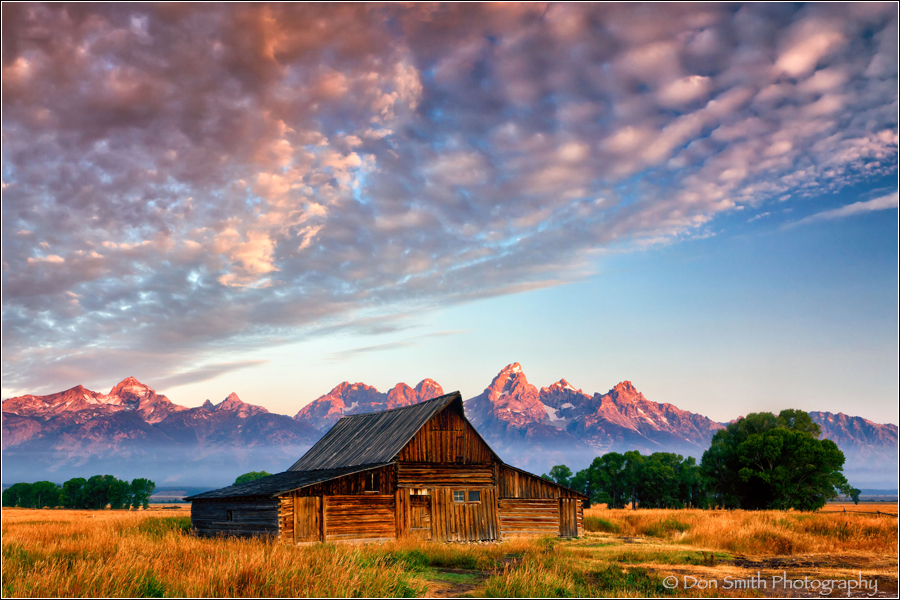
Moulton Barn and Grand Tetons, Grand Teton National Park, Wyoming
Canon 1DsMKIII, 25mm, f/16, 2 seconds, ISO 200, Singh-Ray Thin LB Polarizer, Singh-Ray 2 stop soft edge GND, Lexar Digital Media
Of course we will spend one sunrise and perhaps one afternoon photographing along famous Mormon Row. The Moulton Barn is an iconic scene with the Teton Range serving as a backdrop and is a symbol of the west’s grandeur.
So I hope you can join in. There are (6) spots remaining as of this writing. For more information, please click here: Fall In Grand Teton National Park :: September 28 – October 2, 2014. You can also email me for more information:don@donsmithphotography.com.
Free Video Sample :: Chapter 19 – Introduction to Luminosity Masks
2014 Photo Workshops – Complete List
2015 Photo Workshops
Software Discounts
Photomatix Pro 4.2 type in code at checkout: donsmithphotography 15% discount
Topaz Software type in code at checkout: SMITHPHOTO 10% discount
Helicon Focus click on link to receive 15% discount
Hardware Discounts
MindShift Gear rotation180° Panorama rotating day hiker backpack
Robert’s Distributors – 10% off any regularly priced camera bag and a free memory card wallet with any purchase. Call John or Nick at 800-726-5544 and reference you saw this posted on my blog site.
For Best Light – Arrive Early And Stay Late!
Posted on October 7, 2013

Dusk, National Elk Refuge, Jackson, Wyoming
Canon 5DMKIII, 130mm, f/16, 4 second timed-exposure, ISO 200, Singh-Ray Color Combo Polarizer
Having spent my entire life living in “sunny” California, I learned a long time ago about the importance of getting up early to be on location – sometimes as much as an hour ahead of time on clear days. Yes, that means very early wake-up calls and drives in the dark, but dawn light is simply amazing.
On the other end of the spectrum, I will not leave a location simply because the sun has set. Some of the best light, especially at higher elevations, can come and last well after sunset. My most recent blog post even talks about Capturing Alpenglow Light that happens early and late when the sun is not visible to the naked eye.
During my recently completed Grand Teton Workshops in Jackson, Wyoming, the government shutdown meant I could no longer take my groups into the park for location shoots. I heard reports of other groups violating that rule and getting away with it, but I plan on holding many more workshops there in upcoming years and abided by their rules. Besides that, there are legal and liability issues to deal with, and once the park closed, I sent my co-instructors (Scott Schilling and Pierre Steenberg) out to scout locations that included as much of the Teton Range, but from outside the park boundaries.
To say the least, they did a fantastic job and found locations every bit worthy as those we had lined-up for our group inside the park. Having not actually photographed these locations at sunrise/sunset times, I made sure we arrived at morning locations a minimum 45 minutes prior to sunrise. On the other side of the day, I made sure we stayed out well after sunset, until, the last ounce of color had flickered out.
On our last sunset shoot with Workshop group #2, we got a good lesson as to why we do just what I explained. We were shooting a sunset over the Teton Range on a very chilly evening. Long after the sun had set behind the mountains to the west, we turned around and were greeted with this incredible scene looking east. The sky was filled with purple and pink hues and the wind had died down enough to allow for a long shutter speed to capture the foreground cottonwoods.

Dawn Skies Over Grand Teton Range
Canon 5DMKIII, 95mm, f/16 (focus set with hyperfocal focus), 15 second timed-exposure, 200 ISO, Singh-Ray CC Polarizer
The next morning, we arrived in the dark at this location high above the valley floor. This allowed our participants to choose a foreground that would work with the Teton Range and add a sense of depth to the scene. Though headlamps were initially required, our eyes soon adjusted. I used my 70-200mmL lens to compress my foreground with the mountain range. Careful focus had to be applied to ensure sharpness throughout the scene. I used Essence Computing’s Focal – Depth of Field Calc app that I had on my iPhone to help set my hyperfocal focus point. As you can see, the focus did indeed hold from foreground to infinity (the mountains), and all I did was wait for the dawn light to warm the cirrus clouds with this beautiful pink color.
One of the other positive benefits of working under dawn and dusk light is that the contrast range is well within your sensor’s dynamic capture range – both of these images were captured in one frame, requiring no graduated neutral density filters or bracketed exposures.
My message for all of you is simple: get on location early and stay on location late. Your digital camera’s ability to capture photons that your eyes cannot see is simply amazing!
2013 Photo Workshops
2014 Photo Workshops
3rd Annual Fall Color in Grand Teton National Park – September 23 – 27, 2014 (9 spots remaining)
Software Discounts
Photomatix Pro 4.2 type in code at checkout: donsmithphotography 15% discount
Topaz Software type in code at checkout: SMITHPHOTO 10% discount
Helicon Focus click on link to receive 15% discount
Hardware Discounts
Special September Offer From Think Tank Photo NOTE: (Use Promo Code WS-643)
Gura Gear – 5% Discount – Use Promo Code DSMITHPHOTO
Purchase Fine Art Prints and Cards
Click on this link to purchase prints and cards from a growing library of my favorite landscape images:
When Seasons Collide :: Beautiful Becomes Spectacular
Posted on September 27, 2013

Fall color and Grand Teton Range after clearing storm.
Canon 5DMKIII, 30mm, f/16, 1/20th, Singh-Ray LB Polarizer, Singh-Ray 2-stop soft edge GND, Lexar Digital Media
It’s hard for me to wrap my mind around the fact that just two weeks ago I was basking in the balmy tropical breezes of Hawaii’s Big Island. Yesterday, I stepped off the plane at Jackson Hole, Wyoming and was immediately thrust into frigid winter conditions. “Where in the heck did fall go,” I thought to myself.
Light snow flurries and a stiff breeze greeted me as I walked towards the terminal. A frozen-looking airport employee told me she was not ready for this type of weather so early in the season. The dismayed look on her face told me that she was not kidding.
I could see the Teton Range slowly emerging from the clouds and knew I may have a window of opportunity to capture two seasons in one. The fall color here in Jackson Hole is at what I would consider nearing peak. Some cottonwoods have already leafed-out while others (along with some aspens) are just now starting to turn.
I am here for the next 11 days teaching two fall color workshops. Our bonus, at least if the temperatures stay relatively cold, it that the Teton Range, spectacular regardless of the season, is covered in snow 2/3rds of the way up.
After I picked-up my rental car and checked in to the hotel, I immediately grabbed my camera gear and headed into the park. Fortunately the clouds were still lifting and the peaks were in full view covered in snow. One of my first stops was near Moose Junction. After composing some grand scenes, I became a bit dismayed as I noticed clouds starting to envelope the range once again.
I decided to wait things our but the snow became heavier. My goal was to stay close to the range in the hopes that the clouds would again break. Soon after entering the south entrance gate along Grand Teton Road, I came across this scene that I have always liked. Much to my surprise, the snow flurries subsided and the clouds did indeed lift, leaving me with this incredible scene of fall color and dramatic peaks of the main portion of the Teton Range.
The soft light made the exposure very easy (I did use a 2-stop soft edge grad to hold down the bright parts of the sky), but other than that, I just worked the scene for various compositions. What was even more incredible was the fact that no other photographer was there – I had this all to myself.
Grand Teton National Park is quickly becoming one of my favorites of all the National Parks. Add some fresh snow and fall color, and it becomes a spectacular site.
It was snowing again this morning when I met up with my long-time neighbor Ali. She has been living in Moose for the past four months and had some out-of-way locations to show me. To say the least, they were incredible and I will use them as part of the workshop – thanks Ali The forecast for the next five days is trending towards more normal conditions with warmer fall-like weather. Conditions couldn’t be more perfect. Workshop #1 begins tomorrow!
2013 Photo Workshops
2014 Photo Workshops
Software Discounts
Photomatix Pro 4.2 type in code at checkout: donsmithphotography 15% discount
Topaz Software type in code at checkout: SMITHPHOTO 10% discount
Helicon Focus click on link to receive 15% discount
Hardware Discounts
Special September Offer From Think Tank Photo NOTE: (Use Promo Code WS-643)
Gura Gear – 5% Discount – Use Promo Code DSMITHPHOTO
Purchase Prints and Cards
Click on this link to purchase prints and cards from a growing library of my favorite landscape images:
The Most Bittersweet Image I Ever Captured
Posted on April 30, 2013

Alpenglow Light on El Capitan, Valley View, Yosemite National Park, October 21, 2004
Canon 1DMKII, 16-35mmL @f/22, 2.5 seconds, 200 ISO, Singh-Ray slim polarizer
Click Image for Larger View
Recently I was sorting through some older files and came across this image of a fall evening in Yosemite Valley. It instantly reminded me of the old Rod Stewart line, “Every picture tells a story don’t it?” And boy, does this image ever tell a story!
Due to an early-season snow storm, I had decided to drive to the Sierra town of Strawberry (Highway 108) to close down our family cabin and prepare it for the upcoming winter. Wherever I go, I always take a camera bag and tripod along for the ride. After completing my task, I began my 3-hour trek back home and stopped in the town of Columbia (just west of Sonora) for a late lunch. A radio was playing in the background and I heard an updated weather report that the storm would be breaking. Hmm, only a 90-minute drive to Yosemite, I thought to myself. A quick phone call to my wife and off I went to shoot a clearing storm sunset!
I arrived in the Valley approximately 45 minutes prior to sunset and as I rounded the El Capitan Bridge, I noticed a bevy of news vans. I instantly knew some climber(s) were in trouble on the famed El Capitan face. Strange for me to not have listened to the news that day (I’m a self-confirmed news junkie) but I had been listening to music for the entire journey. I immediately pulled my car over near some bystanders and inquired about what was happening. “Some climbers are stranded on the face of El Cap,” came the short reply. “How many,” I asked? “Seven, three pairs and a solo!” Looking up I could not spot them. Feeling stunned, I decided to proceed about a mile down the road to take up my position at Valley View; after all, I did come to photograph.
After roaming around for a bit, I decided for a low perspective with a bit more than half the frame given to the foreground rocks and meandering Merced River. Sunset actually came and went without much fanfare. Most of the approximately dozen photographers packed and left. I knew that the best light could still arrive so I gave myself another 20 minutes. Suddenly a laser-like light burst through the towering pines to my left and began to paint El Capitan with the much anticipated alpenglow light seen in this frame. It even caught the underside of the clouds as well. With the low water levels of fall, the reflection showed up beautifully in the Merced River and I was able to capture this scene with no grads (too tough of scene to grad anyway).
Ironically, for a brief moment, I was so caught up in making this image that I completely forgot about the tragedy unfolding on the face of El Cap. The loud rumble of the Yosemite Search-and-Rescue helicopter brought me back in to reality. With El Cap clearly emerging from the mist and the day’s light waning, the helicopter’s passengers were checking on the stranded climbers and attempting to drop supplies. Unfortunately, that would not be soon enough to save two of the stranded climbers as they would lose their lives that night from extreme exposure.
I thought to myself the next morning as I sat in my office editing this image and listening to the news reports on the radio, “how can something so beautiful be concealing something so tragic?” I have a copy of this image hanging in our bedroom. I awake to this scene every morning and not a day goes by that I don’t think of two people who met their demise while I was reveling in this beauty. Mother Nature can give and Mother Nature can take away.
I’ve read reports from YOSAR (Yosemite Search and Rescue) that this storm was predicted and not uncommon for this early in the year (Yosemite Valley spans from 4,000 – 4,200 feet), though it did resemble more of a January blizzard than a typical fall storm. Turns out that these climbers could already have died by the time I made this image. According to the official YOSAR report: Two were Japanese National climbers who were bivouacked at Camp VI, a small ledge 600 feet below the top of the Nose Route. at 1pm, it was observed that the Japanese climbers had abandoned their bivouac and were ascending in the full fury of the storm. This seemed to indicate that the climbers were absolutely desperate.
NOTE: To read a detailed article about the rescue and to see an image of the rescue helicopter flying near this alpenglow, please click here.
2013 Photo Workshops
2014 Photo Workshops
Software Discounts
Photomatix Pro 4.2 type in code at checkout: donsmithphotography 15% discount
Nik Software type in code at checkout: DSMITH 15% discount
Topaz Software type in code at checkout: SMITHPHOTO 10% discount
Helicon Focus click on link to receive 15% discount
Hardware Discounts
Think Tank Photo (Receive a free gift for any order over $50 when you order using this link!)
NOTE: Use Promo Code WS-643
Purchase Prints and Cards
Click on this link to purchase prints and cards from a growing library of my favorite landscape images:
Let Backlight Add Drama To Your Images
Posted on November 13, 2012

Canon 5DMKIII, 70-200mmL Series II + 1.4x converter @ f/16, 1/13th second, ISO 100, front element shaded by hand to prevent flare.
Processed in Nik Color Efex Pro 4 (see discount information below)
What is your first thought when seeking a landscape composition? Is is subject? Perspective? Color? Light? Well all are important elements in creating a successful image, but how often do you pay attention to the direction of the light?
In my studio work, I start with one main light (replicating the sun) then add lights as fill and highlights (kickers) where needed. I make conscious decisions regarding the harshness or softness of the light and then modify accordingly. In nature, we have but one light. Mother Nature will decide how harsh (clear sky) or soft (cloudy or foggy) that light will be. But we as photographers have to think about the direction of the light (yes, even soft light or indirect light has a direction). When I first picked up a camera in my early teen years, I can remember the instructions that came packed with each roll of Kodak film showing the photographer with the sun over their shoulder. Of course, I thought this must be what I was supposed to do. So why did all my images look flat? Well, it didn’t take long to learn that “over-the-shoulder” lighting was the worst way to photograph any subject!
Thus I started experimenting with light. Granted I couldn’t move the sun, but I certainly could move my position relative to it. But what about your subject matter you ask? Well, if the light wasn’t right, I learned to come back when it was.
Today’s image, captured on the last morning of my recently concluded Bryce/Zion workshop, was the result of scouting, anticipating, and returning when the light was right. Bryce Canyon National Park’s incredible hoodoos look great to the eye, but really only photograph well when lit properly. My two favorite types of light for shooting these incredible formations are soft (cloudy and/or indirect) and on clear days, backlight (or in this image, 3/4 backlight). Sidelighting also works well just as the sun is starting to crest the horizon. As you can see, backlighting these hoodoos allowed them to take on a luminescent glow that would not be present if the sun was too high in the sky or worse, over my shoulder. Moreover, because of the low angle of the sun, the background hill becomes a dark shadow (similar to stage lighting) and allows for the hoodoos to stand out with no distractions.
I know of various locations in the park where this lighting works well and I plan my workshop location shoots accordingly. From the rim, one is shooting into a canyon (similar to the Grand Canyon). To our eye, overhead lighting illuminating the entire canyon might look good, but when we try photographing this light, more times than not we are disappointed. Shadows will look harsh and blocked-up and highlights will be tough to control. Here is another backlit location in late afternoon light near Sunset Point. Besides the nice glow to these rows of hoodoos, I like the diagonal lines that each successive row provided adding a dynamic aspect to this composition. Again, 3/4 backlighting provides a beautiful rim light behind each hoodoo allowing it to stand out from the formations behind – each takes on a life of its own thanks to the direction of the light.

Canon 5DMKIII, 70-200mmL Series II @ f/22, 1/5th second, 100 ISO, lens shaded with baseball hat to prevent flare.
Proper light is such a key factor that as a workshop group, we stopped photographing 30 minutes prior to sunset as the light became too uneven across the canyon. We had a quick sandwich (as a session of night photography was planned) then returned as the sun set and softlight enveloped the canyon. We were even treated to a beautiful twilight wedge on the eastern horizon!

Canon 5DMKIII, 24-70mmL Series II @ f/11, 1/4 second, 100 ISO, Singh-Ray LB Polarizer.
Moral of the story: pay attention to the direction of your light. Try working against the light on clear sky days and see if your images take on a entirely new sense of drama. Remember to shade your lens if you are shooting towards the sun (a hat or even your had often work) to prevent flare. Bottom line: move your position relative to the light!
NOTE: I have posted all of my 2013 workshop dates. We will be returning to Bryce Canyon next November as part of my Bryce/Zion workshop (click on link below for more information). Don’t wait as this workshop fills up fast!
2013 Photo Workshops
4th Annual Kauai Workshop – Garden Isle and Tropical Paradise – June 21-25, 2013
2nd Annual Fall Color in Grand Teton National Park – September 28 – October 2, 2013
3rd Annual Bryce/Zion National Parks – Hoodoos and Fall Color – November 1-5, 2013
Software Discounts
Photomatix Pro 4.2 type in code at checkout: donsmithphotography 15% discount
Nik Software type in code at checkout: DSMITH 15% discount
Topaz Software type in code at checkout: SMITHPHOTO 10% disount
Revisiting a Dangerous Old Friend
Posted on November 8, 2012

Canon 5DMKIII, 24-70mmL @ f/16, 1.3 seconds, 100 ISO, Singh-Ray LB Polarizer.
I’ve just returned from two weeks of teaching workshops in the amazing state of Utah. It all started with six days at Arches/Canyonlands National Parks, then resumed with another workshop at Bryce/Zion National Parks. Finally, I spent my last two days in Zion photographing the famed Narrows and Subway with friends Tracy Anderson and Jill Matyuch. Today’s blog centers on an image I tried capturing two years ago (albeit in the spring) with another friend, Pierre Steenberg. I knew back then that water levels of the famed “Crack” would be too high, but it was more of a quest to just see the area where so many captivating images had been taken. If you look closely at the dark sections of the Kayenta Shale, the harmless appearance is actually a very slippery moss. I found out the hard way as I lost my footing back then and slid precariously close to a ledge about 100 feet below this image. Fortunately I stopped before what could have been a disaster.
Fast forward to a couple days ago when my friends and I finally reached this area (located above Arch Angel Falls), and my “bad experience” raced back through my mind and got my adrenaline pumping. Having injured my ankle 13 days prior in Canyonlands while walking to Mesa Arch in the dark, I moved with extreme caution. Fortunately we had this area to ourselves and I was first to set my tripod. This composition is by no means unique; in fact, there is probably not a composition out there that is, though some photographers would like you the think so, thus I went with what pleased me. During the fall season, North Creek funnels through this fissure in the Shale that is about 6 inches wide. We were in the height of Zion’s fall color season and thus had some vibrant aspen and maple leaves resting on the Shale.
I really had this composition in mind prior to arriving. If I would have been by myself, I would have tried more, but there were three of us and we wanted to get to the famed Subway before the throngs of photographers hiking up behind us got there – so time was of the essence. In reality, this scene is all about symmetry. About the only time I think symmetrical is when I am photographing water reflections. Yet, for this scene, I thought two equal halves would be far more aesthetically pleasing. The definition of symmetry is “patterned self-similarity.” The leaves also add a sense of scale that otherwise would not be present. This was my thought two years ago before I took my slippery ride down the Shale. In retrospect, the water levels were too high back then to fully reveal the beauty of the crack, so I was glad to be back for another try. As you can see here, the water level was perfect.
My two friends almost met with disaster as both unexpectedly found just enough of the slippery moss to send one of their legs dangerously into the awaiting crack (it happens quickly and without warning – suddenly your footing goes). Thank goodness neither was hurt. The consequences of getting an injured hiker out of North Creek Canyon are daunting to say the least. It took us 3 hours of hard hiking to reach this location and cell phones are useless. I had done my homework on making this hike and all my readings were peppered by warnings that many hikers had met with broken bones, twisted ankles and so on. Some actually make it to the Subway in 2 1/2 hours, but we took planned rest stops as a precaution and to give both my ankle and Tracy’s knee a respite. Coming down was even a bit longer as Tracy’s knee really started to hamper her, but she persevered and we made it out of the canyon with time to spare.
Here is my image of The Subway from the spring of 2010. You can see how high the water level was back then and why each step was one away from impending disaster.

Canon 1DMKIII, 16-35mmL @ f/16, 3.2 second timed-exposure, 100 ISO, Singh-Ray slim polarizer.
It is really quite an accomplishment for most to make this hike. It is rated as “strenuous” by most guide books and one really should be in excellent physical shape before attempting it. The rewards are great as Arch Angel Falls, The Cascades, The Crack, and The Subway await. I know by next fall, the memories of my ankle pain will be a distant memory and I will probably give this hike another go with other compositions still rambling through my mind. If you go, remember to be cautious, especially around “the Crack.” Don’t be the next victim of the underlying moss!
2013 Photo Workshops
4th Annual Kauai Workshop – Garden Isle and Tropical Paradise – June 21-25, 2013
2nd Annual Fall Color in Grand Teton National Park – September 28 – October 2, 2013
Software Discounts
Photomatix Pro 4.2 type in code at checkout: donsmithphotography 15% discount
Nik Software type in code at checkout: DSMITH 15% discount
Topaz Software type in code at checkout: SMITHPHOTO 10% disount
Falling In Love With Live View!
Posted on October 19, 2012

Canon 5DMKIII, Nikon 14-24mm @ f/16, 30 seconds, ISO 100, Fotodiox circular polarizer.
Signs of Fall, Nisene Marks State Park, Aptos, California
It has been said that the best love affairs generally start off as friendships. So what does that have to do with photography you ask? Well, I started with a lukewarm friendship when Live View first arrived on scene in 2007 with Canon’s release of the 1DMKIII camera. I must admit, for the first year, I hardly touched it. Then, slowly, I began to tinker with it. I actually have to credit one of my workshop students with really showing me its potential as a serious tool when I noticed her checking critical focus. Hmm, now it had my rapt attention!
Today, I simply cannot live without it. I’ve truly fallen head-over-heels in love with this technology and use it on every landscape image I capture. Here are (6) reasons why I find it an indispensable tool.
1.) Exposure Simulation: This is becoming standard on many cameras and I use it faithfully with my Canon 5DMKIII. Simply put, you can now see what minor changes to aperture, shutter and even ISO will do for your overall exposure. I preach to my students to never base 100% of their exposure decisions off an LCD screen and I stand by that, but with their real-time RGB histograms activated, they can fine-tune their exposure in the field alleviating any need to bracket.
2.) Real-Time RGB Histogram: As stated above, exposure simulation must go hand-in-hand with an understanding of what is going on with your histograms. You have a choice of either a Luminosity (an average of the RGB channels) or RGB (which displays as three separate channel histograms). The latter is the way to go as you now have information regarding all three channels. The key for me is the righthand side of each histogram as that is the highlight side. The left side will let you know your shadow information. The key is not to clip your highlights (unless they are spectral). You can also make a better informed decision regarding shadow clip also.
3.) Focus: This may have been the biggest tipping factor that got me using my Live View on a regular basis. Perhaps it is my aging eyes, I’m not sure, but I can now dial-up the magnification (I leave mine set at 10x) and simply toggle around the LCD to check critical focus. I also take a frame, then blow that up to check my Depth-of-Field. In the image above, I wanted a slight drop-off in focus as the path wound into the forest. Obviously, it was critical for me keep the leaves in sharp focus as that is where I wanted to direct my viewer’s eyes.
4.) Grid Lines to Aid Composition: By activating the Rule-of-Thirds grid lines, I can better check the critical placement of elements within my composition. I’m not a freak about rules so I don’t adhere strictly to the Rule-of-Thirds; instead, I tend to trust my sense of balance more than some grid lines, but I nonetheless utilize them to move elements off-center when I feel it is needed. I also use the grid lines to help me balance my horizon. I’m often in contorted positions (the camera was 6 inches off the ground for this image) and it’s nice to have some guidelines to help my sense of balance!
5.) Real-Time Grad Placement: Another benefit of Live View is the ability to offer real-time aid with grad placement. I do not use holders with my graduated neutral density filter; instead, I handhold. I find the ability to fine-tune the transition line of the grad enormously helpful.
6.) Aid for Perimeter Check: My final reason for using Live View is that it allows me to slow down and check for any distracting elements that may be residing along the edges of my frame. My friend Gary Hart refers to this as “border patrol.” I did not place or alter any of the leaves in this image. In fact. the front of my lens (set at 14mm) was literally inches from the foreground leaf. But what I was able to do was fine-tune the composition. A slight movement of the camera’s placement here and there was all it took.
Add this all up and I think you’ll understand my love affair with Live View. Are you using Live View? If not, it might be time for you to fall in love all over again!
Rediscovering A Passion For The Intimate Landscape
Posted on October 15, 2012

Canon 1DMKIV, 16-25mmL II @ f/22, 1 1/2 second exposure, 200 ISO, Singh-Ray Slim Polarizer
My travels as a landscape photographer take me to some pretty famous locations: Yosemite, Big Sur, Kauai, Grand Canyon, Grand Teton, Arches/Canyonlands, well, you get the idea. All marvelous landscape locations but also ones that have been photographed incessantly. True, I make my share of iconic images as I lead workshop groups to many of these areas famous landmarks – I would be remiss if I didn’t. However, I have to constantly remind my students (and in the process, myself) that the intimate landscape – the smaller snippets of the grand scene – are everywhere to be found if we just open our eyes.
Now I understand, that I’m not the first nor the last to pass on this advice. I have even had workshop students ask, “what are we shooting here?” Kind of like a “Where’s Waldo” question if you ask me! I generally try to work-in at least one or two of these more subtle locations per workshop. I know many students are along to capture the “trophy shot” and we get those also. But as the years have rolled by and one finds themselves returning to familiar venues, the real challenge lies in finding the undiscovered. I don’t mean the next glowing backlit arch or snow capped 14er bathed in alpenglow. What I’m talking about is something that is uniquely your vision. A scene that 100 other photographers could walk right past but something about the scene: light, pattern, line, form, texture, color shape, etc., catches just your eye – not theirs! In my opinion, this is what stretches both you and your vision, and in the process, helps you grow as an artist.
In about 10 days I will embark on back-to-back workshops in the beautiful state of Utah. I will begin with a workshop in Arches/Canyonlands and then continue with another in Bryce/Zion (I know, tough work but I’m not complaining)! On the last morning of last year’s Bryce/Zion fall workshop, I had the group at the far end of Zion Canyon working a stretch that leads from the parking area to the start of the Narrows. The canyon was alive with beautiful fall color and the morning air was still – a perfect time to be photographing. As I walked along the trail alongside the Virgin River, I came across some vibrant red big leaf maples. Juxtaposed against some yellow birch, the color combination stopped me dead on my tracks. Soft reflected light lit the scene perfectly. I had made many images the previous day of trees against the incredible red rock walls of the canyon and wanted to try for something a bit more intimate. One of my favorite photographers – Elliot Porter – flashed into my mind at that time. Porter was a master at capturing the intimate landscape and his work had always resonated with me.
I had my color palette, all I needed was a foreground – something to add to the colorful background. I decided to put my gear down and just wander around the scene looking for possibilities. I did not immediately spot this foreground though it looks rather obvious. My first thought was a gentle sloping hillside dotted with colorful leaves, but when I dropped low to the ground the angle of the trees became too severe and disorganized. There was no flow in the composition and that is important to me – the eye must be able to travel in a non-jarring journey through the frame. I then rounded a turn on the trail and came to these leaves resting on the rocks. It took a while to maneuver my tripod into position, but the image slowly started to reveal itself. I used my Live View quite a bit in refining the frame and it helped that there was zero wind. I bracketed my aperture and focus to make sure I was obtaining the proper depth-of-field and in the end settled on this frame captured at f/22.
What I felt that I accomplished was an image that contained what had initially drawn me into the scene – the red/yellow color palette – but also another image of the vibrant red maple leaves. Really the image is a combination of these two images and perhaps each portion of the image could be made into a single and separate image. But the flow in my opinion is there and they eye works easily back and forth between both halves of the frame.
Perhaps more than an image I’m proud of is the fact that this image is uniquely mine. I saw many other photographers that morning walk right past this scene on their way for the more “famous” locations. I’m not saying that’s wrong, many times I’m leading the line, but in the journey, keep your eyes and mind open to all the marvelous treasures nature has in store for us. Intimate images are truly everywhere – like hidden gems. Discovering them will bring a newfound sense of gratification to this wonderful passion we all share.
Exploring Visual Concepts – Texture and Patterns
Posted on November 26, 2011

Canon 1DsMKIII, 400mmL f/5.6 @ f/16, 1/8th second, ISO 100, Singh-Ray Circular Polarizer, Lexar Digital Media.
Keeping your eyes open to patterns and texture in nature can add some interest and drama to your scenes. Sometimes, as is the case of the image included with this article, man-made patterns such as these vineyards can do the trick. Patterns are attention-grabbers and also can direct the eye (depending on where we place them in the scene).
Many photographers I have talked to say nature is chaotic. At first glance, I tend to agree. But I submit, that there is an inherent order in nature and part of our jobs as landscape photographers is finding it. For me, this is also part of the fun of landscape photography. Aerial photography is perhaps the best way to see patterns as the landscape is flattened in perspective and patterns appear quite easily. But these patterns are observable from the ground also, sometimes it just takes moving around, though trespassing onto one’s property is not something I advocate.
When I do find a pattern I wish to photograph, I try to find a focal point or another interesting aspect of the landscape that I can put with the pattern. In the image below, I just photographed a vineyard with no focal point. To me, I think the image doesn’t quite make it because it is simply a pattern – no focal point is included. This begs the question: Do all images require a focal point? I’ll save that one for another day.

Canon 1DsMKIII, 400mmL @f/16, 1/13th second shutter, ISO 100, Singh-Ray Circular Polarizer, Lexar Digital Media
Highlights and shadows can also help accentuate patterns in landscapes that may not first be evident to the naked eye. In the scene below, I awaited the first light of sunrise to paint the ridges of Lone Pine Peak located in the Alabama Hills just west of Lone Pine, California. The pattern of these ridge lines were there, they were just made evident by the play of alpenglow light and shadow.

Canon 1DsMKIII, 70-200mmL @ f/16, 1/4th second shutter, ISO 100, Singh-Ray Circular Polarizer, Lexar Digital Media.
Revealing texture in a landscape is very easy. I simply await either first or last light of the day as the sun’s angle of incidence is very low to the ground. I love photographing desert scenes in this type of light on clear days. Every nuance of the landscape is revealed. One key point is to try and position yourself 90-degrees off-axis to the sun as i did with this morning scene on Death Valley’s Mesquite Dunes.

Canon 1DsMKIII, 16-35mmL Series II, 2-second timed exposure, ISO 100, Singh-Ray Slim Circular Polarizer, Lexar Digital Media.
