Nature's Best :: Don Smith Photography
Exploring our incredible world one image at a time!
Do You Look Or Do You See? Developing Your Creative Vision :: Part 2 of 3
Posted on June 2, 2014
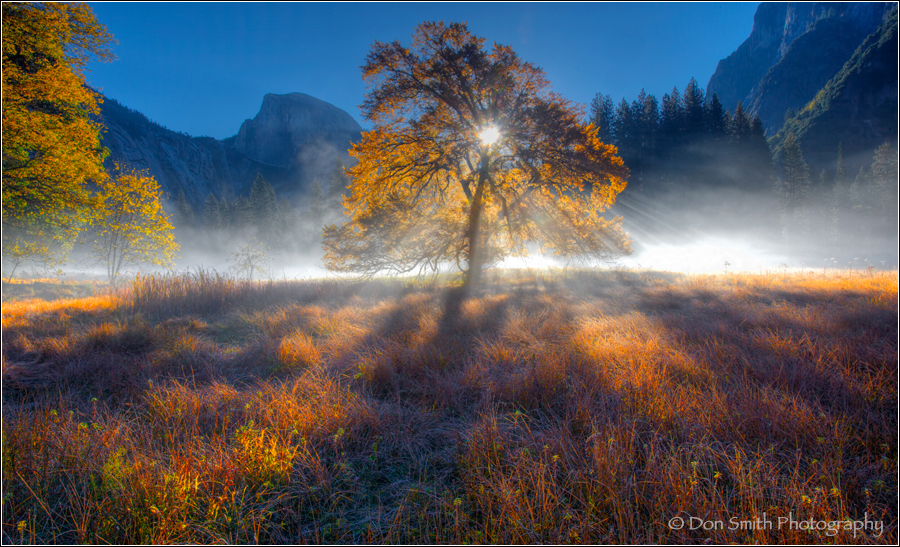
Back-lit Elm, Cooks Meadow, Yosemite National Park
Canon 1DsMKIII, Canon EF 24-70mm f/2.8L II USM Lens, f/22, 1/10th, ISO 100, Lexar Digital Media
This is Part 2 of a 3-part series on developing your creative vision. You can find Part 1 of this series by clicking here.
My path to becoming a full-time landscape photographer has been long a varied. If you read PART 1 of this series, then you know I started photographing landscapes back in my teenage years. You’ll also come away with an understanding that to become a really good photographer, you have to learn your craft and constantly work to improve your creative vision.
Once I turned professional, my landscape work took a backseat to my full-time pursuit of professional sports photography. I never stopped mind you, it was just not the way I made my living. I did that by photographing America’s pro sports: MLB, NBA, NFL, and NHL. Of the four, I still shoot the NHL as co-team photographer for the San Jose Sharks.
This meant lots of travel. My way of relaxing while on the road back then was to actually go out in my off-time and photograph landscapes all over the United States. By my count, I’ve photographed in 48 of our 50 states. Pretty cool!
What it also allowed me to do, was to develop my creative eye for fine art landscape photography without the pressure of having to succeed at it financially to feed my family. Not that sports photography wasn’t creative, but it just involved a completely different mindset.
Passion is what drives me. I was just born to do what I am doing, and believe me, I fought the idea for years! When I finally gave into the fact that this is who I am and this is what I do, then my life really changed (perhaps the old “sink-or-swim” theory kicked in)! One truism: when you dedicate your life to being an artist (in any genre), you will live with a certain amount of financial uncertainty.
Passion is what drives me. I was just born to do what I am doing, and believe me, I fought the idea for years! When I finally gave into the fact that this is who I am and this is what I do, then my life really changed (perhaps the old “sink-or-swim” theory kicked in)!
I never bought in to that old “starving artist” theory, so I made money with my camera shooting commercial work along with sports. Granted there were some jobs I really didn’t want to do, but they helped pay the bills. My dad was self-employed and I learned a lot by watching how he and my mom navigated his business. Hard work and treating people right being at the top of the list.
Looking back, there could have been some really lean years early on. But I was so blessed to have my wife Beri’s love and support – she is still there for me every day – she accepted me and what I do for a living and didn’t try to change me. She also told me that she would work full-time, which in-turn allowed me to grow my business at a steady pace without having to be the main bread-winner.
That freed my mind up to really concentrate on becoming the best photographer that I could be, and I still do it every day of my life. I made a commitment to work at both my craft and creative vision as hard as I could.
Take Time To Develop Your Vision :: It Does Not Happen Overnight
Ten years ago, Beri and I decided to make a go of my landscape photography. That’s another story for another day, but suffice it to say we are still working at it – step-by-step, day-by-day. It’s not an easy path to follow.
In my previous blog, I broke my photography into two parts: Craft (camera / processing) and Vision. I said that if you worked hard at your craft, you could learn it in a year. But that is working every day – most of you don’t have that luxury, so give yourself a bit more time.
Learning the camera is pretty straightforward. Post-processing gets a bit trickier and is really personal. We all read images differently and our processing is a personal statement about the scene that we are presenting. Post-processing in and of itself is a very creative activity.
I can help shortcut you through the process with my new video series: A Simplified Method to Workflow. I show you step-by-step how I process and work you through setting up your computer, processing RAW files and finishing off in Photoshop. I even show luminosity masking, using Tony Kuyper’s luminosity mask action palette. Learn this last step and you can re-create any scene you photographed as you intend (you’ll throw away your HDR programs – guaranteed)! Tony has great tutoriols on his site and I go over the basics in my video series.
So, that brings us to what I consider the most critical part of photography – developing your creative vision. If the craft part can be accomplished in a year or two, then you may be dismayed to hear that vision takes years and years. Really mature vision does not happen quickly – it really is a culmination of all of your life-experiences. You’ll never stop learning how to see, but through the transformation, you’ll stop merely looking. The scene in front of you will become a starting point only for your creativity.
The really cool part is that you’ll start seeing the potential for images everywhere you go! Exotic locations are awesome, but when you make the leap to really seeing, your everyday surroundings can be mined for nuggets!
For me, it started with a serious study of composition, light, art (color and depth), and design. Let’s take a closer look at all four and see how we can tie them together to help your creative vision. For this article, I will discuss my thoughts on composition and light. In Part 3, I’ll discuss the importance of art and design.
The Study Of Composition
The foundation of any good image is a strong composition. If you have a scatter-shot approach to your photography, perhaps you should re-think how you work. Fine Art landscape photography for me was just the opposite of my sports photography work.
I made my living with sports primarily because I loved the sports I was photographing, understood them almost as well as the coaches and players, and I was blessed with really good hand/eye coordination. I worked part-time for Sports Illustrated and started before autofocus lenses were a reality. That meant manual focus on fast-moving subjects with 400mm and 600mm glass. One could either do it or not. Somehow I was born with this talent. I went on to become team co-team photographer for the NHL’s San Jose Sharks (still am today).

San Jose Sharks Tomas Hertl scores a goal on a shot fired between his legs and over the shoulder of New York Ranger goalie Martin Biron
October 8, 2013, SAP Center, San Jose, California
Canon 1DX, Canon EF 28-300mm f/3.5-5.6L IS USM Lens, f/7.1/ 1/250th sync, ISO 200, PocketWizard MultiMax 32 Channel Transceiver Radio Slave, (8) Speedotron 2401SX 2400 Ws Power Supply (120VAC) and Speedotron 105 CC UV Quad-Tube Lamphead (220/240VAC), Lexar Digital Media
It means quick timing and and even quicker movements – pro hockey players move really fast! I’m at my best when I can find my zone (similar to the athletes). Once I get there, it seems as if everything goes into slow motion. Can’t explain this one either other than to say I go into a very deep concentration and block everything else out. It took me years to learn how to do this. I had to become emotionally unattached; in other words, when I am photographing a game, even if it involves my beloved Sharks, I cannot allow myself to become a fan, I am strictly a photographer and the players are my subject.
Once the emotion is gone, then I can really begin to concentrate on what I am doing. I try my hardest to focus my mind on what I am seeing through my camera. Anticipation is key, and staying as relaxed as possible is essential. If I’m tense, I can’t react – I’ll be a fraction off and that will be enough to cause me to miss the shot.
Pro athletes talk all the time about staying on an even keel. Former Shark, Torrey Mitchell, once told me and my sons that the Shark players had a rule: if they won, they got up for 5 minutes then came back to even; if they lost, they allowed themselves to get down for 5 minutes then had to get right back to even. Great advice for not only photography, but also life! In other words, being too high or too low messes with your ability to really see and concentrate. Try to stay as even keel as possible and you will be at your best to really tune-in to your subject.
When I go out to shoot landscapes, concentration and finding the zone are still key for me. But I am not rushing. It took me years to learn how to slow down (that was not part of my makeup when I was younger, but getting older is actually helping in that regard). Being on a tripod is key, but I don’t start there – I start with my camera off my tripod so I am more free to move around. Only when I find my composition do I bring in the sticks.
Moreover, I have to have an emotional connection to what I am photographing. I call this “paying attention to my emotional tugs.” When I am really in the zone, and really seeing well, then I have opened myself up to allowing these emotional tugs to communicate with me. I tend to make my best images when I am alone and really into this process; it’s nearly impossible to get there while I am teaching a workshop because my main goal is not my photography; rather, it’s helping my students with their photography. I take my camera along because it helps me see as a photographer and allows me to call out potential scenes to my participants.
I’m not big on compositional rules and theory. I keep it simple. In my mind, I assign visual weight to all the elements in my scene. I envision my composition sitting on a fulcrum point. I want the composition to feel balanced. If I add an element to the right of center, I try to counter-balance by adding an element to the left-of-center. It’s a feel thing and hard to put in to words, but I trust my inner sense of visual balance, you need to do the same. If the scene feels unbalanced, then study the composition and try to figure out why. It’s kind of like completing a puzzle, but only you can get the pieces to fit right.
I really enjoy this challenge and find it fun to work through each composition. Of course, when the light is rapidly changing, the whole process has to get kicked into high gear; yet, this can be mitigated by anticipating the light and finding your composition prior to the good light arriving.

Salsify Against Sunset Light
Canon 5DMKIII, Canon EF 100mm f/2.8L Macro IS USM Lens, f/5.6, 1/80th sec., ISO 400, Lexar Digital Media
Of course balance is just one part of composition, depth, or at least creating the illusion of depth, is another and one I will discuss more in-depth (pardon the pun) when we look at the study of art in Part 3.
But finding a good composition is only the starting point. Next, and perhaps more important, is finding the right light.
Finding The Light
It is no big secret that most fine art landscape photographers like working around the fringes of the day. Why? Because that is when the light is most interesting. That’s not to say you can’t find good quality light during the day, but I live in California, where 6 months out of the year we have blank-blue skies. Great for taking Chamber-of-Commerce images, but not fine art landscape images.
So that means getting up in the dark to be on-location 45 minutes prior to sunrise to photograph dawn light, and also staying well beyond sunset to chase dusk light.
In the image of the back-lit elm that starts off this article, I actually had to wait for the sun to crest Yosemite Valley’s Cooks Meadow. It was easy to see where the sun was going to rise and the unexpected bonus was the rising mist coming off the Valley floor. As soon as the sun crested, the elm tree exploded into vivid backlit yellows and the warm foreground grasses came to life!
Prior to the sun rising, this scene was pretty, but the light was boring. It allowed me time to think through my composition, at least a starting composition. Once the light arrived, I fine-tuned my composition (in this case, I moved the camera lower to the ground to emphasize the warm foreground grasses), which I could not see nor anticipate prior to the sun cresting.
The macro image of the salsify above was captured near sunset. I simply setup my camera, composed the shot, then waited for the sun to lower and warm the salsify. My earlier attempts were technically correct, but it was the warm light that gave this image its soul.
As the sun rises or sets, the light becomes warmer due to light-scattering. It has to do with the way light wavelengths are transmitted and I could bore you to death with it but I won’t. Suffice it to say, the cool rays of the spectrum are scattered allowing just the warm light to pass through. The light is directional and warm and fleeting, so be prepared.
Below you see an image of dancing sunflowers. I was out an hour before sunset attempting to freeze these sunflowers with a 300mm lens. Mother Nature had other ideas and decided to add a 25mph wind. As the sun lowered to camera-left and warmed the scene, I gave into my frustrations of trying to freeze the flowers and instead, allowed them to dance and paint themselves onto my camera’s sensor (as the tag line for the old commercial used to say, “you can’t fight Mother Nature).”

Dancing Sunflowers
Canon 5DMKIII, Canon EF 300mm f/4L IS USM Lens, f/5.6, 1/80th sec., ISO 400, Singh-Ray 77mm LB ColorCombo Polarizer Thin Mount Filter, Lexar Digital Media
Again, without the quality of the low-angled sunlight, this scene would have recorded too cold and uninteresting IMO, and earlier frames bore that out.
Please come back for Part 3, where I will explore the importance of studying art (color/depth) and design and show examples of how both can aide in improving your creative vision.
Free Video Sample :: Chapter 19 – Introduction to Luminosity Masks

2014 Photo Workshops – Complete List
2015 Photo Workshops
Software Discounts
Photomatix Pro 4.2 type in code at checkout: donsmithphotography 15% discount
Topaz Software type in code at checkout: SMITHPHOTO 10% discount
Helicon Focus click on link to receive 15% discount
Tony Kuyper Luminosity Action Palette click on link to receive a 15% discount
Hardware Discounts
MindShift Gear rotation180° Panorama rotating day hiker backpack
Special offer From Singh-Ray Filters: You will receive 15% off of any filter(s) you order when you call Singh-Ray direct and use my code – Smith 15: (800) 486-5501. Offer valid through June 13th!
Fujifilm XT-1 Mirrorless Camera :: Real-Life Impressions After Six Weeks Use
Posted on May 9, 2014

Common Large Monkey Flowers, Pinnacles National Park, California
Fuji XT-1, 60mm macro, f/5.6, 1/125, ISO 800
NOTE: BEFORE I BEGIN, I’D LIKE TO SAY THAT I AM BY NO MEANS AN EXPERT WITH THIS CAMERA. I WILL SAY THAT IT IS HEAVILY AUTOMATED RIGHT OUT OF THE BOX AND I AM OLD-SCHOOL; THUS, I’VE HAD BETTER LUCK MOVING FORWARD BY DISABLING MANY OF THE AUTOMATED FEATURES I FOUND THAT HINDERED MY CREATIVE PROCESS. I’VE ALSO GONE BACK TO THE 130 PAGE OWNERS MANUAL REPEATEDLY TO ADDRESS ISSUES AS THEY COME UP. THE LEARNING CURVE FOR ME WITH THIS CAMERA IS A BIT STEEP, BUT I AM GETTING THERE. IT SEEMS MANY OF MY INITIAL CONCERNS HAVE BEEN ELIMINATED BY SIMPLY SHUTTING OFF THE AUTOMATION. I PREFER TO SHOOT IN MANUAL MODE AND NOW HAVE THIS CAMERA SET-UP TO DO JUST THAT.
ALSO WORTH NOTING: I WILL MORE-THAN-LIKELY LEAVE SOMETHING OUT OF THIS REVIEW THAT IS IMPORTANT TO YOU BUT NOT SO MUCH TO ME AS TO WARRANT MY TIME WRITING ABOUT IT. FEEL FREE TO LEAVE A COMMENT AND I’LL DO MY BEST TO ADDRESS THE ISSUE. I AM ALREADY AWAITING A RESPONSE BACK FROM FUJI AS TO WHY THERE IS NO RGB HISTOGRAM (JUST A SILLY LUMINANCE HISTOGRAM), WHICH FOR THOSE OF YOU ADVANCED AMATEURS AND PROS IS INDISPENSABLE! I’LL ADD AN UPDATE AS SOON AS I HEAR SOMETHING. MY HOPE IS THAT AN RGB HISTOGRAM COULD BE ADDED VIA A FIRMWARE UPDATE.
AND NOW, WITHOUT FURTHER ADIEU, HERE’S MY REVIEW…
After having owned the new Fujifilm XT-1 mirrorless camera, with a 16.3 megapixel APS-C size sensor, for the past six weeks, I’m ready to share my “real-world” opinions.
First and foremost, I’m thoroughly impressed with this camera and lens system. I will show examples of the (4) lenses that I have purchased: 10-24mm f/4, 18-55mm f2.8-4, 55-200mm f/3.5-4.8, and the 60mm f/2.4 macro. These lenses are all very lightweight and sharp!
Let me start with this statement: I did not purchase the Fuji XT-1 with the intent on having it replace my Canon 5DMKIII or Canon Series II lenses for my landscape work, nor did I purchase it with the intent of replacing my Canon 1DX and Series II lenses for my pro sports work. Quite simply, I was looking for a bridge camera that would fill the gap between these pro level cameras and my iPhone5 (yes I do consider the iPhone a camera). It is an extremely light system (amazing the weight savings gained by removing the mirror-box assembly) that can go into a separate fanny pack and along with my Gitzo Mountaineer tripod with a Really Right Stuff BH-40 LR ballhead. I now have a lightweight system capable of producing heavyweight images! More on this soon.
Furthermore, this review is not intended to walk you through every menu and button on the camera (and God knows there are way too many IMO and there are a plethora of those type of reviews on the web); rather, I will approach this from a working pro’s perspective. How practical the camera/lenses are and how good they perform under real-life landscape location shoots. The images that will appear in this blog will be from a test shoot I did a few days back at Pinnacles National Park in central California (our 59th and newest National Park). I’ll also include one image from a recent scouting trip to Oregon’s Columbia River Gorge and one from a college golf tournament of my oldest son Rob.
The camera and lenses have been in my MindShift Gear bag since I first purchased the camera and 18-55mm lens as a combo from Robert’s Distributors (see offer/phone number below). I next added the 55-200mm, then followed up a few weeks later by adding the 60mm macro and the awesome 10-24mm.
I’ll approach this review in segments, so feel free to jump around if you are looking for one topic in particular. I’ll give both the pros and cons, but remember, this is just from my point of view.
Why I Purchased This System

© Fujifilm XT-1
As I briefly mentioned, this system is intended to be a “bridge camera” and not a “replacement camera.” Thus, I did not wish to purchase the Sony A7 or A7R. Fuji’s 16MP was fine for me and produces incredible files (45.7 in 8-bit). I res these files up to 52MB and I have no hesitation sending them off to my agency, Getty Images.
I wanted this system to take with me on my long hikes. After having partial knee replacement surgery last July, I’m happy to say my “new knee” is feeling great and my wife and I are starting to plan our summer hikes.
Moreover, I was ready to dive headfirst into the new mirrorless technology that I had been eagerly anticipating. After reading initial reviews on this camera, I felt the XT-1 was ready to fit my needs (and it will only get better from here).
So quite simply, am I using this camera for landscape? Yes, but only when I don’t feel like lugging my Canon gear. Am I using this camera for sports? No, not my pro sports; however, it’s an perfect camera for photographing my son Rob’s college golf tournaments.
Here is a caveat to think about when attempting to shoot sports with this camera: As you motordrive (the XT-1 allows for 8 frames per second) you will lose the live scene as you are looking at once the buffer fills; rather, you’ll see what is being recorded by the sensor. For golf this is fine as the subject is stationary. However, if I was trying to track let’s say a runner coming at me or zig-zagging, I would lose the subject as these images started writing. Before mirrorless gets to “prime-time” status, this will have to be addressed.

Rob Smith, Monterey Peninsula JC Golf Team, Cordevalle Golf Course, San Martin, California
Fuji XT-1, 55-200mm @ 110mm, f/4.2, 1/1000 sec., ISO 200, polarizer
Just wanted to make that statement for those of you interested in this camera for sports shooting. But the emphasis of this article is to address landscape photography and this camera and lenses have more than met my expectations.
Let’s Talk About the Camera
Obviously the camera is cool-looking with it’s retro-styling. I love that Fuji has moved the most important exposure adjustments to dials like the old-day film cameras that I grew up with – a bit of nostalgia here! There is a dial for setting shutter speeds in full stops (and adjustable in 1/3 stops with the aid of a dial), a dial for ISO (also with 1/3 stop intermediate settings), and my four lenses have an actual aperture ring on the lens itself (also adjustable by 1/3 stops via and adjustment dial).
I love that the Fuji engineers have added those three features (exposure compensation – which I don’t use – is also on a separate dial).
What I don’t like is that there are so many other buttons that it is easy to accidentally touch something and change a setting. A couple weeks ago I was using the XT-1 in the Columbia River Gorge to photograph Wahclella Falls. My first compositions were vertically oriented. The camera actually allows you to make a setting so all the pertinent information rotates from vertical to horizontal orientation.
Here is a RAW file (that can now be processed in Lightroom 5) from that first series using the 18-55mm lens.

Wahclella Falls, Columbia River Gorge, Oregon
Fuji XT-1, 18-55mm @25mm, f/16, 8/10th second, ISO 200, polarizer
As I readjusted the camera to horizontal orientation (my L-bracket from Really Right Stuff has not yet arrived so I am having to lay the camera over with the ball head only), I somehow hit one of these buttons, which somehow took me out of RAW mode and placed me into JPEG mode only (I still do not know where I went wrong). Unfortunately, the JPEG file, captured in 8-bit, left no control over the highlights in the water, which were 1.1 stops overexposed. This would have been no problem for a RAW file to recapture, but were toast in the JPEG file.
This leads me to my next gripe. Fuji engineers opted to place a extremely small Luminance-only Histogram instead of allowing for an RGB Histogram. I thought this absurdity was addressed about 5 years ago by all digital camera manufactures. I was negligent in not watching my histogram close enough, and because I somehow got into JPEG only, I lost a really nice image.
I would hope that Fuji could rectify this with a firmware upgrade, then again I am not a camera engineer.
My last complaint with the camera is that the back buttons, used to allow the user image and menu scrolling, do not protrude enough from the camera and are hard to work with large fingers, and virtually impossible to work with gloves.
Lastly, and this isn’t a knock on the camera itself, everything is reversed from my Canon camera. I can change the direction the way the lenses focus via a menu setting, and may still do so. It is just a rather steep learning curve working through an entirely new camera and menu system. It gives me a whole new appreciation of what my workshop students go through when working with a new camera!
My advice is to not even look at the 130 page camera manual. Just review some basics and get out there shooting. Then, as needed, go back to the manual to address certain issues.
I’ve found that I have disabled most of the automation that the camera is set to by default. The focus system was really a problem as I work in manual mode. Every time I would try to fine-tune the focus, it would target the middle of my scene and blow it up 500%! I’ve disabled this and can now focus on regions such as the lower rocks in this scene. If you are conscious of adding foreground elements to your landscape scenes, then you will probably want to disable this function.
The great news is that when shooting in the manual mode, you still have a back-button autofocus by default – way to go Fuji!

Cracked Granite and Lichen, Pinnacles National Park, California
Fuji XT-1, 55-200mm @110mm, f/14, 1/2 second, ISO 200, polarizer
One more note: Fuji advertises this camera as “weatherproof,” which leaves a lot of questions in my mind. Does that mean “waterproof?” They do say there are 80 points of weather resistance from moisture to dust. Short of dumping my camera into a bucket of water (sorry gang, ain’t going there), I’ll have to defer to those of you who have had experience shooting with this camera in heavy precipitation.
Fuji’s other claim of “fastest autofocus in its class,” could be correct, but it doesn’t come close the matching the autofocus in any of my pro level Canons (1DX, 5DMKIII, or 1DMKIV).
As for the file itself, Fuj uses the same X-Trans CMOS II sensor as the celebrated X-E2. It does not use an optical low-pass filter so the images are very sharp at capture!
According the Fuji’s website: The X-T1’s X-Trans II sensor controls moiré and false color generation by using an original color filter array with a highly randomized pixel arrangement. This removes the need for an Optical Low Pass Filter (OLPF) that degrades resolution.
The ERR Processor II corrects even fractional blurring at the edges of the lens, as well as diffraction blur caused when narrowing the aperture. Image quality is further enhanced by the inclusion of a Lens Modulation Optimizer (LMO) for interchangeable lens cameras. This advanced technology has been made possible by the integrated development of lens, sensor and processor and is based on the optical performance and characteristics of each individual lens to maximize its resolving power.
One sad note (as I understand it) is that Lens Modulation Optimizer does not apply to RAW files, only those captured in JPEG mode!

One more note about the camera. The XT-1 allows for (4) viewing modes on either the EVF (electronic viewfinder), or the flip-out LCD, or both!
Here is what each does: Four different display modes: Full, Normal, Dual and Vertical.
- Full mode: Displays shooting information at the top and bottom of the screen to avoid obstruction of the view.
- Dual mode: Adds a small second screen for checking focus point with Focus Peak Highlight or Digital Split Image*4.
- Normal mode: Lets you concentrate on framing the shot in Auto Focus mode while keeping you aware of how the shooting conditions are changing, making it the perfect setting for sports and action photography
- Portrait mode: When in Full or Normal modes, it rotates the shooting information interface when the camera is turned vertically.
The camera also uses an eye-detection software that allows for the EVF to be activated as you put your eye to the viewfinder!
What about the Lenses?
Now let’s move along and talk about the glass itself. I can say that similar to the camera, the lenses I purchased have far exceeded the quality level I was anticipating. So much so, that I added the 10-24mm and the 60mm macro to round out my system.
In terms of focal length (equivalent to 35mm), I now have a range of glass from 16mm (10 mm) to 300mm (200mm) and a 90mm (60mm) macro!

Closing Down For The Day, California Golden Poppy, Pinnacles National Park, California
Fuji XT-1, 60mm macro, f/2.4, 1/1000th second, ISO 800
As I said, I was blown away by the quality of what Fuji calls it’s “kit lens,” the 18-55mm lens that came with the camera. If I can find any fault, it would be in the corners of the 10-24mm in RAW mode only. As I mentioned, the Lens Modulation Optimizer feature that is accessed via a menu setting can only be applied (to my knowledge) to JPEG files – bummer! This feature improves definition by adjusting for diffraction and the slight loss of focuses at the periphery of the lens (I have not run RAW vs. JPEG tests to confirm the difference – will do at some point).
Quite frankly, the quality of these lenses are about 90% of my Canon Series II glass (that’s just an educated guess looking at files from both systems over the past 6 weeks and not any actual lab testing). In other words, this is my real-world opinion.
One thing you will quickly learn with these lenses is that they are also very heavily automated. In fact, I recently just upgraded the firmware – yes for the lenses not the camera, that resulted if faster autofocus. That was a first!
What About Wireless Control?”
This feature is very cool! It’s a bit quirky getting it setup (I remember sitting in Starbucks trying to get it figured out. But once set up, it works)!
This feature, among other things, allows you to control the camera from your smartphone or mobile tablet via a Fujifilm Cam Remote app. You have to establish the initial connection via WiFi and it is a bit glitchy; however, once connected, it does indeed work.

© Fujifilm Cam Remote App
As you can see, the app allows for control of all the basic setting plus you can autofocus by simply touching an area of the image – now that’s high tech!
I must admit that I have not had time to fully test this app, but I had a great time composing, exposing and focusing various Starbucks customers! Watch out – big brother is watching 🙂
How Does the XT-1 Handle Noise?
I would think by now most of you are aware that just because a camera manufacturer establishes a ISO range, that doesn’t mean it has any practical usage (unless you law enforcement working surveillance).
For my work, 3200 would be the highest that I would feel comfortable using this camera without having to radically deal with noise during processing. Fuji allows ISO settings as high as 51,000 in its H2 mode (good luck to those who go there)!
Closing Thoughts
What I thought I was purchasing, and what I happily ended up with is a lightweight system that produces professional files.
Besides the lenses, I also added a Vertical battery grip VG-XT1, and a Remote release RR-90. I lost my eye piece the first day of shooting (my fault, was hiding the camera under my jacket in a heavy rain storm and knocked it off), and have managed to lose my remote cord (a new one arrives today)!

Gray Mule Ears, Pinnacles National Park, California
Fuji XT-1, 10-24mm @20mm, f/16, 1/2 second, 200 ISO
Other than that, just a few other random items to note before wrapping up:
Batteries: they drain fast because you are essentially shooting in “Live View” mode 100% of the time. Thus, have extra batteries on hand and/or purchase the battery grip.
SD Cards: The XT-1 is compatible with the newer SDHC and SDXC memory cards.
Movies: Did not test, but movies can be recorded.
OIS Lenses: Fuji’s Image stabilization – works great for handholding.
Flash: The XT-1 ships with a shoe-mounted flash that allows for Auto, red-eye reduction, slow sync, and rear-curtain sync. Also can remote via other flash units. I haven’t tested much.
LCD: 2.36 Million Pixel OLED, High Magnification .77x – 31 Degree angle of view – Display lag 0.005 sec – a very kick-ass LCD – the best I’ve worked with!
Intelligent Face Detection: Another very cool option where the camera detects faces in the scene and focuses on the eyes. I haven’t tested it much but I’ve read reviews from portrait specialists who claim it works great!
One More Thought To Close On!
For roughly $3500.00, I have an entire setup that I could live with for years to come (though I know the camera will be updated frequently). By comparison, I spent more than this on my Canon 5DMKIII alone!
I believe mirrorless is here to stay (already accounts for over 60% of total camera sales in Japan alone) and things will only get better due to tight competition between camera manufactures. When they compete, the consumer ultimately has to be the winner. Hey Canon, are you hearing the noise?
Free Video Sample :: Chapter 19 – Introduction to Luminosity Masks
2014 Photo Workshops – Complete List
2015 Photo Workshops
Software Discounts
Photomatix Pro 4.2 type in code at checkout: donsmithphotography 15% discount
Topaz Software type in code at checkout: SMITHPHOTO 10% discount
Helicon Focus click on link to receive 15% discount
Hardware Discounts
Check Out The New May offerings from our friends at Think Tank (receive a free product when placing an order)!
MindShift Gear rotation180° Panorama rotating day hiker backpack
Robert’s Distributors – 10% off any regularly priced camera bag and a free memory card wallet with any purchase. Call John or Nick at 800-726-5544 and reference you saw this posted on my blog site.
Tips For Better Wildflower Photography – An Evening In The Columbia River Gorge
Posted on May 3, 2014

Mt. Hood Under Dusk Skies, Columbia Hills State Park,
Columbia River Gorge, Washington
Canon 5DMKIII, 70mm, f/16, 1/8th sec., ISO 3200, Singh-Ray Thin LB Polarizer, Singh-Ray 2-stop GND
I just returned from one of the most beautiful spring locations that I have ever photographed – the Columbia River Gorge!
It was part of a scouting trip with Gary Hart for a planned co-workshop next April 2015 (details to be released soon).
Both of us had visited and photographed waterfalls in the gorge last year. We knew the area was perfect for a workshop offering, but we also knew we had to scout locations for sunrise/sunset shoots and had no idea where to begin.
Prior to the internet, this information was discovered through word of mouth and pouring over lots of books. Nowadays, the internet is, well, a starting point. Then the real work begins in the form of scouting the sites at the exact time we plan on taking our participants.
This resulted in plenty of 15 hour days, but the beauty made it worth the effort.
For those of you who have never been to the Columbia River Gorge, it is located east of Portland where the Columbia River rolls through mountains bordering northern Oregon and southern Washington. We had booked our hotel along the river in scenic Hood River, Oregon, which put us in the middle of most of our locations, including the incredible waterfalls.
The accompanying image was captured well after sunset from Columbia Hills State Park in Washington after talking to a couple of park rangers earlier in the day. We scouted (and shot) the location but knew it would photograph best at sunset.
I had this composition in mind prior to arriving and just hoped that Mt. Hood (located in Oregon across the river) would be visible. The hillside was alive with peak bloom of lupine and balsamroot.
After the sun had set, I placed my tripod low to the ground to give prominence to the flowers. Fortunately Mt. Hood was visible and a 2-stop Singh-Ray GND brought the sky exposure in-line with the foreground flowers and hills.
There was a bit of a breeze, so I had to raise my ISO at that point to 3200 in order to get a 1/8th shutter speed to freeze to bobbing flowers. It was a trade-off I was hoping not to make, but reducing my depth-of-field by going to f/11 was not an option as the depth was already minimized by my short distance to the near flowers.
These are the decisions that race through all our minds at the critical time that the light is perfect. Of course I wished I could have used an ISO of 100 or 200, but the flowers would have been blurred.
One’s ability to “think-on-the-fly,” is crucial and made somewhat easier with experience (at least decisions get made quicker). This combination of ISO, shutter speed and aperture was the best solution for me.
Here is a checklist that might help you the next time you are out capturing spring flowers:
* Scout your locations, if possible, before arriving.
* Plan to either arrive in the dark (if shooting at dawn), or stay well after sunset (if shooting dusk). This tends to be the calmest time of the day in terms of wind as ground and air temps tend to neutralize reducing up-drafts.
* Get low and close to your foreground flowers, or use a telephoto. You want to create depth and flow to your composition. Make sure your scene has pathways so the eye can move through the frame.
* Remember, successful landscape photography is often about trade-offs. Be willing to compromise to get the image. If wind is blowing too hard, make your scene wider so blowing flowers are not as much of a distraction.
* Shutter speeds are key. Thankfully digital allows us to see what is happening. Don’t forget to be patient and time the lulls in the breezes. Have remote in hand and fire as soon as you feel the breeze start to die down.
* Similar to what I did for this image, raise your ISO to allow for a faster shutter speed, especially if you don’t feel you can compromise with your depth-of-field. This involves knowing where your camera’s noise threshold is. You do this through testing before critical shoots.
* Balance your skies with a graduated neutral density filter or bracketing and blending exposures.
* Use a polarizer to help cut the sheen off the flowers thus adding saturation in the color. All foliage has a waxy sheen that reflects even off of indirect light (cloudy days, dusk/dawn, fog, etc.). Be prepared to hear, ‘you Photoshopped this image,’ from the people who don’t understand how to properly use polarizers and/or think they are simply a sky filter.
* Look for flowers facing your direction and use slopes of hills to guide eyes through the frame.
Free Video Sample :: Chapter 19 – Introduction to Luminosity Masks
2014 Photo Workshops – Complete List
2015 Photo Workshops
Software Discounts
Photomatix Pro 4.2 type in code at checkout: donsmithphotography 15% discount
Topaz Software type in code at checkout: SMITHPHOTO 10% discount
Helicon Focus click on link to receive 15% discount
Hardware Discounts
MindShift Gear rotation180° Panorama rotating day hiker backpack
Robert’s Distributors – 10% off any regularly priced camera bag and a free memory card wallet with any purchase. Call John or Nick at 800-726-5544 and reference you saw this posted on my blog site.
A Funny Thing Happened On The Way Out Of Surgery…
Posted on May 1, 2014

Lightning Strike on Mt. Wooley, north rim, Grand Canyon National Park
Canon 5DMKIII, 35mm, f/22, 1/10th sec., ISO 50, Singh-Ray Thin LB Polarizer
Without a doubt, my favorite lightning image did not come about easy. It did not just happen, and yes, it did scare the you-know-what out of me!
This scene took place last August in-between two Grand Canyon Monsoon Photo Workshops co-taught by both Gary Hart and myself (please click link for details about this summer’s workshops – we only have a handful of sports remaining).
We had finished the first of two workshops on the Canyon’s north rim on a Friday. The next day we were off to scout a few new locations we had found on a topo map (off the beaten path). About 10 am, we noticed the sky to our east was turning seriously dark.
It was about a twenty minute drive to Point Imperial (elevation 8803 feet) and sure enough, just as we arrived, the show began.
We both use Lightning Trigger IV by Stepping Stone Products L.L.C. The unit attaches to the camera’s hot shoe and is connected via the remote connector (which Rich Davis makes when you order the product).
During the workshop, we teach students how to best use the Trigger, with optimum shutter setting’s between 1/4th sec., to 1/15th sec.
The rest involves tracking active cells and some guesswork as to where the cell is moving. Then, we combine this with our knowledge of the Canyon to get our participants to the best (and safest) location to photograph. It also involves some inherent risk as lightning can jump miles from one spot to the next. Essentially, if you can hear thunder, you are in range of being hit.
Knowing all this still did not deter us from getting out on the point to photograph this scene. Perhaps it is that lure of danger, I don’t know, that makes otherwise sane people do stupid things – like photograph lightning. But the resulting images are nothing short of spectacular!
This image was created soon after two active cells collided. At most, we were perhaps 5 miles (hard to judge) from where this lightning was striking – definitely not a safe area, but neither of us wanted to leave. It was as if we were in a trance knowing the opportunity for an awesome image could happen any moment.
Soon after I captured this image, the cell shifted and a deafening crash of thunder hit immediately overhead followed by pelting hail. Everyone ran for the cars – everyone except me. I was a month removed from a partial knee-replacement surgery and running was simply not going to happen.
I heard the voice of Dr. Ting in my ears saying, “you are a three-legged dog. Forget about the knee.” And forget I did. Amazing what a human being is capable of when a surge of adrenaline and the fight-or-flight sensation kicks in. I basically hopped and sprang off my good leg all the way back to the car and made it, all while wondering was the next strike going to get me?
As we waited out the storm, we eagerly chimped through our take and I discovered this image. I couldn’t believe what I was seeing!

Lighting Strikes and Partial Rainbow at Sunrise, Bright Angel Point, north rim, Grand Canyon National Park
Canon 5DMKIII, 75mm, f/13, 1/13 sec., 100 ISO
Over the weekend, the storms unfortunately died down, but then our next workshop began on Monday. Each day got better in terms of lightning activity until the climax on the final morning of the workshop. We seriously thought of not even taking our cameras as we had no idea that a lightning cell had settled in over the south rim
In the dark, we hiked the group out to Bright Angel Point, and proceeded to photograph lightning for the next two hours. As the sun began to rise, it skimmed the Canyon and a partial rainbow came out while my trigger captured these multiple bolts. An amazing sight and an unforgettable way to end the workshop!
We’d love to have you join us this August as we do it all over again. Our first workshop is once again sold out but we do have a handful of openings in the second:
Free Video Sample :: Chapter 19 – Introduction to Luminosity Masks
2014 Photo Workshops – Complete List
2015 Photo Workshops
Software Discounts
Photomatix Pro 4.2 type in code at checkout: donsmithphotography 15% discount
Topaz Software type in code at checkout: SMITHPHOTO 10% discount
Helicon Focus click on link to receive 15% discount
Hardware Discounts
MindShift Gear rotation180° Panorama rotating day hiker backpack
Isolate Sharpening Through A Mask
Posted on April 12, 2014

Dueling Light Shafts,
Canon 5DMKIII, 150mm, f/16, 1.6 sec., 800 ISO
During last month’s Northern Arizona Workshop, I took my group to Upper Antelope Canyon. The first portion of the tour centers on capturing the iconic light beams produced as the sun passes over the narrow opening of the 100 foot deep canyon.
This image was quite a surprise. In fact, I didn’t realize that I had captured split light shafts until a recent edit.
It was important during the sharpening phase of my edit (generally the last step in the process), to protect the softness of the light shafts. Here is how I went about it.
I created a mask using Tony Kuyper’s luminosity masks in Photoshop CC to select the white shafts. I did this in two steps. First, I used a Light Lights selection to select just the shaft. Tony’s masks works on the image’s tonality (not color) to make mask selections. You can see in the screen shot that the image turns into a black and white. The marching ants show the main selection, but all of these masks are self-feathering, so I knew the majority of my mask selection was just the shafts.

A selection means that what is selected is where the modification (sharpening) will take place. Thus, I needed to inverse my selection to protect the shafts. To do this, while the selection was active, was to go to Select > Inverse.

Now the selection includes all of the sandstone walls and not the shafts.
Now it is time to sharpen. I use Nik Sharpener Pro, but this techniques will work with Photoshop’s sharpening filters also. In this next screen shot, you can see what will be sharpened while the light shafts are gone (checkerboard background as they are protected by the mask).

Notice that the selection has automatically been feathered for a smooth transition!
Masks are a great way to work on your images. If you would like to learn more about how to process your images professionally, please consider purchasing my video tutorial, “A Simplified Method to Workflow” which contains (26) downloadable videos and contains more than 6 1/2 hours of instruction!
I also teach workflow and vision techniques in my workshops. Would love to have you join the fun!
Free Video Sample :: Chapter 19 – Introduction to Luminosity Masks
2014 Photo Workshops – Complete List
2015 Photo Workshops
Software Discounts
Photomatix Pro 4.2 type in code at checkout: donsmithphotography 15% discount
Topaz Software type in code at checkout: SMITHPHOTO 10% discount
Helicon Focus click on link to receive 15% discount
Hardware Discounts
MindShift Gear rotation180° Panorama rotating day hiker backpack
March Madness!
Posted on March 11, 2014

Kalalau Valley, Kauai, Hawaii
Canon 1DsMKIII, 16mm, f/22, 2.5 seconds, ISO 200, Singh-Ray Thin LB Polarizer, Singh-Ray 2-stop GND
NOTE – DUE TO A CANCELLATION, ONE SPOT HAS OPENED UP FOR MY APRIL 14-17 SPRING BIG SUR WORKSHOP.
March Madness has begun for me – and I’m not talking college basketball!
If any of you reading this blog are self-employed, then you know you have “busy seasons,” and “not-so-busy-seasons.”
March is my ultimate “BUSY SEASON!!!”
First off, I’m not complaining. I think I have a dream job (career). I’m living my passion and have a beautiful wife who supports me, and two awesome sons. They are the love of my life and my number one priority.
But they also know that I can get very busy this time of year. Besides being a workshop instructor and stock contributor to Getty Images, I am also co-team photographer for the NHL’s San Jose Sharks. We are in the stretch drive for the playoffs and we just finished off the team photo yesterday.
Today, I am packing for Phoenix, Arizona for three weeks of travel/workshops stating at the Grand Canyon this Friday. From there, we will continue on to Page (Upper Antelope Canyon Photo Tour and Horseshoe Bend), then caravan on to red rock heaven, Sedona!
I return home on the 19th and will shoot two games in three nights for the Sharks before hopping on another plane destined for Maui (try not to feel to sorry for me here).
So why the picture of beautiful Kauai? Because that’s the next workshop that I have openings available. We have (3) as of this writing and would love to have you join us in tropical paradise this June 20-24. Gary Hart will be with me as co-instructor. If you are interested, click on the link below.
After that, it will be two more weeks of NHL games and then the playoffs (the absolute best time of the year for a hockey nut like me). In April, I will hold my Spring Big Sur Workshop (which is sold out).
Yes, I live a charmed life and I am the first to admit it. But when I looked at my calendar for this month, I realized I do not have a day off. I know, I can hear you, “your whole life is a day off.”
Well yes and no. It is a blast and I love every minute of it. But it is also work and responsibility. I have to make sure everything runs smoothly on the workshops. Maui is Gary Hart’s workshop and I will be second instructor (he is helping me in Arizona).
On top of all this, I run a commercial sports portion of my business where I oversee six photographers. I have one person who is like my superintendent, Nick Lust, and I would be lost without him. I would also be lost without the help from my wife Beri.
I have met and made friends with some very special people in this business. Mike Hall, Nick, Scott Schilling, James Guillory, Pierre Steenberg and Gary Hart are just a few who are at the top of the list. I say a prayer every night thanking the Lord for all the blessings in my life.
As Scott tells me, “you are living the dream!” He is so right.
April will be here before I know it. For the remainder of March, my blogs will be a bit shorter and if you email me, it will take me a bit longer to respond.
So why the picture of beautiful Kauai? Because that’s the next workshop that I have openings available. We have (3) as of this writing and would love to have you join us in tropical paradise this June 20-24. Gary Hart will be with me as co-instructor. If you are interested, click on the link below.
Gotta run. Lot’s on the agenda. March Madness is in full swing 🙂
Free Video Sample :: Chapter 19 – Introduction to Luminosity Masks
2014 Photo Workshops – Complete List
2015 Photo Workshops
Software Discounts
Photomatix Pro 4.2 type in code at checkout: donsmithphotography 15% discount
Topaz Software type in code at checkout: SMITHPHOTO 10% discount
Helicon Focus click on link to receive 15% discount
Hardware Discounts
MindShift Gear rotation180° Panorama rotating day hiker backpack
Think About Pathways to Create Flow in Your Compositions
Posted on February 11, 2014

Winter Morning, Dead Horse Point State Park, Utah
Canon 1DsMKIII, 16mm, f/16, 1.6 sec., 100 ISO, Singh-Ray Thin LB Warming Polarizer
It’s important when composing a scene to think about visually moving your viewer’s eye. I call this “creating pathways or creating flow.”
Conversely, it’s also important to be aware of the edges of your frame to stop the eye from exiting the scene, I call these “eye-leaks.”
Let’s take a look at both of these concepts in this image I captured on a cold morning at Dead Horse Point State Park in Utah.
While walking the rim looking for a foreground, I came across this U-shaped juniper. I loved how the shape mimicked the U-shape of the Colorado River over 1,000 feet below – awesome – I found my foreground, mid-ground and background. Note that I started my search in the dark to ensure that I would be ready once the warm dawn light arrived.
My next consideration was looking for pathways to move my viewer’s eye through the scene. The human eye will follow lines, either real or implied, and this scene had plenty of lines to observe and analyze.
I like to turn on my Live View and contemplate the glowing LCD as if I were looking at an image hanging in an art gallery. I asked myself if I was working the eye through the scene without allowing it to exit.
As you can see with my overlay of arrows below, this is what I visualized in my mind:

Once I found my composition, the next step was to determine the aperture. For this particular scene, I needed a lot of depth-of-field. Because I was framed at 16mm with a full-frame sensor, I determined that f/16 would be fine. I quick check of my hyperfocal app would have confirmed this, but I opted to do a test frame instead and then I enlarged the image on the back of my LCD and toggled around to check that every element was sharp.
Next I started to observe the directions of the lines in the scene. I had many rounded lines that all led to the Colorado River. Midway up either side of the frame I had horizontal lines. The key there was in processing to make sure I burned down the corners of the sandstone slightly enough to hold the eye in the frame.
Eye-leaks can happen if a predominant line leads the eye out of the scene and/or if there is a bright spot somewhere on the perimeter of the frame. The eye will naturally be drawn to the brightest area of the scene so we certainly don’t want that on the edge.
With all that mentally checked, I proceeded to capture my image, holding down the tonality of the sky with a 2 stop graduated neutral density filter.
Think about flow in your next composition. Allow your viewer’s eye clear pathways to move through the scene. I believe that in doing this, you will aide to the visual flow of the image and engage your viewer longer as they view your image – which is a good result to have!
Free Video Sample :: Chapter 19 – Introduction to Luminosity Masks
2014 Photo Workshops – Complete List
2015 Photo Workshops
Software Discounts
Photomatix Pro 4.2 type in code at checkout: donsmithphotography 15% discount
Topaz Software type in code at checkout: SMITHPHOTO 10% discount
Helicon Focus click on link to receive 15% discount
Hardware Discounts
Special Year End “Black Friday” Offer From Think Tank Photo NOTE: (Use Promo Code WS-643)
Memorable Moment :: Horsetail Fall, Yosemite National Park
Posted on January 25, 2014

Horsetail Fall, Yosemite National Park, February 18, 2009
Canon 1DsMKIII, 180mm, f/11, 1.5 sec., ISO 100
Let’s face it, nature’s phenomenon’s are cool to photograph!
Each February brings the potential for a chance at photographing Yosemite’s famed Horsetail Fall, a small seasonal fall fed by snowmelt from high atop Yosemite’s El Capitan.
The fall itself can be something of a challenge to locate. I discovered this fact back in 1998, the first year I ever attempted finding and photographing the tiny fall made famous by the Galen Rowell image that appeared in his book, Mountain Light.
Unlike its larger brethren (Yosemite Falls, Bridalveil Fall, Vernal Fall, and Nevada Fall, this tiny fall clings tightly to the side of the giant monolith and is not immediately noticeable.
When conditions are perfect, what looks like red lava spilling down the side of the monolith is actually directed rays of light from the setting sun that align perfectly with the tiny fall.
NOTE FOR THOSE WHO HAVE NEVER WITNESSED THIS PHENOMENON IN PERSON: Other than setting the white and black point and adding a touch of contrast via an S-Curve to the midtones in Lightroom, this is exactly the color the fall looked. I have actually gone back to the RAW file and tried, unsuccessfully, to saturate the red. It was already at maximum saturation thanks to Mother Nature!
Early last February, I wrote a blog where I said, “On February 18, 2008, I witnessed and photographed Horsetail at its blood-red state. I was atop a snow mound along Southside Drive with two of Gary’s (Gary Hart) workshop participants and another good friend of mine who happened to make a day trip from the Bay Area. We were surrounded by well over 100 photographers. Approximately 25 minutes before sunset, the sun’s rays were obscured by clouds and the light abruptly fell off of Horsetail. I told our group that we were staying until 15 minutes past posted sunset. As sunset came and went, most of the assembled group packed and left. Then, exactly three minutes after sunset, a warm pink glow appeared in the middle of the fall and within a minute, had spread from top to bottom and lasted for another 3 1/2 minutes. It was the blood red light that looked as if someone had opened a valve on molten lava – it was beyond amazing!”
“So what conditions are required for this light? That’s the million-dollar question and one that I have yet to hear a definitive answer.”
I had never before, nor since, seen this fall lit top-to-bottom with this light – that is how elusive it is.
So what conditions are required for this light? That’s the million-dollar question and one that I have yet to hear a definitive answer. I have been contacted quite a bit for my own opinions since capturing this image. Last year a production company from the BBC contacted me to be a part of a documentary they were filming (that appeared on our country’s The Weather Channel) about Nature’s Phenomenons. Unfortunately, schedule conflicts prevented me from being able to conduct the interview (I was in Maui and the studio portion of the documentary was being filmed in Colorado), but this image was used.
What I can tell you is this. On the evening I made this image, and on another evening where I saw somewhat similar conditions, there were broken clouds hovering over Yosemite Valley. There also needs to be adequate snow atop El Capitan, temperatures warm enough to melt the snow, and a window starting February 16th-23rd for top-to-bottom light.
I’ve heard various theories that the setting sun’s final warm rays bend up-and-over the horizon and align precisely with the fall (that fact I will concur and have witnessed on clear-sky evenings). I’ve further read or heard that the intensity or saturation of the red is the scattered light being re-directed from the clouds. I’ve also read that Tule fog (a thick ground fog) in the central Valley helps. Is all this true? I have no idea – sorry!
I do know this. The chance at capturing this scene has lured photographers from around the world. On any given late-afternoon, photographers numbering in the 100’s can converge on two primary viewing locations (the picnic area located off Northside Drive where Rowell made his image, and from the banks of the Merced River off Southside Drive – approximately 9/10ths of a mile from the Cathedral Beach picnic area – where this image was captured).
I’ve been asked numerous times if I shot this from an elevated perch and the answer is no. I was actually on a snowbank in the middle of the Merced River. I agree that it does look as if I am shooting down at the fall, but I believe it is an illusion due to the slope atop El Cap.
The dates for this year’s window is rapidly approaching, but we desperately need some snow. California has been enjoying springlike conditions for the past 5 weeks. It’s time for winter to arrive!
2014 Photo Workshops – Complete List
5th Annual Kauai Workshop – Garden Isle and Tropical Paradise – June 20-24, 2014 (3 spots remaining)
2015 Photo Workshops
Software Discounts
Photomatix Pro 4.2 type in code at checkout: donsmithphotography 15% discount
Topaz Software type in code at checkout: SMITHPHOTO 10% discount
Helicon Focus click on link to receive 15% discount
Hardware Discounts
Special Year End “Black Friday” Offer From Think Tank Photo NOTE: (Use Promo Code WS-643)
Build An Image In Your Mind
Posted on January 8, 2014

Winter Evening, Soberanes Point, Garrapata State Park, Big Sur Coast
Canon 5DMKIII, Nikon 14-24, f/22, (4) bracketed exposures blended with masks in Photoshop CC, ISO 100, Fotodiox circular polarizer
It’s a new year and yesterday it was time for me to get back with my camera and try and make an image. I use the term “make” as opposed to “take” in a deliberate sense.
Many of my best images are created in my mind prior to me ever putting a camera to my eye. Experience has taught me to “slow down” and access what it is about a location that I wish to capture (quite the opposite of my sports photography).
I feel it is a huge mistake to simply walk out on a location and immediately put a camera to my eye (though at times that technique does serve to jump start my creative juices).
I arrived on location late yesterday afternoon and had originally wanted to get down onto the small cobblestone beach you see at the edge of this cove. Unfortunately, the trail was closed for renovation, so it was time for Plan B!
Sunset was a mere 35 minutes away, which left no time to depart for another location; thus, it forced me to take account of what was in front of me and to try and assemble an image by using the elements I had to work with.
My first attempt was a composition looking up the coastline (to the right of this image). I then switched to my Nikon 14-24 and set it at 14mm. I loved the two sea stacks in my midground and the vibrant non-native ice plant – I had my foreground and my mid-ground identified – I was off and running.
It was easy to deduce where the sun would be setting once it dropped from behind the cloud bank. I would have a small window of opportunity once it slipped into the thinner veil of clouds. I would then lose it completely when it got onto the horizon due to the thick buildup of clouds. I needed to be ready!
“I then switched to my Nikon 14-24 and set it at 14mm. I loved the two sea stacks in my midground and the vibrant non-native ice plant – I had my foreground and my mid-ground identified – I was off and running.”
I had decided that I would bracket my exposures and later assemble the frames in Photoshop using layer masks (a technique I teach in my workshop). The Fotodiox polarizer is 145mm in diameter and I do not have grads that size; thus, blending images was my only option. With such an irregular horizon, it was also the only practical option.
As I awaited the sun’s arrival into the break in the clouds, I paid attention to where I set the crop for this image. I wanted to include the Whale’s Hump (top left) but stop the frame midway down the left slope as an ugly telephone pole resides there.
I also allowed the cove to complete (cutting this line would have taken my viewer’s eye out of the frame).
My key problem initially was that the furthest point of the headland in my foreground was merging with the right sea stack. I repositioned myself until I could create an opening for the water (to merge the two would have made them look as one).
Eventually, the sun slipped into the opening in the clouds, and at an aperture of f/22, I was able to capture a bit of a sun star!
This image was made in my mind prior to me ever taking a frame. I was happy with the final image as it closely matched what I had imagined. A fun evening and a beautiful way to end my day!
2014 Photo Workshops – Complete List
5th Annual Kauai Workshop – Garden Isle and Tropical Paradise – June 20-24, 2014 (3 spots remaining)
Software Discounts
Photomatix Pro 4.2 type in code at checkout: donsmithphotography 15% discount
Topaz Software type in code at checkout: SMITHPHOTO 10% discount
Helicon Focus click on link to receive 15% discount
Hardware Discounts
Special Year End “Black Friday” Offer From Think Tank Photo NOTE: (Use Promo Code WS-643)
Capture and Post-Processing; Learn Both Sides Well
Posted on January 2, 2014

Cottonwoods and Clearing Storm, Grand Teton National Park, Wyoming
Canon 5DMKIII, 175mm, f/16, 1/8th sec., 100 ISO, Singh-Ray CC Polarizer
Perhaps the question that I least like hearing but nonetheless get asked all the time is: “did you Photoshop that image?” Let me answer in one simple word – YES!
Now let me explain. There are really two distinct phases of digital photography: the capture and post-processing. To be a good photographer, one really needs to understand how to control both.
It all obviously starts with the capture side. That begins with allowing something in nature to “grab” your attention, something that stirs your emotions. With this image, it was the glow of the backlit cottonwoods and the majesty of the clearing storm along the Teton Range.
My main determination was what focal length the use. I decided I wanted to compress the trees with the mountains, so I used a 70-200mmL to compress those two main elements.
Now it was time to process the image. I love fall color when it is a little before the “peak” stage, just as these trees were. It was important in processing to bring out both the yellows and the greens.
This is where a part of the photographer’s soul comes through. It is really your call as an artist as to how you wish to process the scene. More contrast, less contrast. Darker or lighter. All of these decisions help to set the mood of the image.
Personally, I am not always trying to capture reality; it is just a starting point. I don’t add elements to my image, but I do think through my choices of how much midtone contrast to add. When one alters contrast, color is also affected. Colors become more rich and saturated looking.
In this particular image, after adjusting my midtone contrast, I felt the yellows and greens could still use a bump. Again, this was my choice; others may say it’s too much, too little, or just right. I wanted to reproduce the luminescent glow that I experienced when capturing this image.
Controlling both tones and color becomes easier with the help of masks. That’s another subject for another day, but essentially, I make a selection of what it is that I wish to control and then make my adjustment through the mask.
Ansel Adams used to say that he “previsualized” the finished print in his mind at the time of capture. I try to do the same with my digital captures.
So, do I use Photoshop? Yes I do. All images need processing. Sometimes, just a few adjustments in Lightroom does the trick. Regardless, learn your craft thoroughly and your image will represent what you visualize in your mind. It takes a lot of practice but the effort is worth it for better results.
2014 Photo Workshops – Complete List
5th Annual Kauai Workshop – Garden Isle and Tropical Paradise – June 20-24, 2014 (3 spots remaining)
Software Discounts
Photomatix Pro 4.2 type in code at checkout: donsmithphotography 15% discount
Topaz Software type in code at checkout: SMITHPHOTO 10% discount
Helicon Focus click on link to receive 15% discount
Hardware Discounts
Special Year End “Black Friday” Offer From Think Tank Photo NOTE: (Use Promo Code WS-643)
