Nature's Best :: Don Smith Photography
Exploring our incredible world one image at a time!
Working A Composition – Allow Your Scene To Evolve
Posted on November 21, 2013

Bridalveil Creek and Fall Color, Yosemite National Park
Canon 5DMKIII, 57mm, f/16, 6 second timed-exposure, 100 ISO, Singh-Ray Slim LB Polarizer
Rarely do I capture a finished landscape image on my first attempt. Like most things in life, crafting a finished composition is a process. Few of us are gifted enough to see a finished image on our first try.
While co-teaching Gary Hart’s recent Yosemite workshop, I listened as Gary told the group that oftentimes his best image is one of the last he captures during a sequence. Pros call this “working the scene.”
The next morning, we took our group to Bridalveil Creek. Three tributaries form at the base of the Bridalveil Fall, but during this time of year, with so little moisture, only one of the tributaries was flowing. Indirect light allowed for controllable contrast (highlights through shadows captured in one click) and students were able to work on compositions and not be overly concerned with exposures.
What first drew my attention to this scene was the beautiful flow of the tiny falls. I knew that a long exposure (6 seconds for this image) would create a dreamy and peaceful image. What is natural for me (and perhaps you) is to become too focused on what draws our initial attention. What follows, is a pictorial depiction of how I worked my composition to arrive at my final image. Let’s start with the initial composition of what first drew my eye – the falls. Image #1:

This image on its own did indeed feature the falls, but lacked depth and secondary interest. I also found the foreground rock a bit obtrusive and my limited position did not allow for me to shift far enough to my left to eliminate it. At this point of crafting my scene, I’m always thinking, “is there a possible foreground?” Lesson #1: if you find an interesting background, challenge yourself to find a complimentary foreground; conversely, if you find an interesting foreground, challenge yourself to find a complimentary background (and middle ground). Alright, pretty basic, so let’s move on to my initial attempt at adding a foreground – these beautiful fall leaves. Image #2:

At first I concerned myself with closing the gap between the leading edge of the foreground rocks and the outer edge line of the falls. With my tripod fully extended, I had too much of the dark pool (not very interesting). I paid special attention to not allow the leading edge of the top right boulder to cross into the white outer edge of the fall. This would have merged the two shapes in the image’s 2-dimesional realm and served to reduce depth (be careful where lines merge).
Oftentimes I find it more productive to take my camera off the tripod and move around until I overcome a particular problem. For this scene, it was eliminating some of the real estate I gave to the pool. Once I found what worked, I brought the tripod back in to match my new perspective. OK, the scene is now getting more interesting – CLICK – ANALYZE.
I like using my LCD to study the image. I try to slow down and ask myself how I can improve on the composition. What I did not see were the annoying sticks and pebbles in the lower left of the image (my eye was focused on the leaves in the center and I missed it). Recompose to get that portion of the scene eliminated – CLICK- ANALYZE.

A tighter crop did the trick of eliminating the clutter. Now the eye is free to move from the falls (my focal point) to the colorful leaves. The eye will fall on the falls (pardon the pun) because it is naturally drawn to the brightest part of the scene. Every image also contains a nodal point (an area where the eye moves out into the remainder of the scene). Remember, I want the viewer’s eye to flow out from the falls to the leaves thus connecting the two key elements of the composition.
It’s important that we are aware of where the nodal point is located (I like think of this as a hinge – a balance point in the image). For this image, it is the base of the falls. This is where the eye is free to move out and explore the lower potion of the composition. I should note that sometimes the focal point and nodal point are one in the same. Leonardo da Vinci’s Last Supper is a perfect example where Christ’s head (tilted towards the left), is both the focal point and the nodal point (pushing the viewer’s attention to the right side of the painting as they view it).
Back to my image. Again I began the process of analyzing my scene. I did not spot my final foreground composition at first, but then it caught my attention. I tried not to look at the leaves literally; instead, I looked at them collectively as a shape. Once I switched into this mode of thinking, I spotted this final image where I felt the shape of the leaves (as a whole) mimicked the shape of the falls: CLICK!
Keen observers may recognize the the foreground rocks are now wet. Yes, I allowed myself a bit of artistic license and splashed some water on the rocks (to darken them down). I thought about burning them down in post-processing, but opted for a more natural darkening by splashing water on them. Viola’ – lighter tones are now darker tones. Remember, you can move your viewer’s eye just by controlling the tonality of the image. In final processing, I added a burn layer and darkened them down a bit more.
If you would like to learn more about my workflow methods (both visual and post-processing), please consider signing up for one of my workshops or a private workshop (that I can design directly for you specific needs).
2014 Photo Workshops – Complete List
5th Annual Kauai Workshop – Garden Isle and Tropical Paradise – June 20-24, 2014 (3 spots remaining)
Software Discounts
Photomatix Pro 4.2 type in code at checkout: donsmithphotography 15% discount
Topaz Software type in code at checkout: SMITHPHOTO 10% discount
Helicon Focus click on link to receive 15% discount
Hardware Discounts
Special Year End “Black Friday” Offer From Think Tank Photo NOTE: (Use Promo Code WS-643)
A Life-Altering Shoot
Posted on June 29, 2013

Clearing Spring Snow Storm, Tunnel View, Yosemite Valley, Yosemite National Park
Canon 1DsMKII, 24-70mmL @f/20, 1/5th second, 100 ISO, Singh-Ray Neutral Polarizer
March 2, 2006
CLICK IMAGE FOR LARGER VIEW
Have you ever been driving along when a song comes on the radio and stops you (not literally) in your tracks? Well, for me, sometimes images can do the same. One of my many projects for this summer is to edit through all of my old images that still reside on DVDs. This morning, I came across a series of images I made from Yosemite’s Tunnel View that I would consider life-altering. The start of a wonderful 7-year friendship and a career-altering moment all rolled up in a incredible clearing storm photo captured at Yosemite’s famed Tunnel View.
Let the Story Begin
Back on March 1, 2006, I had noticed that a late-spring snowstorm was barreling towards the southern Sierra range, with Yosemite National Park dead in its tracks. I took this as an opportunity to get into the park and allow the storm to pass over me. That morning, I drove to the Valley (about 3 hours from my house) and spent the day shooting under mist and some light rain. Here in California, warmer air usually accompanies an approaching front with the cooler air behind the system. The following day, March 2, the storm pounded the Valley and the rain had turned to snow overnight. Howling winds also arrived, which can prove dangerous with heavy snow clinging to tree limbs. By the time afternoon rolled around, Highways 41 (the Park’s southern entrance) and 120 (the Park’s northern entrance) were closed due to multiple fallen trees and limbs. The only entrance still precariously open was Highway 140 (which runs through the Merced River Valley). I was staying at the Yosemite View Lodge (located alongside Highway 140 just outside the entrance to the Park). The snow level had dipped to 1500 feet and rangers were trying to get the remaining visitors out of the park.
During the day, I kept driving the loop (Northside and Southside Drive) looking for photo ops as conditions were changing by the minute. As the snow pounded the Valley, scenes would change inside of 30-minutes. I kept noticing another photographer who was about my age and we at one point kidded that we were the only two nuts left in the park. I thought to myself at one point, “now there’s a guy as crazy as me, he must be pretty passionate about his photography.” Little did I know how passionate!
After about my sixth loop, a park ranger stopped me. It was about 3:30pm and I had been listening to a Bay Area news channel. They were reporting that this “fast-moving” storm had cleared San Francisco and sunny skies were emerging. I had spent many years living in the Sierra when I was younger. I had been chasing my dream of making the US Ski team and in the process, had become quite adept at reading weather patterns and how they affected the Sierra Mountain Range. I worked some quick math in my head and felt I had a better-than-average chance of catching a clearing storm from Tunnel View if I could wait-out the storm. The ranger had other ideas. I know his job was to think safety first, and he strongly suggested that I hightail it back to my hotel and forget about photography. “It will be great in the morning when you come back,” he said. To which I confidently replied, “I think this storm will break within the next two hours!” When I told him that I had been monitoring the storm on the radio, he said that I was wrong and that this storm was forecast to go through the night. I could see that I wasn’t going to win that argument, so I kindly thanked him and proceeded towards the park’s exit along Northside Drive.
A Message From a Higher Power
I made a quick stop at the famed Valley View location, but the clouds had sunk into the Valley and I could not see more than 50 yards out. At that point, I seriously thought of heeding the ranger’s advice and calling it a day. As I pulled away, there is a short stretch of road before I would have to make a quick decision: either proceed out of the park, or turn left over the Pohono Bridge and drive to Tunnel View. As I crept along contemplating my decision, a bolt of sunlight suddenly shafted through the trees. I had just finished a prayer in which I asked God what to do (I’m not making this up). Obviously, my answer was immediate and I bolted to the Tunnel View parking lot.
Upon arriving, I noticed a ranger (sitting in his truck) and four shadowy figures with tripods covered in snow. I tapped on the window of the truck and asked the ranger if I was allowed to be there. Unlike his partner, he said that legally he could not kick me out and also added that if the storm was to break, I would be in for a huge treat (he must have been a photographer).
I grabbed my gear and headed towards the shadowy figures. Unsurprisingly, one of the snow-covered photographers was the gentleman I had bumped into during my earlier stops. “We meet again,” I joked. He shook my hand and introduced himself as Gary Hart. Over the course of the next 90 minutes, we talked about a lot of subjects and quickly found out we had many similar interests: from our mutual love of sports to our love of photography. Our wife’s even had the same birthday (which was yesterday – Happy Birthday Beri and Sonya)! We found out we were also the same age (Gary only a couple months older than me). Gary had been in the tech world and had quit cold turkey to make a living as a landscape photographer. I, on the other hand, had already been in the business for many years but as a sports photographer. I was hoping to make the transition into landscape but was scrambling to figure out a path. Somewhere during the course of the conversation, Gary mentioned that he was going to start teaching photo workshops and was looking for and assistant instructor. He wanted to know if I was interested and I immediately said “yes!”
Let the Show Begin
One of the interests we both had was weather. We had both joked that if we weren’t photographers, we would possibly had become meteorologists. I told Gary that I had been tracking this storm (we did not have smart phone with doppler apps back then) and through my experience of living in the mountains, felt we had a better-than-average chance of getting a clearing storm at sunset. I told him about the shaft of sunlight and he said he witnessed it from Tunnel View. I kept the prayer part to myself only later to find out that Gary’s dad was a minister. Looking back, I think Gary’s dad may have had a thing or two to do with the sent message.
There were three other photographers who hung out and joined in the conversation. As I recall, one may have given up, but Gary and I were thoroughly committed to staying through sunset time. As that time neared, we began to notice a break in the clouds above. This is when the adrenaline started to kick in. I quickly forgot about how cold and wet I was got to work making images. Then, the mist in the Valley parted and the scene you see here opened up in front of us. I was speechless. I remember thinking to myself, “come on sky, catch some color.”
A Very Surreal Moment
I have never before, or since, been at Tunnel View feeling as if I had the location to myself. It just doesn’t work that way. Millions of photographers pass this way every year; yet, here was this amazing clearing storm scene, and I was one of only a handful of people on earth with a front-row seat. Persistence pays off, but this was over-the-top! Quietness has a sound all to itself. All I heard over the next 20 minutes was clicking shutters and whispers of, “I can’t believe this!” Surreal is the best adjective I can come up with. The color had arrived and matched this incredible scene. Either one of the two would have been enough for a great image, but to have them both together was almost a miracle – what are the odds with the timing of all this, I thought to myself?
When it was over, I not only had some incredible images, but looking back, I more importantly had a new friend and the start of a new career in the making as a landscape photographer.
From Then Until Now
Well, as the saying goes, the rest is history! Gary did follow through, and as promised, contacted me to help with his first (of many) Yosemite workshops. I remember saying to him, “no contracts, I’ll take this one at a time.” We worked quite a bit together those first couple of years and garnered a following of many photographers we now call “good friends.” I even credit Gary with giving me the confidence to step-off and start my own workshops (which I did with a Spring Big Sur workshop in 2007). Over the ensuing years, we have both built our workshop business’s to the point that we can only co-teach a handful of workshops per year. In 2013, we will be together 8 times (I’ll help Gary on three of his, and vice-versa, and we will co-teach our first venture this August at the Grand Canyon – 2 Monsoon workshops).
More importantly to me, our friendship continues to grow. As Joe Walsh once said of the Eagles, “we are a couple of creative alphas and that can lead to disagreements,” but overall, the friendship (and partnership) has survived. We are two completely different photographers in our approach and processing, but end up liking the same images by-and-large. For our students, we both believe that this is invaluable as they learn there is no single way to accomplish making an image. Moreover, we are both heavily influenced by the late Galen Rowell and consider his classic book, Mountain Light, our photographic bible.
In the Near Future
The month of July is usually our downtime. We also joke that we are not getting any younger. I’m off in a couple weeks to have my left knee partially replaced and Gary is dealing with replacing his front teeth (which were knocked-out during a softball game – the ump forgot to duck)! We’ll both be on the mend in time for the Grand Canyon and look forward to the 11-plus hour drive from California – we’ll have a lot of stories to swap as the XM radio is tuned to Classic Rock! As they say in NASCAR, we are both just pulling in for a short pit stop – we’ll be back out on the track very soon!
2013 Photo Workshops
2014 Photo Workshops
Software Discounts
Photomatix Pro 4.2 type in code at checkout: donsmithphotography 15% discount
Nik Software type in code at checkout: DSMITH 15% discount
Topaz Software type in code at checkout: SMITHPHOTO 10% discount
Helicon Focus click on link to receive 15% discount
Hardware Discounts
Think Tank Photo (Receive a free gift for any order over $50 when you order using this link!)
NOTE: Use Promo Code WS-643
Purchase Prints and Cards
Click on this link to purchase prints and cards from a growing library of my favorite landscape images:
Purchase Fine Art Prints and Cards
No Moon? No Worries – Shoot Away!
Posted on May 22, 2013

Yosemite High Country Under the Stars
Canon 1DMKIV, 15mmL Fisheye @f/2.8, 42 second timed-exposure, 6400 ISO
(Click on Image for Larger View)
At this time of year in California, we begin a stretch of relentless blank-blue sky days. One of the more enjoyable ways to mitigate this rather boring light is to photograph at night. I find that many amateurs think night photography must involve a full moon, but this is not always the case. Certainly, having a moon up helps us in many ways; most notably, finding something to focus on and composing the scene (tough to do when you can’t see anything)!
Yet, I find this challenge inviting, and the resulting images rather magical. Moonless nights mean the only illumination of the landscape comes from the stars and planets. Whereas our cones (color transmitters) shut down under this type of illumination, we are completely dependent on the rods (black-and-white transmitters) in our eyes to transmit any sense of what is in front of us.
Here are some tips that may help you to improve your moonless night photography:
1.) Find the scene you wish to photograph before it is completely dark. Generally speaking, I combine my night photography with a sunset shoot. I then proceed to photograph dusk light (my favorite), then, find my composition for my night scene.
2.) Patience. Once you have composed your scene, it is simply a matter of sitting back and enjoying the transition from dusk into night. At this point, most other photographers are long gone and you’ll have to location to yourself. Depending on the time of year, this transition time can be as short as 20 minutes (during winter months) to as much as an hour (during summer months).
3.) It is very important to know where your main buttons are on your camera. I try to avoid using any type of artificial light as I want my night vision to take full affect. This period can be as long as 30 minutes for most of us.
4.) Shoot in manual mode for easier control of the camera.
5.) Once the sky is completely dark, set your camera’s ISO to 128,000 (if it goes that high).
6.) Open your lens aperture to its widest setting.
7.) Shoot a 30 second exposure and evaluate.
8.) I am a huge proponent of reading the histogram to fine-tune exposures, but for night photography, I tend to bias my choice more towards what the LCD is showing me. This histogram will obviously be biased towards the left (shadows) and it may be difficult to see the highlights (stars).
9.) If my test frame looks too dark, then I need to either double my time or double my ISO. Each of you should test your camera to know where noise becomes too much of an issue. I try not to shoot at ISO’s over 6400 for both my Canon MKIV, 1DX, and 5DMKIII. Conversely, if my exposures look too bright, I need to either cut my ISO in half or cut my time in half. Each time you either double or half an exposure, you are changing the exposure by one stop of light. For example, changing my exposure from 30 seconds to one minute allows one stop more of light to record. Changing my ISO from 6400 to 3200 results in one stop less light.
10.) Once you find the correct exposure, you are set for the night. Without a moon influencing the ambient exposure, what you get is what you’ll have for the remainder of the night (until you start approaching dawn).
11.) If you wish to change compositions, then simply point the camera at something else and fine-tune the composition after shooting a frame or two.
12) For pinpoint stars, a general guideline is to keep exposure times to 30 seconds or less (15 seconds or less is ideal but may not be practical unless you have really fast glass).
13.) Use a cable release with a locking feature. Cameras will automatically keep the shutter open for up to 30 seconds, beyond that, you’ll need to go into Bulb mode.
14.) Focus. Tough to do if you are on your own with no moon. One trick that works is to set your headlamp on a rock about 20-30 yards away and focus on that light with the lens in auto-focus mode, then, turn off auto-focus and recompose. If you do find the scene prior to darkness, simply focus and leave the lens alone.
15.) Assign focus to a back button. By default, your camera’s focus is activated via the shutter button. Not what you want at night as auto-focus relies on contrast – there is no contrast at night! By assigning focus to a back-button (may not be available on all model cameras), you can set your focus and not have to worry about the lens refocusing as you trip the cable release.
I know this sounds like a lot to remember, but after a session or two, you’ll be an old pro at photographing under moonless skies. The digital camera’s ability to accumulate light (photons) will produce images that your eyes simply cannot see.
A side benefit of photographing at night is the experience itself. If you shoot at night you understand what I mean; if not, give it a try. Being out in a beautiful area, far away from ambient light is very cool. Take a friend and enjoy the peacefulness!
NOTE: If you would like to learn more about night photography, consider signing up for either a group or private workshop. I can tailor private workshops to fit your specific needs!
2013 Photo Workshops
2014 Photo Workshops
Software Discounts
Photomatix Pro 4.2 type in code at checkout: donsmithphotography 15% discount
Nik Software type in code at checkout: DSMITH 15% discount
Topaz Software type in code at checkout: SMITHPHOTO 10% discount
Helicon Focus click on link to receive 15% discount
Hardware Discounts
Think Tank Photo (Receive a free gift for any order over $50 when you order using this link!)
NOTE: Use Promo Code WS-643
Purchase Prints and Cards
Click on this link to purchase prints and cards from a growing library of my favorite landscape images:
The Most Bittersweet Image I Ever Captured
Posted on April 30, 2013

Alpenglow Light on El Capitan, Valley View, Yosemite National Park, October 21, 2004
Canon 1DMKII, 16-35mmL @f/22, 2.5 seconds, 200 ISO, Singh-Ray slim polarizer
Click Image for Larger View
Recently I was sorting through some older files and came across this image of a fall evening in Yosemite Valley. It instantly reminded me of the old Rod Stewart line, “Every picture tells a story don’t it?” And boy, does this image ever tell a story!
Due to an early-season snow storm, I had decided to drive to the Sierra town of Strawberry (Highway 108) to close down our family cabin and prepare it for the upcoming winter. Wherever I go, I always take a camera bag and tripod along for the ride. After completing my task, I began my 3-hour trek back home and stopped in the town of Columbia (just west of Sonora) for a late lunch. A radio was playing in the background and I heard an updated weather report that the storm would be breaking. Hmm, only a 90-minute drive to Yosemite, I thought to myself. A quick phone call to my wife and off I went to shoot a clearing storm sunset!
I arrived in the Valley approximately 45 minutes prior to sunset and as I rounded the El Capitan Bridge, I noticed a bevy of news vans. I instantly knew some climber(s) were in trouble on the famed El Capitan face. Strange for me to not have listened to the news that day (I’m a self-confirmed news junkie) but I had been listening to music for the entire journey. I immediately pulled my car over near some bystanders and inquired about what was happening. “Some climbers are stranded on the face of El Cap,” came the short reply. “How many,” I asked? “Seven, three pairs and a solo!” Looking up I could not spot them. Feeling stunned, I decided to proceed about a mile down the road to take up my position at Valley View; after all, I did come to photograph.
After roaming around for a bit, I decided for a low perspective with a bit more than half the frame given to the foreground rocks and meandering Merced River. Sunset actually came and went without much fanfare. Most of the approximately dozen photographers packed and left. I knew that the best light could still arrive so I gave myself another 20 minutes. Suddenly a laser-like light burst through the towering pines to my left and began to paint El Capitan with the much anticipated alpenglow light seen in this frame. It even caught the underside of the clouds as well. With the low water levels of fall, the reflection showed up beautifully in the Merced River and I was able to capture this scene with no grads (too tough of scene to grad anyway).
Ironically, for a brief moment, I was so caught up in making this image that I completely forgot about the tragedy unfolding on the face of El Cap. The loud rumble of the Yosemite Search-and-Rescue helicopter brought me back in to reality. With El Cap clearly emerging from the mist and the day’s light waning, the helicopter’s passengers were checking on the stranded climbers and attempting to drop supplies. Unfortunately, that would not be soon enough to save two of the stranded climbers as they would lose their lives that night from extreme exposure.
I thought to myself the next morning as I sat in my office editing this image and listening to the news reports on the radio, “how can something so beautiful be concealing something so tragic?” I have a copy of this image hanging in our bedroom. I awake to this scene every morning and not a day goes by that I don’t think of two people who met their demise while I was reveling in this beauty. Mother Nature can give and Mother Nature can take away.
I’ve read reports from YOSAR (Yosemite Search and Rescue) that this storm was predicted and not uncommon for this early in the year (Yosemite Valley spans from 4,000 – 4,200 feet), though it did resemble more of a January blizzard than a typical fall storm. Turns out that these climbers could already have died by the time I made this image. According to the official YOSAR report: Two were Japanese National climbers who were bivouacked at Camp VI, a small ledge 600 feet below the top of the Nose Route. at 1pm, it was observed that the Japanese climbers had abandoned their bivouac and were ascending in the full fury of the storm. This seemed to indicate that the climbers were absolutely desperate.
NOTE: To read a detailed article about the rescue and to see an image of the rescue helicopter flying near this alpenglow, please click here.
2013 Photo Workshops
2014 Photo Workshops
Software Discounts
Photomatix Pro 4.2 type in code at checkout: donsmithphotography 15% discount
Nik Software type in code at checkout: DSMITH 15% discount
Topaz Software type in code at checkout: SMITHPHOTO 10% discount
Helicon Focus click on link to receive 15% discount
Hardware Discounts
Think Tank Photo (Receive a free gift for any order over $50 when you order using this link!)
NOTE: Use Promo Code WS-643
Purchase Prints and Cards
Click on this link to purchase prints and cards from a growing library of my favorite landscape images:
Dealing With Noise – A Basic Workflow Primer!
Posted on February 22, 2013

Winter Evening, Camp 6, Yosemite National Park
Canon 5DMKIII, 24-70mmL @ f/2.8, 6400 ISO
With the newer models of digital cameras/sensors on the market, noise has become less of a concern for many photographers. In fact, I generally try to shoot at ISO 100 or 200 as much as possible. Yet, there are times when we need to push our cameras to the max in order to record an image. Recently, I co-taught Gary Hart’s Winter Yosemite Workshop. We spent and evening with the group at Yosemite’s Camp 6 on a moonless evening for a session of night photography. Without any moonlight to help provide illumination, the correct exposure was f/2.8 at 30 seconds at 6400 ISO.
I own both the Canon 5DMKIII and 1DX. My own tests reveal little, if any, difference in quality at high ISO’s between the two cameras, thus I do not prefer one camera over the other for night photography. What I do know about both cameras is that ISO 6400 is really pushing the threshold of where noise gets to be problematic. By that I mean that even with noise reduction software, I will not be able to completely eliminate noise while presenting a sharp image.
So what is my workflow for noise and how did I handle processing the above image? Well, let’s take a look. First off, I should say that there are many different noise reduction programs on the market and the aim of this blog is not to debate one over the other; instead, I will pick Nik’s Dfine 2.0 noise reduction software and show you how I go about using it. I am by no means a software expert. Most of my workflow comes about via trial and error.
I should note that all of my landscape images are captured in RAW mode, so if you shoot in JPEG mode this article may or may not be beneficial as your camera is adding a noise reduction step at the time of image capture. Granted, there is some processing going on behind the scenes with a RAW file, but it is minimal. In the RAW converter (I use Adobe Camera RAW), I turn off all noise reduction. I opt to do this because it really is hard for me to know how much to apply. I had a tendency to add too much and found it to be a guessing game for me, thus I eliminate it at that part of the process. Where I do apply it is when I come out of the RAW processor into Photoshop (or Lightroom). That is always step number one and I do it regardless of what my ISO setting I used.
The interface for Nik Dfine 2.0 is pretty straightforward and for most of my images, I simply click on the Automatic button and allow the software to do its thing. But on an image where I had a high ISO setting, I may need to go beyond. Note the top arrow pointing the the preset “Automatic” mode and the bottom arrow pointing to the Loupe showing a before and after version of the image. CLICK ON ANY OF THESE IMAGES FOR A LARGER VERSION.

I should note on images captured at lower ISO’s, I am in automatic noise reduction mode, but once the image appears in my layer palette in Photoshop, I will enlarge it to 100% and then lower the opacity of the Noise Reduction layer if I think the reduction went overboard and caused a “pasty” look to the image.

As noted, with my image captured at 6400 ISO, chances are good that I will need more noise reduction, especially in the lower half of the image as I will need to add some exposure to open the darker areas. Here is how I go about working that section of the image: Instead of clicking on the Measure button, click instead on the Reduce button:

Here you will find a panel that allows for global reduction of Contrast (Luminance) and Color noise. If the entire image needs more, then just use the sliders. But in the case of this image, only my bottom section needed more noise reduction once I opened the shadows. For selective noise reduction, I click on the + and – buttons then click into the section of the image (Nik’s U-Point technology). The top line of this tree sets the size of the selection. The middle line controls Contrast noise, while the bottom line controls color noise.

Now I have control over just this portion of the image. To apply this, I simply clicked on the + button. Had I originally applied a global reduction and needed to reduce some, I would have chosen the – button. Note: it’s better to make your selection circles smaller and duplicate them by holding the option key (alt on PC) and clicking the on the solid black nub (closest tot he tip of the arrow).
There is even more help for very stubborn images. To access this panel, click on the triangle next the the word More.

Now you will see options for controlling Edge Preservation (enables you to adjust the amount of detail preserved through the noise reduction effect), JPEG Artifacts (for you JPEG shooters), and Debanding (both horizontal and vertical). Simple sliders allow you to see the results in real time:

So as you can see, there is more to Nik Dfine 2.0 than initially meets the eye. Be aware that extreme processing of any image will cause bothersome artifacts. Get the exposure correct in-camera at time of capture and the majority of your problems will be under control. Also, do some testing with your camera(s) to see for yourself where their noise threshold resides. A little homework on the front end can be the difference of capturing an image that can be processed with a minimum of fuss!
There is far more that this plugin can do including allowing you to control noise by individual color channels, profiling your camera, etc. These are just some of the main features that I use on a regular basis.
If you are interested in purchasing a copy of Dfine 2.0, please use me code DSMITH at checkout and receive a 15% discount off your purchase price. NOTE: this code works for any of the fine Nik products!
2013 Photo Workshops
4th Annual Kauai Workshop – Garden Isle and Tropical Paradise – June 21-25, 2013 (4 spots left)
3rd Annual Bryce/Zion National Parks – Hoodoos and Fall Color – November 4-8, 2013 (5 spots left)
Software Discounts
Photomatix Pro 4.2 type in code at checkout: donsmithphotography 15% discount
Nik Software type in code at checkout: DSMITH 15% discount
Topaz Software type in code at checkout: SMITHPHOTO 10% disount
Purchase Prints and Cards
Click on this link to purchase prints and cards from a growing library of my favorite landscape images:
Purchase Fine Art Prints and Cards
Chasing The Elusive Horsetail Fall
Posted on February 14, 2013

Horsetail Fall and Merced River – February 12, 2013 – 5:26pm
Canon 5DMKIII, 24-70mmL @ f/11, 1 1/2 seconds, 100 ISO, Singh-Ray LB Polarizer, Singh-Ray 2 stop hard-edge graduated neutral density filter – processed in Nik Color Efex Pro 4 and Viveza 2
If it’s February it must be Horsetail time! Not sure if there is a landscape photographer out there who has not heard of the Horsetail Fall phenomenon in Yosemite National Park. First made famous by the late-Galen Rowell in his book Mountainlight, photographers from around the world descend upon Yosemite Valley like flies on a chocolate cake for a two-week period each February hoping for a glimpse of the firefall light that appears near sunset. Yet so many conditions have to align to even get a chance of witnessing this event, that it almost boggles the mind.
My own quest began ten years ago and not a winter goes by when I, like thousands of others, am drawn back by the Horsetail allure to see if I can get something better. Above is an image I made this past Tuesday evening while co-teaching Gary Hart’s Winter Yosemite Workshop. Our group arrived at this Southside Drive location two hours prior to sunset and had were the first ones on the scene (hard to believe) until Gary told me about a blog that local photographer Michael Frye wrote suggesting the best time period as February 16-23. Michael could very well be right, but being there only a few days before didn’t deter our efforts; in fact, most of the fall received the warm light (save for the middle section) before some clouds shut off the show three minutes before sunset on the same evening evening. It was my third straight night of “stalking” the elusive light show.

Horsetail Fall and Merced River – February 12, 2013 – 5:33pm
Canon 5DMKIII, 70-200mmL @ f/11, 1 1/2 seconds, 100 ISO, Singh-Ray LB Polarizer, processed in Nik Color Efex Pro 4 and Viveza 2
So what are the ingredients necessary in order for one to witness this beautiful spectacle? First off, a clear western sky certainly helps. The color begins to arrive roughly 30-35 minutes before posted sunset. The right ridge line begins to fall into shadow and the granite wall of El Capitan to the left of the fall slowly has a shadow creep across it until all that is lit is the fall itself. And speaking of the fall, if you have never seen Horsetail, then you, like most others witnessing it for the first time, will be a bit disillusioned by how tiny it appears in comparison to its famous siblings: Yosemite and Bridalveil Falls.
Horsetail is a seasonal fall, fed by snowmelt from the top of El Capitan. That is ingredient number one; without snow on top of El Capitan, there would be no fall (and on some years there isn’t). Ingredient number two, the temperatures need to be warm enough to melt enough of that snow in order to get the fall going. Every morning this past week the fall has been frozen, then slowly begins to flow as the east-rising sun hits the face and top of El Capitan. Lastly, as sunset time nears, one hopes and prays that clouds do not begin forming to the west as they tend to block the sun’s path. Standing on the Valley floor makes it virtually impossible to see what is out along the horizon. I cannot begin to tell you the number of times I thought we were going to see the entire light show (from orange to pink to blood red) only to have the light’s path blocked by an annoying cloud or cloud bank!

Horsetail Fall – February 18, 2008 – 5:42pm
Canon 1DsMKIII, 24-70mmL @ f/11, 1.2 seconds, Singh-Ray circular neutral polarizer, 100 ISO
On February 18, 2008, I witnessed and photographed Horsetail at its blood-red state. I was atop a snow mound along Southside Drive with two of Gary’s workshop participants and another good friend of mine who happened to make a day trip from the Bay Area. We were surrounded by well over 100 photographers. Approximately 25 minutes before sunset, the sun’s rays were obscured by clouds and the light abruptly fell off of Horsetail. I told our group that we were staying until 15 minutes past posted sunset. As sunset came and went, most of the assembled group packed and left. Then, exactly three minutes after sunset, a warm pink glow appeared in the middle of the fall and within a minute, had spread from top to bottom and lasted for another 3 1/2 minutes. It was the blood red light that looked as if someone had opened a valve on molten lava – it was beyond amazing!
I can assure you that this weekend will be the height of craziness in the Valley as it coincides with a three-day weekend. If you plan on going, my advice is to get to your viewing spot at least three hours early and bring a folding chair, snacks, a good jacket and some warm socks! Oh yeah, don’t forget to bring a heavy dose of patience also and don’t leave early or you may regret it. Here’s wishing all of you good luck in your quest for the elusive Horsetail Fall firefall image that you can call your own!
2013 Photo Workshops
4th Annual Kauai Workshop – Garden Isle and Tropical Paradise – June 21-25, 2013 (4 spots left)
3rd Annual Bryce/Zion National Parks – Hoodoos and Fall Color – November 4-8, 2013 (5 spots left)
Software Discounts
Photomatix Pro 4.2 type in code at checkout: donsmithphotography 15% discount
Nik Software type in code at checkout: DSMITH 15% discount
Topaz Software type in code at checkout: SMITHPHOTO 10% disount
Purchase Prints and Cards
Click on this link to purchase prints and cards from a growing library of my favorite landscape images:
Purchase Fine Art Prints and Cards
Looking Back – My 12 Favorite Images!
Posted on December 26, 2012
Twelve significant photographs in any one year is a good crop
— Ansel Adams
It’s that time of year where we all take stock of the past and more importantly, look forward to the future. Personally, 2012 was a very good year for both me and my family in so many ways. For my year-end blog, I thought of posting my 12 favorite images from the past year. But after discussing the idea with my wife Beri, we decided to expand my search for my 12 favorite landscape images since switching to digital back in 2003. I viewed thousands of images and narrowed my search down to 24 finalists, and with the assistance of Beri, we pared the search down to our favorite 12.
I will post an image a day (over this 12-day period) to this blog complete with technical notes and the back-story on how the image was created – I hope you check back each day!
I will also add each image if you would like to purchase it to my new:
So, without further adieu, here are my favorites and how they came to be:
Image #12 – Yosemite Falls Moonbow and Reflection – June 14, 2011

Yosemite Falls Moonbow and Reflection
Canon 1DsMKIV, 16-35mmL @ f/2.8, 30 seconds, 400 ISO
June 14, 2011
Each spring, high country snowmelt revs up the falls around Yosemite Valley. On a clear evening, with a full moon, one can witness one of nature’s coolest phenomenons – a moonbow. Similar to a daytime rainbow, a moonbow (or mistbow) appears when the moon is directly over one’s shoulder and at a proper height to create an angle of 42 degrees from its light rays path the the viewers angle of view. During the springtime, the falls are booming creating a huge volume of mist to form near middle cascades, thus allowing for the moonbow.
Most simply are able to see a faint grey bow, but those with excellent night vision can see some color. Fortunately, camera sensors can record color that our eyes can’t see. In June of 2011, the volume of water spilling over the top of Yosemite Falls was at a 50-year high; so much water in fact that Cook’s Meadow flooded creating a rare opportunity to photograph the moonbow and its reflection. I drove to the Valley three fellow photographers: Mike Hall, Scott Schilling and Nick Lust and waited until the moon rose high enough to create the bow – about 11:07pm.
The moon illuminated to granite walls around the falls so brightly that I actually had to make two exposures of this scene and blend them in Photoshop. I kept my reflection exposure one-stop darker than the the actual scene to make it look as it appeared to my eyes. We photographed until 12:30am on that evening then drove three hours back home finally getting to bed around 4am, but the resulting image was worth the effort!
This is the last image for this article. If you have been following along I appreciate it! Here’s wishing all of you a healthy and happy 2013 with plenty of great photo ops!
Image #11 – Los Viboras Road, San Benito County, California – January 23, 2005

Los Viboras Road, San Benito County, California
Canon 1DsMKII, 70-200mmL @ f/16, 1/4 second, 100 ISO, Singh-Ray neutral polarizer.
January 23, 2005
Image number 11 of my all-time favorites must first be credited to my wife Beri. This country lane actually leads to a popular Christmas tree lot just outside of Hollister, California. In 2004, we drove to this lot for the first time and my wife commented how this eucalyptus-lined lane would make an awesome image. I immediately envisioned the scene with some ground fog (to add a air of mystery) and waited patiently for 3 1/2 weeks for the early morning fog to arrive.
I decided it would look best if I compressed the trees, thus, I used my 70-200mmL at 200mm. I set my tripod low to the ground and just as I finished composing and was about to trip the shutter, a pair of headlights showed up at the far end of the lane. It took forever for the slow-moving vehicle to make it to my location, while I held my breath that the rising sun would not punch through the rapidly dissipating fog. Turned out that the car was an old Cadillac driven by a little old lady who could barely see over the wheel. She seemed rather annoyed that I was even there and shot my a harsh glance. Just as she started to roll down her window to ask what the hell I was doing, I jumped behind the car, re-composed my scene, and fired three frames before the sun burst through and the image was gone!
This picture has become my all-time highest selling stock image. My agency, Getty Images, has sold this image multiple times (8 book covers and counting) with my most lucrative sale resulting from an Italian advertising campaign that ran for a year in all the airports in Italy. It really is a simple scene that took on a painterly look thanks to the morning mist and sun. Thank goodness grandma didn’t spoil the party!
Image #10 – Winter Sunset, Garrapata State Park, Big Sur Coast – December 27, 2009

Winter Sunset, Garrapata State Park, Big Sur Coast, California
Canon 1DsMKIII, 16-35mmL II @ f/16, 1 second timed-exposure, 100 ISO, Singh-Ray Thin LB Warming Polarizer
December 27, 2009
I’m often asked what is the best shutter speed when it comes to photographing water? That is an impossible question to answer because it really depends on the speed of the water relative from your shooting location, and your focal length. Thankfully, with digital, our LCD’s allow us to review and fine-tune our shutter until we can get the “feel” of the water to match our previsualiztion of the finished image in our mind.
Such was the case with this scene that I captured along Garrapata State Park’s north coast in late December of 2009. We had a storm push through during the day with high surf and I was hoping for a bit of clearing sky at sunset. As the swells would begin to push in, I simply timed their surge and with a one-second shutter, was able to get this painterly effect with the surf that I had envisioned.
There is really no wrong or right way to photograph water, it is simply how you wish to portray it: frozen, scratchy, silky, etc. I had photographed from this location on a prior trip and liked how it allowed a different view of the Garrapata Arch. As the sky began to warm, a surge pushed through and I had my shot.
Image #9 – Arch Angel Falls, Zion National Park, Utah – November 7, 2012

Arch Angel Falls, Zion National Park, Utah
Canon 5DMKIII, 24-70mmL II @ f/16, 1.3 second timed-exposure, 100 ISO, Singh-Ray LB Warming Polarizer
November 7, 2012
After three hours of hard hiking through Zion’s North Creek Canyon, one is rewarded with this incredible scene of cascading Arch Angel Falls. It is the beginning of a visual paradise that makes the aches and pains fade like a distant memory.
I first hiked this canyon during the spring of 2010 after some flooding. Looking back, that was a rather dangerous hike. Nonetheless, we made it to the Subway back then, but Arch Angel Falls was moving too fast to make a decent photograph.
Hiking this canyon in the fall was much easier (if you could call this hike easy). The high walls and trees yielded plenty of fall-colored leaves from the maples and aspens along with just the right volume of water for the cascades.
About a quarter-mile past these falls is the famed Subway. I liked my images of the Subway from both trips, but picked this image as my favorite from the canyon hike.
Image #8 – Double Trouble – Dual Strikes, North Rim, Grand Canyon, Arizona – August 9, 2012

Double Trouble – North Rim, Gand Canyon
Canon 5DMKIII, 24-70mmL II @ f/16, 1/4 second, 200 ISO, Singh-Ray LB Warming Polarizer
August 9, 2012
This past August, my friend Gay Hart and I traveled to the Grand Canyon in search of daytime lightning images during Northern Arizona’s annual monsoon season. Capturing lighting during the day is virtually impossible without the help of a device called The Lighting Trigger.
This unit attaches to the camera’s hot shoe and a cord attaches The Lightning Trigger to the camera’s remote plug. As the Stepping Stone Products website indicates: Photography with the Lightning Trigger is possible because a lightning flash is not a singular event. A flash is comprised of multiple return strokes occurring over as many as several-hundred milliseconds that are spaced approximately 40 milliseconds apart.
Another key component to the success of capturing daytime lightning is the camera’s shutter lag time. Suffice it to say, top-of-the-line cameras are required. For this image, I used a Canon 5DMKIII with a shutter lag time of .58ms. Lag times of .60 or less are recommended for the highest success rates.
Photographing a lightning storm is dangerous to say the least. I won’t get into all the lightning facts here, but lightning is the number-two weather related killer in the United States, surpassed only by floods.
So why did we do it? Well personally, I think images with lightning are exciting. The experience was exhilarating also. This image was captured just below Bright Angel Lodge along the Canyon’s north rim. I was sitting down, making myself small, while letting the camera and Lighting Trigger do its thing. I just monitored the cell and occasionally adjusted the camera’s position. It wasn’t until the shoot was over that I realized that I had captured this frame!
Image #7 – White Cone Geyser, Yellowstone National Park – September 13, 2011
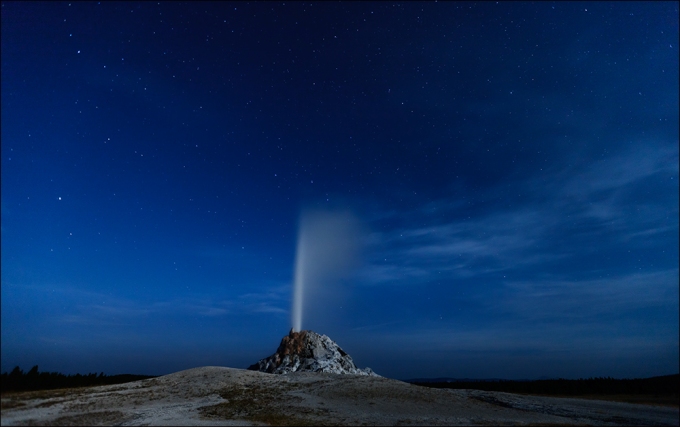
White Cone Geyser, Yellowstone National Park
Canon 1DsMKIII, 16-35mmL II @f/2.8, 30 second timed exposure, 800 ISO
September 13, 2011
Sometimes it pays to push yourself even when every fiber in your body is screaming for sleep. It also helps to have a friend and traveling companion convince you that stopping, even when the hotel is 40 minutes away and you are on hour 16 of a long day, is still worth doing!
Such was the case as my friend Mike Hall convinced me to pull into Firehole Lake Drive in Yellowstone National Park to photograph White Cone Geyser. We were on Day 8 of a 10-day scouting trip to both Yellowstone and Grand Teton National Park. We had started the day around 4:30am in Jackson and were on our way back to our hotel in West Yellowstone when Mike mentioned stopping.
We had no idea about the eruption times of this particular geyser, but with a full moon out that evening, we thought the geyser would look nice against the star-filled sky. As we arrived, we noticed the Big Dipper sat over the top of the geyser; after calculating our exposure, we started shooting.
I remember only being on my third exposure when we began to hear what sounded like a muffled growl. We instantly looked at each other, knowing we were in grizzly bear country, and asked almost simultaneously, what’s that?
Thirty seconds later our answer arrived in the form of steam and boiling water spewing from the geyser; as luck would have it, we had perfectly timed an eruption! I had to wait for my current 30-second exposure to complete along with the black frame I was writing and hoped the geyser’s eruption would not subside. Luckily, I got in one frame, the one you are viewing!
Image #6 – Paris Sunset and Eiffel Tower – July 9, 2012
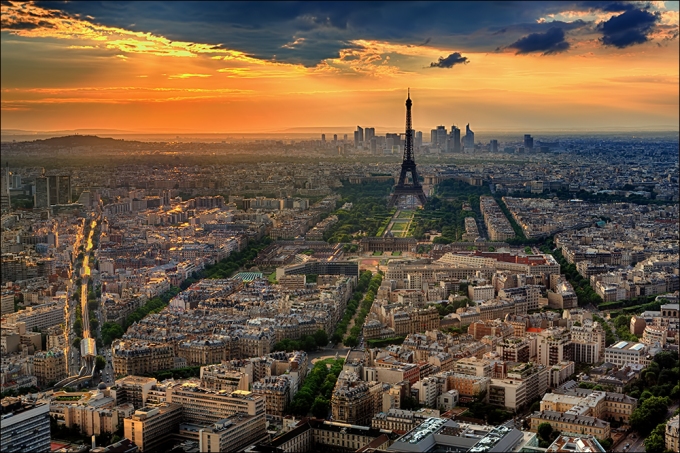
Paris Sunset From Montparnasse
Canon 5DMKIII, 24-70mmL II @ f/11, (5) exposures processed in Nik Efex HDR Pro 2, then a portion of the sky masked in with Photoshop CS6, ISO 100
July 9, 2012
If you have been following this series, then your first reaction to this image is probably something along the lines of, hey this is not a landscape this is a cityscape! Guilty as charged; nonetheless, it is one of my 12 favorites – hey, my sand box, my rules 🙂
I captured this image this past July while my family and I were on vacation in Europe. We started our trip with a week’s visit to Paris (then continued on to London, Yorkshire (where my wife grew up), Edinburgh, Scotland, and St. Andrews, Scotland). Our family had hosted an exchange student from Paris over the past two summers and via email, we got to be friends with his family. They all wanted us to come and visit. Paris was part of a three-week trip and my wife convinced me to not get too involved taking pictures (she wanted me to enjoy the vacation). I basically documented our entire trip with my iPhone! Yet, I decided that one evening I wanted to do some serious work and photograph both the Eiffel Tower and The Louvre. After all, Paris is “The City of Lights!”
We had been putting in long hours sightseeing during the day and on the evening that I wanted to go out, everyone was exhausted. But I knew we would be leaving for London in two days so it was now or never. Our Paris friends cautioned me about getting “outside” of the tourist subway lines as it could become confusing, but I decided to go anyhow. Fortunately, my youngest son Aaron (16 years old) said he would come along and between the two of us, we successfully navigated our way around the city. My original plan was to photograph the Eiffel Tower from its base, but the day prior to me going, a friend from California who had been following my Facebook iPhone postings wrote and recommended going to the top of France’s tallest skyscraper – Montparnasee (59 stories tall). It has an observation deck that affords a 360-degree panoramic view of Paris.
We arrived about an hour before sunset and I immediately staked this spot. I was hopeful that we would have a good sunset and I wasn’t disappointed. I used a Canon 5DMKIII and a 24-70mmL lens @ f/11 at 100 ISO. Due to the scene’s high contrast, I bracketed my exposures as the camera’s sensor would not record this latitude of tones due to the sensor’s limited dynamic range. During post processing, I started assembling these images as an HDR using Nik HDR Efex Pro 2 software, then I masked in the sky in Photoshop to complete the image. BTW – we photographed until darkness took hold, then went on to The Louvre and photographed until midnight! To say the least, it was a very memorable evening!
Image #5 – Snake River Overlook, Grand Teton National Park – September 11, 2011

Stormy Evening, Snake River Overlook, Grand Teton National Park,
Wyoming
Canon 1DsMKIII, 24-70mmL @ f/11, 2.5-second timed shutter, ISO 200, Singh-Ray LB Warming Polarizer
September 11, 2011
If you read my narrative regarding my image of Horsetail Fall (Image #1 of this series), then you know my thoughts about not leaving a location as soon as the sun sets. Our modern-day digital cameras see so much color that our eyes cannot see at early dawn or late dusk. At those periods of the day, our rods begin transmitting black-and-white signals to our brain as our limited amount of cones (color transmitters) are effectively overruled. I’m not a doctor so that is as much as my research has taught me. What’s important for us photographers to realize, is that even as out brains can no longer receive color signals, our digital camera sensors can. Moreover, the limited contrast range at that period of the day allows for the entire range of the scene’s tonality (from highlights to shadows) to record well within the limited dynamic range of the camera’s sensor. Certainly the scene will appear flat and colorless to our eyes, but that can be altered to our liking in post-processing.
It seems an easy concept to grasp, but it never ceases to amaze me how many photographers base their decisions just on what their eye/brain is seeing and not what intellect should be telling them. On this particular evening, there were enough clouds in the sky to completely hide the sun as it was setting. I had calculated that sunset time would be two minutes earlier than what was listed from our position (I calculated this information with the help of The Photographer’s Ephemeris). We were at an elevation of approximately 6500 feet and had a good chance of seeing some alpenglow light, we just had to remain patient.
I was with my friend/colleague Mike Hall, and we had to laugh when almost on cue, all the other photographers packed and left – we had this location to ourselves. As you can see, our patience was rewarded as the sky began to warm considerably. This image is a single exposure and was post-processed globally as a RAW file, then I adjusted the tonality with the help of Nik’s Color Efex Pro 4 software. Sure I could have gotten the same results with Curve adjustment layers in Photoshop, but CEP-4 makes the processing so much easier and quicker. If you are interested in purchasing any of the Nik filters, and I highly recommend you do, then please use my code DSMITH at checkout for a 15% discount (this works for upgrades also).
Image #4: Backlit Elm, Cook’s Meadow, Yosemite National Park – October 14, 2007

Backlit Elm, Cook’s Meadow, Yosemite National Park
Canon 1DsMKII, 16-35mmL @f/22, 1/10the second, ISO 100
October 2007
I captured this image while co-teaching a 2007 fall workshop with my friend/colleague Gary Hart in Yosemite National Park. It was mid-October and we had the group out for a sunrise shoot at the El Capitan Bridge. I knew that the sun would be rising from behind Half Dome approximately 45 minutes past posted sunrise and asked if anyone wanted to come along. Only 4 of the 12 students said they would and the rest went with Gary to photograph another location. As we pulled up to Cook’s Meadow, my pulse began to race a bit as I could see the mist rising off the frosted meadow. Fortunately, and much to our surprise, there was only one other photographer set up to capture this moment. I do remember a small girl playing near the base of the tree and I remember asking her mom if she could stop once the sun got close to rising as I explained the picture we were trying to capture. Fortunately the mom said yes and we got into position.
My thought was to take a low perspective so I lowered my tripod to about two feet off the ground, and I knew that I would have to bracket my frames as the contrast range would be extreme once the sun peaked over the ridge. This elm is non-native to the Valley and is the only tree of its sort growing in the meadow and was at peak fall color.
As the sun began to crest the ridge, it was as if someone threw a powerful light switch. The elm exploded into vibrant light and the backlit steam was incredible. I can remember calling out to my students to bracket their exposures – I knew we were all witnessing a unique moment and I didn’t want them to miss on the exposure, which was tricky. The light held for a good 20 minutes and as the sun rose and I positioned it against the trunk of the elm to get a starburst effect.
Having examined this image many times over the years, I think what I appreciate most are the crepuscular rays created by the sun striking this mist, and the shafts of warm light striking the foreground grasses. It’s a powerful image and one that has sold well as a stock image. Nik Software has featured this image in an ad campaign last year and is currently using it on their website to promote one of my favorite plugins, Nik Color Efex Pro 4.0, which allowed me to process this image from a single frame of a bracketed series – originally it was processed as an HDR. Please use my code DSMITH when ordering any of the Nik filters for a 15% discount!
Image #3 – Halemaumau Crater, Kilauea Caldera and Milky Way – September 5, 2010

Halemaumau Crater, Kilauea Caldera, Volcanoes National Park, Hawaii
Canon 1DMKIV, 16-35mmL II @ f/2.8, 20 second timed-exposure, 3200 ISO
September 5, 2010
In early September of 2010, I traveled with colleagues Mike Hall and Scott Schilling to the Big Island of Hawaii to photograph lava. Two months prior, Gary Hart and I had the good fortune to get up close and personal with the lava as Kīlauea’s ongoing Puʻu ʻŌʻō–Kupaianaha eruption crossed the road that led to the government controlled viewing area on the day we arrived. We were allowed on that particular afternoon/evening to get as close as 100 yards from the slow moving flow as it steadily progressed towards the ocean. This experience had a profound affect on me as I witnessed earth’s creation – I could have stayed all night!
On my return journey in September, we photographed from a boat lava flows spilling into the sea at dawn, captured the flows from the air via a helicopter, and photographed this caldera from the visitors area inside Volcanoes National Park. Though I have many favorite images from both trips, I find myself continually coming back to this particular image. Mike, Scott and I spent two consecutive evenings trying to capture this scene and had to time our shoots between intermittent rain storms.
A major feature within the caldera is Halemaumau Crater, a large pit crater and one of Kīlauea’s most historically active eruption centers. The crater is approximately 920 m (3,018 ft) in diameter and 85 m (279 ft) deep, but its form has varied widely through its eruptive history; the floor of the Halemaumau Crater is now mostly covered by flows from its most recent eruption, in 1974.
I chose my Canon 1DMKIV to capture this scene because at the time, it was the best camera Canon made in regards to noise. An ISO of 1600 would have been ideal, but I needed to push it an extra stop to ensure that I properly exposed the Milky Way. I’ve reprocessed this image with the help of Nik Software’s Color Efex Pro 4.0 and have been able to extract the fine detail in the night sky while keeping any noise issues at bay (please use my code DSMITH when ordering any of the Nik Software for a 15% discount).
Image #2 – Emerald Bay – May 16, 2011
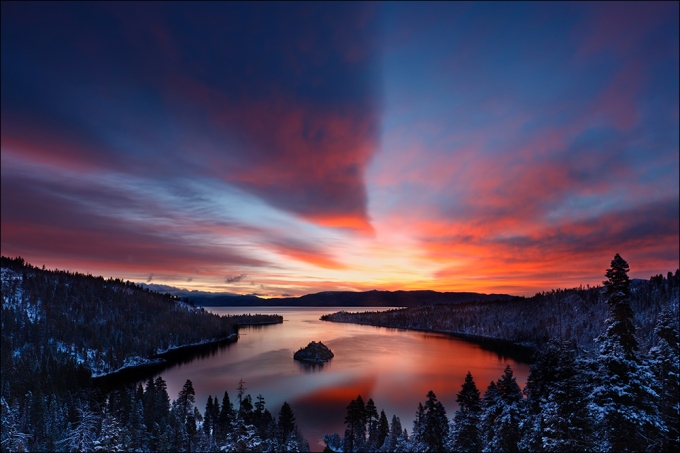
Emerald Bay, Lake Tahoe, California
Canon 1DsMKIII, 16-35mmL II @ f/16, 1 1/2 seconds, ISO 100, Singh-Ray Slim LB Warming Polarizer, Singh-Ray 2-stop soft-edge grad.
May 16, 2011
It’s funny how certain images come about. The old saying, The best laid plans…, was never so true as in the creation of this image. If you look closely at the date this image was captured, you’ll see that we were far closer to summer than winter; nonetheless, a series of three winter storms pounded the Lake Tahoe basin during my 2011 Spring Lake Tahoe Workshop playing havoc with many of our planned location shoots. Instead of t-shirt and shorts, we all donned our warmest winter clothes and made the best of the huge curve ball that Mother Nature threw us.
On this particular morning, we left the hotel in complete darkness and had no idea what type of conditions we would encounter. It had been snowing quite heavily when we went to bed that night. Fortunately, we were in between storm number two and three and we arrived at Emerald Bay to an empty viewing lookout. As dawn broke, we could see the potential for an incredible sky. High thin cirrus clouds and some left over cumulus awaited the rising sun. It was cold – very cold in fact, but our excitement outweighed any unpleasantness we were experiencing.
Emerald Bay resides along the western shore of Lake Tahoe, closer to the south end, and calls for very wide angle. Generally in dawn light, the pine trees turn to silhouette as the scene contrast ratio is too extreme. But with the fresh snow, the trees became a more integral part of the scene. As the warm light began to arrive, all that was left to do was balance the brightening sky with the Lake and trees. I remember using a 2-stop grad (and possibly switching to a 3-stop just before the sun crested). What amazed all of us was the beautiful reflection on the surface of the Bay, which was glass-like on that morning.
I have photographed many times at Emerald Bay and would be hard-pressed to witness a more colorful or perfect morning than what we had. A perfect winter dawn captured four weeks prior to Summer Solstice – go figure! All of the workshop participants captured incredible images that morning and some left later that morning as storm #3 was expected to be produce copious amounts of snow and wind. We wrapped the workshop up later that afternoon and had to cancel our sunset shoot – there simply wasn’t going to be one! At that point, only two participants remained and we barely made it over Carson Pass that evening on our way back to the Bay Area as the storm pounded the region as predicted!
Image #1 – Horsetail Fall – February 18, 2008

Horsetail Fall, Yosemite National Park
Canon 1DsMKIII, 70-200mmL @ f/11, 1 1/2 second timed-shutter, 100 ISO, Singh-Ray Circular Polarizer.
February 2008
This was one of those images that first came to my attention from the late Galen Rowell. One of my favorite books on landscape photography is Mountain Light, and I’d have to say, Galen’s image of Yosemite’s Horsetail Fall left a lasting impression on me (as I’m sure it did on countless others). It’s really kind of a freak-of-nature and can only be seen during a 2-week window in February, and only if all the elements align properly! To this day, no one has really provided a convincing explanation as to why this tiny seasonal fall that emanates from the top of El Capitan (7,573 feet), glows lava red at or just after sunset. My personal quest of this image started five years prior to me capturing this frame with countless 6-hour round trip drives to the Valley when I thought conditions were trending for the magic light to appear. For five years, I came away with various iterations of the scene, but alas, no top-to-bottom sighting. But that all changed on February 18, 2008.
I was co-teaching a workshop with Gary Hart and volunteered to take two workshop participants (husband/wife) to this location (a snow mound in the middle of the Merced River) located just off Yosemite Valley’s Southside Drive. The rest of the group had really good light on the fall the day prior and went with Gary to photograph from Tunnel View. Horsetail Fall has become such a quest for photographers from all over the world, that the park rangers actually have to direct traffic as this location and one other along Northside Drive.
We arrived 2-hours prior to posted sunset time and staked our spot on the before-mentioned snow mound in the middle of the Merced River. Another friend of mine, Nick Lust, happened to be there and the four of us set our cameras and tripods and began the long wait for the much-anticipated magic light. Posted sunset for that evening was 5:39pm, though the sun would disappear sooner from our location. Our spirits were dampened when 20 minutes prior to posted sunset, clouds began to form and the warming light on El Capitan faded to gray. I took a rough head count of the photographers set-up around the banks of the river and stopped counting at 100! Over the next 20 minutes, that number dwindled considerably.
I remember instructing the participants to rehearse their compositions ahead of time on the off-chance that the magic light did appear. I know personally that when special moments in nature arrive, it’s easy to get locked-in to one composition and waste too much time bracketing exposures. I discussed options of framing the scene vertically and horizontally. As we neared posted sunset time, I remember someone asking if we should pack up and leave. I told them that I wanted to stay up to 20 minutes past sunset just in case. In all honesty, I was 99% certain that nothing would happen as our window-of-opportunity was rapidly closing. Many others must have thought the same that evening as over 70% of the photographers had either left or were packing. I remembered thinking to myself, what’s another 20 minutes, we’ve been out here 2 hours already!
A quick glance at my watch told me sunset time had come and gone. I remember it being eerily quiet and my gaze was no longer on El Capitan. Then, out of the quiet, a photographer setup behind us called out that some pink light was starting to hit the fall. At first glance, I thought he was crazy; then, I saw it. It started from the middle of the fall and began expanding vertically in both directions. As it expanded, it became increasingly more reddish in color and grew more and more saturated. I called out for everyone to shoot as we had no idea when it would disappear. Within a minute, the light reached the top of the fall and looked to our eyes like red lava spilling from the top of the monolith – it was an incredible sight and I remember a distinct awareness of all of my senses as I knew I was witnessing Horsetail at its absolute rarest state of blood-red reflected light!
The light lasted for all of three minutes (confirmed by checking my metadata) and this peak light was exactly 2 1/2 minutes after posted sunset. How the light got through the clouds is a mystery to me. After all my talk of rehearsing various compositions, I realized that I shot the same vertical frame at least 20 times, and this frame, my favorite, was only one of two horizontal compositions that I fortunately remembered to make.
People ask me all the time if I Photoshopped this red into the scene. I have gone as far as to show the RAW files to demonstrate that the color was at full maximum saturation at capture. I’ve tried making the color more intense and cannot. So my answer is, this is exactly how we saw it that evening!
My five-year quest had ended and I still try every year for something better, but it has yet to happen. I proudly have this image displayed as a 4′ x 6′ canvas print in my home. It has also been a good selling stock image and is available via Getty Images. These rare moments in nature are pure magic. It was an evening I will never forget and an image that will remain one of may all-time favorites!
2013 Photo Workshops
4th Annual Kauai Workshop – Garden Isle and Tropical Paradise – June 21-25, 2013
3rd Annual Bryce/Zion National Parks – Hoodoos and Fall Color – November 4-8, 2013
Software Discounts
Photomatix Pro 4.2 type in code at checkout: donsmithphotography 15% discount
Nik Software type in code at checkout: DSMITH 15% discount
Topaz Software type in code at checkout: SMITHPHOTO 10% disount
Purchase Prints and Cards
Click on this link to purchase prints and cards from a growing library of my favorite landscape images:
My Favorite Horsetail Fall Moment
Posted on February 24, 2012

Horsetail Fall, Yosemite National Park, February 18, 2008.
This past week, Yosemite’s nondescript Horsetail Fall has garnered national media attention! Within the past five days, The Associated Press ran a story that was followed-up the next night by a report on NBC Nightly News. There was also an interview with local photographer Michael Frye on National Public Radio. Not that Horsetail was the world’s best-kept secret by any stretch of the imagination; quite frankly, it’s just the opposite. Since the late-Galen Rowell’s 1973 image of this natural phenomenon of light and shadow was first published in his famed book Mountain Light, amateur and professional photographers have traveled from around the globe to both witness and capture their own version of this seasonal fall lit by the waning rays of sunset light. I must admit, it caught my attention also, but I did not attempt to photograph it until the winter of 2003 as I was busy running a full-time sports photography business.
This February once again found me in the Valley chasing this elusive light while co-instructing Gary Hart’s winter workshop. Needless to say, I have witnessed varying degrees of Horsetail light throughout the past 9 winters, but only once have I seen and captured what I consider the ultimate Horsetail light – the red lava type of light that, as I’m finding out, is extremely rare to see!
It was really a set of unforeseen circumstances that led me to that opportunity back on February 18, 2008, when as a group we photographed the fall the night before. Unfortunately, two participants missed meeting us and thus did not have the opportunity to join us for the shoot. I volunteered the next day to lead them out to a popular viewing location along Southside Drive. It had snowed quite a bit and I remember spotting a mound of snow smack in the middle of the Merced River. We had arrived 2 hours prior to sunset and decided to stake our spot on the snow mound in the hopes of getting a reflection. Another friend of mine happened to also be there and he joined us. As the four of us waited for sunset, I discussed how I liked “rehearsing” my compositions. Sounds weird I know, but I reasoned that when/if the elusive light appeared, it was important to not get into a panic shooting mode.
Scheduled sunset time for that particular day was 5:39 pm, and at 5:11, as the light was starting to warm, it suddenly disappeared! One of the difficulties with shooting Horsetail is that one is generally immersed in the Valley with a view of the western horizon obscured by trees. I can only surmise that a cloud, or a bank of clouds, had blocked the sun’s path. I know this image appears to have been captured from some high mountain-top, but believe me, we were on the Valley floor – it is really somewhat of an illusion. By a rough guesstimate, we figured there had to be over 100 photographers surrounding us. As we neared posted sunset time, I feared the light would not return as the ambient was getting darker and darker. Apparently most of the photographers around us felt the same and as most packed-up and left. I told my participants that we would stay until 15 minutes past sunset as I have seen alpenglow appear at its best, just at, or even past posted sunset time.
As posted sunset neared, and just as all hope was lost, I remember someone excitedly calling out from behind our position that they were spotting some faint red light near the base of the fall. We all immediately went into scramble mode and I can clearly recall a surge of adrenaline shooting through my veins! Within 30 seconds, the entire fall lit, at first faintly (see third frame from left – top row), then got more and more vibrant within the next 30 seconds. There it was – the red lava-like light I had only seen in other images and now I was seeing, and photographing it, live! With all the talk I did about preparation and varying compositions, I barely followed my own advice as I was so excited. I can remember actually trembling at the sight and not wanting to screw-up the image! The light lasted until 5:43 pm (4 1/2 minutes total) then quickly flickered-out and the show was over. High-fives abounded along with many whoops and hollers from the few remaining photographers. I couldn’t help but think to myself, “why did everyone leave?”
I have been accused over the years of “pumping up the red” in this shot, so it is time to prove this was not created in Photoshop. Here is an unaltered screen capture of my RAW images from that night: Click on image for a full-screen view.

Horsetail Fall Contact Sheet - RAW Captures. Canon 1DsMKII
The only processing I did on this image follows my normal steps of setting the white and black point, which resulted in a slight bump in contrast. I also tamed-down the brightness in the sky in the top-left of the frame. I’ve tried cropping it out but ultimately liked the version with it included. As you can see, I only captured one frame with my 70-200mm lens in horizontal format, while the rest of my captures were with my 100-400mmL at about the 300mm range. In retrospect, I wish I would have captured more horizontals but at the time did not think it looked that appealing. In the end, it is my most-prized composition of the evening and the one I have displayed large in my home. It also is my best-selling Horsetail Fall stock image via Getty Images. Don’t you just love 20/20 hindsight?
As I revisited these images for this story, I realized that not only did we have an opportunity to witness special light, but also, just the fall itself was lit. It was as if someone had punched a hole in the top of El Capitan and blood poured out! I have actually tried to increase the color/saturation of the red in the RAW images and can’t – no matter what Photoshop process I try. The red color is maxed-out in the RAW file!
By most accounts, the window for Horsetail Fall will be closing soon. If you plan on viewing and/or photographing your own image, be aware that the water levels are low this year and the fall could be down to a trickle by now. We shot it on two consecutive nights just after 4 inches of snow fell on the park back on February 15 and 16. No new snow has fallen since.
Have a Lot of RAW’s to Process? Try This Simplified Workflow
Posted on December 19, 2011

Canon 1DsMKIII, 70-200mmL @ f/16, 1/4th-second shutter, ISO 100, Singh-Ray Circular Polarizer, Lexar Digital Media - Yosemite National Park
Recently I volunteered to photograph my son’s High School (Monterey Bay Academy) for a new website and related recruiting material that the school was putting together. What I thought would be a somewhat simple project turned into six location shoots at various times of several days spanning two weeks and resulting in 95 edited RAW captures. I’m not sure about you, but I can spend anywhere from 30 – 90 minutes per image when working on my RAW landscape files. I did entertain thoughts of shooting in JPEG mode, but knew I would compromise the ability to massage my file to its fullest potential. Having worked the math, I realized that I had to come up with a simplified workflow.
My attention first turned towards simplifying my RAW processing in Adobe Camera Raw. Basically, I like to exit my RAW processor with a somewhat flat image. I do set highlight/shadow points, but then I back them off just a tad. I turn off all sharpening, noise reduction and curve adjustments (this will be done later). One key is to set the bit rate to 16-bits to allow for an expanded tonal and color range while editing in PS (I reconvert back to 8-bit once finished processing the file). Lastly, I set my Camera Profile to ACR 4.4, then go to Lens Correction and placed a checkmark next to Enable Lens Profile Correction. The image is now ready to open into Photoshop. By the Way, many of these settings can be saved as Camera RAW Defaults.
Now it’s time to open my image into Photoshop CS5. Thanks to the awesome products from Nik Software, my editing workflow gets even simpler. My first step is to open the image into Nik DeFine 2.0 and allow the auto mode to do its thing. It is important to do your noise reduction on the front-end of your workflow as it always yields better results. Next, using the new Color Efex Pro 4.0, correcting contrast has just become simple! I like working to get the proper contrast first as changes to tonality affects the saturation of color. I open the photo into Pro Contrast then click on the third preset down the list, Dynamic Contrast (this is new in CEP-4). Voila’, the image just pops!
Next I click on the Add Filter button (CEP-4 now allows for layering) and go to the Brilliance/Warmth filter. There are many new presets to choose from along with setting your own controls. Some of my favorite presets are the Perceptual Colors. I’ll also at times add a Warm preset then add a Cool preset on top and blend the two – there are so many options!
Lastly, I save my file as a TIFF, then in PS I go to Image>Duplicate and re-size that file for whatever output I desire. Lastly, I use Nik Sharpener Pro 3.0 oftentimes brushing in the sharpness at varying opacities on different areas of the image. If I have a sky for example, I’ll oftentimes not sharpen that portion of the image. This holds true with anything that appears soft in nature.
That’s it! My image is ready to go. Start to finish, I can oftentimes get through an image in minutes rather than hours.
So the next time you are facing a large project and you don’t want to sacrifice quality, try this method. It certainly cut hours out of my total time and I delivered the images on time and confident that they can be used from large display prints to web displays.
If you would like to purchase any of the fine products from Nik Software, please use my code DSMITH at checkout and receive a 15% discount off your order!

In conclusion, I’d like to wish all of you a Happy and Safe Holiday Season. We’ll see you all in the New Year!
A Night Under the Stars in Yosemite National Park
Posted on July 5, 2011

Canon 1DsMKIII, 16-35 mmL at f/2.8, 400 ISO, (28) 3 1/2-minute frames blended in Photoshop using the Screen/Lighten Blend mode explained in article.
Perhaps the most dramatic difference between film and digital is the latter’s ability to render an image in a manner that our eyes simply cannot see. I’m talking about photographing under low ambient conditions (think after the sun has gone down). Yes, night photography! Don’t get me wrong, one could photograph at night with film, but with digital, there is no comparison. Most notable are that there is no reciprocity failure with linear capture devices (sensors). Reciprocity failure meant a shift in exposure and color at long exposures. This simply does not happen with digital, thus exposures are easily calculated. Also, because of our diminished color reception at night, digital can record colors our eyes simply cannot see. It can even reveal luminance that our eyes cannot detect!
Recently, some friends and I spent a night photographing from atop Yosemite’s Sentinel Dome (elevation 8,122 feet) and Glacier Point (elevation 7,214 feet). The goal of the trip for me was to experiment with a technique of shooting multiple images of the same scene and then stacking and blending them in Photoshop to produce noise-free star trails. The other benefit of shooting shorter exposures is the ability to control jetliner lights that tend to dot the night sky. The image I have used (above) is from our second location looking across the promontory from Glacier Point towards Half Dome and Clouds Rest. I began my first exposure at 1:15 am and finished recording my final frame at 3:00 am. We then had a 4-hour drive home (arriving just in time for breakfast)!
This technique is hardly new but it is one that I have only dabbled with prior to this evening. One could accomplish the same look using one long-exposure, but noise (both color and luminance) would be the two key issues would need addressing in post-processing. Removing noise results in a loss of sharpness, adding back sharpness results in adding back noise (that’s a lose/lose situation). By using shorter exposures, the resulting images a virtually noise-free!
First let’s discuss what’s needed to properly capture these multiple frames. First, a bit of homework is required. I used The Photographer’s Ephemeris and determined that on this particular night, there would be a new moon, essentially allowing us to photograph the entire night without moonlight. Not that a moon is a bad thing for night photography, but I also wanted to test blending a foreground image based on my extended-exposure (not what moonlight provided). The moon reflects sunlight back down to earth and is difficult to predict its resulting luminance with any consistency. Without the moon, only the stars were illuminating the landscape. In this image, I went for a silhouetted outline of the horizon because Half Dome is so recognizable as a shape – it just worked in the final analysis. I also chose this scene for this article because jet traffic at the time of the shoot was virtually nonexistent; whereas, in the earlier shoot from atop Sentinel Dome (between 10:00 pm and midnight), many frames are riddled with jetliner lights and will take some time to retouch. I had only one jet fly through one frame from the Glacier Point sequence. Speaking of sequences, I used 28 frames of 3 1/2 minutes at ISO 400 with my Canon 1DsMKIII camera. From tests, I knew this 400 ISO would record with very little noise.
To capture the sequence properly, I used Canon’s Time Remote Controller TC-80N3. I simply dialed in a 28-frame sequence, 3 1/2 minutes per frame, with a 1-second interval between frames. I am by no means a sensor engineer, but by allowing the sensor to turn off then restart limits the amount of noise from frame to frame. In fact, a check of my first frame compared to my last frame in the sequence reveals only a slight increase in noise. If any of you reading this understand why this is, please let me know. All I know is that it worked! I first ran a test frame to determine composition at a higher ISO, then readjusted both the framing and the ISO and started my exposures. Unfortunately I did not have a second body with my on this evening, thus I opted to lay down and just gaze up at the Milky Way! There were a couple other photographers on-scene and in fact their headlamps recorded in the bottom-right of my composition. This proved not to be a problem as I cropped out that portion of the frame in my finished image.
Back at my computer (after much sleep) I began the process of blending the images. I first loaded all the images into Adobe Camera Raw and did some basic tuning – primarily, I bumped the Clarity and Contrast, and lowered the overall exposure -1 (this will be added back during the blend mode in PS), and finally, set the Color Temperature to 3600 degrees Kelvin. I like a bit cooler look for my night images. I then Synchronized all the frames and clicked DONE (don’t open into Photoshop).

In this screen shot, I show you how to properly load the images. In Photoshop (I am using CS5) File>Scripts>Load Files into Stack. Select your RAW files and sit back while Photoshop loads them and stacks them into layers. If you own PSCS5 Extended, you can opt to use Statistics script (I understand that this creates a noticeable gap between exposures – whereas the technique I am describing doesn’t). Once completed, you will need to duplicate all the frames in the layer stack except for the bottom and top layer. Using 28 frames for this sequence, I simply started with layer 2, duplicated it (Command/Control J) and went through the stack all the way to Frame 27 (do not duplicate Frame 28 or Frame 1).

In the above screen shot, you see the process of me duplicating each frame (except for the top and bottom frame in the stack). This screen shot was from my earlier location atop Sentinel Dome.
Now, we are ready to let Photoshop work its magic. Starting with Frame 2 (located near the top of the stack), I selected it, then in the Blend Mode box (located on the top left of the Layer Palette) I changed the blend mode from Normal to Screen. I then selected both this Layer and Layer 1, then Merged them (Control/Command E) then changed the blend mode to Lighten. If you keep your eye on the image as you do this, you will see the star trail begin to lengthen.

In the screen shot (above), you can see my star trails really developing as I work my way down the stack. Continuing on, I next selected Frame 2 Copy, changed the blend mode to Screen, then selected both that Layer and Layer 2 and Merged (Control/Command E) and set the Blend Mode to Lighten. Work your way through the stack until you reach the final frame and your image will be complete and you will be left with multiple Layers all set to Lighten Blend Mode. If you have captured a better exposed frame of the landscape, now is the time to blend (I’ll save that for a future article). You will see in the frame above the red headlamps created by the other photographers on scene that evening that I ended up cropping our of my final frame.
As I mentioned earlier, this techniques is hardly new and the web is filled with how-to articles (yet I have not found one article that makes complete sense to me). Hopefully this article clears up the inconsistencies I found in other popular instructional pieces on the web. Russell Brown also offers a stacking script for free on his website, but I could not get it to work with all 28 of my rather large frames (perhaps if I reduced the file size or purchased a super-sonic computer). There are also other Star Stacker software available. Again, if any of you have found success using optional techniques I’d love to hear about it.
I plan to work with this technique more in the future. Summers here in northern California can be and endless string of blank-blue skies. Getting out at night opens an entirely new world of photographic possibilities. And a night spent under the stars at high elevations is a very special experience indeed!
